爬梯:RabbitMQ(二)
资料学习整理于:B站编程不良人
MQ消息中间件之RabbitMQ以及整合SpringBoot2.x实战教程
本次学习使用系统:CentOS release 6.5 (Final)
6、Publish/Subscribe 发布订阅模型
广播~原来叫:Fanout模型
在广播模式下,消息发送流程是这样的:
- 可以有多个消费者
- 每个消费者有自己的queue(队列)
- 每个队列都要绑定到Exchange(交换机)
- 生产者发送的消息,只能发送到交换机,交换机来决定要发给哪个队列,生产者无法决定。
- 交换机把消息发送给绑定过的所有队列
- 队列的消费者都能拿到消息。实现一条消息被多个消费者消费
生产者代码
/**
 * 广播模型 生产者
 * @author: stone
 * @create: 2020-09-10 00:32
 */
public class Provider {


    public static void main(String args[]) throws IOException {

        Connection connection = RabbitMQUtils.getConnection();
        Channel channel = connection.createChannel();

        /**
         * 绑定交换机,若不存在则创建
         * 1、通道名
         * 2、通道类型:fanout为广播类型
         */
        channel.exchangeDeclare("石似心","fanout");
        //广播模型中,生产者不需要与队列有关联
        //推送消息到交换机
        channel.basicPublish("石似心","",null,"给我一首歌的时间!".getBytes());

        RabbitMQUtils.closeConnection(connection,channel);
    }
}
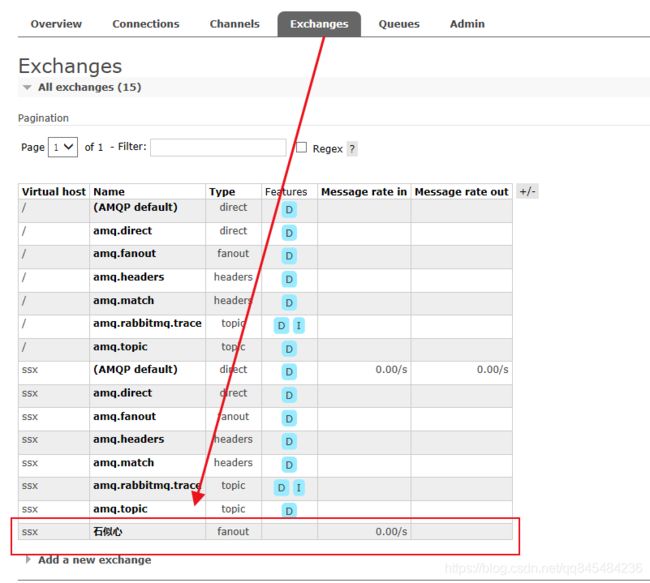
执行后,rabbitmq会创建交换机
消费者代码
/**
 * @author: stone
 * @create: 2020-09-10 00:38
 */
public class Consumer1 {

    public static void main(String args[]) throws IOException {

        Connection connection = RabbitMQUtils.getConnection();
        Channel channel = connection.createChannel();
        /**
         * 消费者需要创建一个临时的队列,与交换机建立关系
         * 临时的队列的好处,避免rabbitmq服务器堆积过多的队列影响消息中间件的高性能
         */
        //获得临时队列名
        String queue = channel.queueDeclare().getQueue();
        System.out.println("临时队列名:"+queue);
        channel.queueBind(queue,"石似心","");
        channel.basicConsume(queue,true, new DefaultConsumer(channel){

            @Override
            public void handleDelivery(String consumerTag, Envelope envelope, AMQP.BasicProperties properties, byte[] body) throws IOException {

                System.out.println(new String(body));
            }
        });
    }
}
复制多个消费者启动监听后,生产者再次推送结果如下
生产者1:
生产者2:
大家都接收到了广播~
7、Routing 路由模型
在Fanout模式中,一条消息,会被所有订阅的队列都消费。但是,在某些场景下,我们希望不同的消息被不同的队列消费。这时就要用到Direct类型的Exchange。
在Direct类型下:
- 队列与交换机的绑定,不能是任意绑定了,而是要指定一个
RoutingKey(路由key) - 消息的发送方在 向 Exchange发送消息时,也必须指定消息的
RoutingKey。 - Exchange不再把消息交给每一个绑定的队列,而是根据消息的
Routing Key进行判断,只有队列的Routingkey与消息的Routing key完全一致,才会接收到消息
流程:
图解:
- P:生产者,向Exchange发送消息,发送消息时,会指定一个routing key。
- X:Exchange(交换机),接收生产者的消息,然后把消息递交给 与routing key完全匹配的队列
- C1:消费者,其所在队列指定了需要routing key 为 error 的消息
- C2:消费者,其所在队列指定了需要routing key 为 info、error、warning 的消息
生产者代码
public class Provider {


    public static void main(String args[]) throws IOException {

        Connection connection = RabbitMQUtils.getConnection();
        Channel channel = connection.createChannel();
        /**
         * 绑定交换机,若不存在则创建
         * 1、通道名
         * 2、通道类型:direct为路由模型
         */
        channel.exchangeDeclare("周杰伦最新资讯","direct");
        //路由模型中,生产者不需要与队列有关联
        //推送消息到交换机,并且制定 routingKey ,说明此消息是什么类型的
        channel.basicPublish("周杰伦最新资讯","goodNews",null,"好消息:周杰伦十月份将发布新专辑!!!".getBytes());
        channel.basicPublish("周杰伦最新资讯","badNews",null,"坏消息:周杰伦今天喝了10杯奶茶~~~".getBytes());
        channel.basicPublish("周杰伦最新资讯","goodNews",null,"好消息:周杰伦说刚刚的奶茶只喝了6杯!!!".getBytes());

        RabbitMQUtils.closeConnection(connection,channel);
    }
}
使用生产者发送了两条goodNews,一条badNews
消费者1代码
public class Consumer1 {

    public static void main(String args[]) throws IOException {

        Connection connection = RabbitMQUtils.getConnection();
        Channel channel = connection.createChannel();
        /**
         * 消费者需要创建一个临时的队列,与交换机建立关系
         * 临时的队列的好处,避免rabbitmq服务器堆积过多的队列影响消息中间件的高性能
         */
        //通道绑定绑定交换机
        channel.exchangeDeclare("周杰伦最新资讯","direct");
        //获得临时队列名
        String queue = channel.queueDeclare().getQueue();
        channel.queueBind(queue,"周杰伦最新资讯","goodNews");
        channel.basicConsume(queue,true, new DefaultConsumer(channel){

            @Override
            public void handleDelivery(String consumerTag, Envelope envelope, AMQP.BasicProperties properties, byte[] body) throws IOException {

                System.out.println(new String(body));
            }
        });
    }
}
消费者1指定了 routingKey=goodNews
只收听好消息。
消费者2代码
public class Consumer2 {

    public static void main(String args[]) throws IOException {

        Connection connection = RabbitMQUtils.getConnection();
        Channel channel = connection.createChannel();
        /**
         * 消费者需要创建一个临时的队列,与交换机建立关系
         * 临时的队列的好处,避免rabbitmq服务器堆积过多的队列影响消息中间件的高性能
         */
        //通道绑定绑定交换机
        channel.exchangeDeclare("周杰伦最新资讯","direct");
        //获得临时队列名
        String queue = channel.queueDeclare().getQueue();
        channel.queueBind(queue,"周杰伦最新资讯","badNews");
        channel.basicConsume(queue,true, new DefaultConsumer(channel){

            @Override
            public void handleDelivery(String consumerTag, Envelope envelope, AMQP.BasicProperties properties, byte[] body) throws IOException {

                System.out.println(new String(body));
            }
        });
    }
}
消费者2指定了routingKey=badNews
只监听坏消息。
测试结果
消费者1:
消费者2:
8、Topics 动态路由模型
Topic类型的Exchange与Direct相比,都是可以根据RoutingKey把消息路由到不同的队列。只不过Topic类型Exchange可以让队列在绑定Routing key 的时候使用通配符!这种模型Routingkey 一般都是由一个或多个单词组成,多个单词之间以”.”分割,例如: item.insert
# 统配符
		* (star) can substitute for exactly one word.    匹配不多不少恰好1个词(是词,不是字)
		# (hash) can substitute for zero or more words.  匹配一个或多个词
# 如:
		audit.#   匹配audit.irs.corporate或者 audit.irs 等
    	audit.*   只能匹配 audit.irs
生产者代码
/**
 * 绑定交换机,若不存在则创建
 * 1、通道名
 * 2、通道类型:topics  动态路由模型
 */
//榜单
channel.exchangeDeclare("list","topic");
//路由模型中,生产者不需要与队列有关联
//推送消息到交换机,并且制定 routingKey ,说明此消息是什么类型的
channel.basicPublish("list","popular.song",null,"最佳歌曲:七里香!!!".getBytes());
channel.basicPublish("list","popular.album",null,"最佳专辑:叶惠美!!!".getBytes());
channel.basicPublish("list","popular.man.singger",null,"最佳男歌手:周杰伦!!!".getBytes());
channel.basicPublish("list","popular.women.singger",null,"最佳女歌手:孙燕姿!!!".getBytes());
消费者1:
//通道绑定绑定交换机
channel.exchangeDeclare("list","topic");
//获得临时队列名
String queue = channel.queueDeclare().getQueue();
//获取全部流行榜单消息
channel.queueBind(queue,"list","popular.#");
console
消费者2:
//通道绑定绑定交换机
channel.exchangeDeclare("list","topic");
//获得临时队列名
String queue = channel.queueDeclare().getQueue();
//获取全部歌手榜单消息
channel.queueBind(queue,"list","*.*.singger");
console
消费者3:
//通道绑定绑定交换机
channel.exchangeDeclare("list","topic");
//获得临时队列名
String queue = channel.queueDeclare().getQueue();
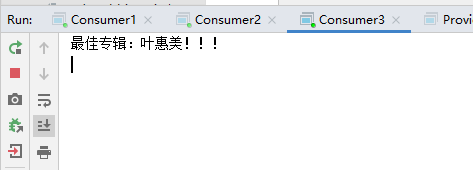
//获取专辑消息
channel.queueBind(queue,"list","*.album");
console
记住关键点:
( * )星号表示单个词
( # )井号表示任意词
9、SpringBoot整合RabbitMQ
1.环境搭建
创建简单springboot项目,导入amqp依赖
<dependency>
    <groupId>org.springframework.bootgroupId>
    <artifactId>spring-boot-starter-amqpartifactId>
dependency>
在配置文件声明rabbitmq服务器链接方式
spring:
  rabbitmq:
    host: 192.168.1.181
    port: 5672
    username: ssx
    password: 123
    virtual-host: ssx
2.直连模型 hello rabbitmq
生产者代码
import com.ssx.BForspringbootApplication;
import org.junit.Test;
import org.junit.runner.RunWith;
import org.springframework.amqp.rabbit.core.RabbitTemplate;
import org.springframework.beans.factory.annotation.Autowired;
import org.springframework.boot.test.context.SpringBootTest;
import org.springframework.test.context.junit4.SpringRunner;

/**
 * 生产者
 * @author: stone
 * @create: 2020-09-10 23:54
 */
@SpringBootTest(classes = BForspringbootApplication.class)
@RunWith(SpringRunner.class) //spring工厂
public class Provider {


    /**
     * 注入rabbit模板类
     * springboot中直接使用模板类操作rabbitmq
     */
    @Autowired
    RabbitTemplate rabbitTemplate;

    @Test
    public void testSend() throws InterruptedException {

        /**
         * 虽然两个参数的源码里面说第一个参数是路由key,但其实是springboot整合后,将queue name和routing key的概念整合了
         * 回忆一下,直连模式,没有交换机的时候,是不需要传routingkey的,
         * 然后,使用路由模式时,生产者绑定交换机,设置routingkey,而不需要设置queue name了,
         * 也就是说 routing key和queue name是不会同时存在的
         * 这边说是整合,其实也算一种代码优化吧
         */
        rabbitTemplate.convertAndSend("queueName","message body");
    }

}
监听者代码
import org.springframework.amqp.rabbit.annotation.Queue;
import org.springframework.amqp.rabbit.annotation.RabbitHandler;
import org.springframework.amqp.rabbit.annotation.RabbitListener;
import org.springframework.context.annotation.Configuration;
import org.springframework.stereotype.Component;

/**
 * 消费者
 * 与原生rabbitmq开发不同,需要有监听者监听时才会创建队列,当没有这个监听者时,哪怕发送者发送消息也不会创建对应队列
 * queuesToDeclare 就是当没有则创建
 * @author: stone
 * @create: 2020-09-10 23:55
 */

@Component
@RabbitListener(queuesToDeclare = @Queue("queueName"))
public class Listener {


    /**
     * 声明这是一个读取消息的方法 MessageMapping
     */
    @RabbitHandler
    public void receive1(String message){

        System.out.println(message);
    }
}
console
3.工作模型 work
生产者代码
@Test
public void work(){

    for (int i = 0; i < 10; i++) {

        rabbitTemplate.convertAndSend("workQueueName","消息内容!!!");
    }
}
监听者代码
@Component
public class WorkListener {


    @RabbitListener(queuesToDeclare = @Queue("workQueueName"))
    public void receive1(String message){

        System.out.println("receive 1 :"+message);
    }

    @RabbitListener(queuesToDeclare = @Queue("workQueueName"))
    public void receive2(String message){

        System.out.println("receive 2:"+message);
    }
}
console
4.发布订阅模型
广播儿~
生产者
@Test
public void fanout(){

    for (int i = 0; i < 3; i++) {

        rabbitTemplate.convertAndSend("fanoutExchangeName","","This is Context."+i);
    }
}
监听者
@Component
public class FanoutListener {


    @RabbitListener(bindings = @QueueBinding(
            value = @Queue,
            exchange = @Exchange(value = "fanoutExchangeName",type = "fanout")))
    public void receive1(String message){

        System.out.println("receive 1:"+message);
    }

    @RabbitListener(bindings = @QueueBinding(
            value = @Queue,
            exchange = @Exchange(value = "fanoutExchangeName",type = "fanout")))
    public void receive2(String message){

        System.out.println("receive 2:"+message);
    }
}
console
5、路由模式 routing direct类型
发送者
@Test
public void routing(){

    rabbitTemplate.convertAndSend("routingName","info","This is info.");
    rabbitTemplate.convertAndSend("routingName","error","This is error.");
    rabbitTemplate.convertAndSend("routingName","waring","This is waring.");
    rabbitTemplate.convertAndSend("routingName","info","This is info.");
    rabbitTemplate.convertAndSend("routingName","info","This is info.");
}
监听者
@Component
public class RoutingListener {


    @RabbitListener(bindings = @QueueBinding(
            value = @Queue, // 队列:不指定名称则是临时队列
            exchange = @Exchange(value = "routingName",type = "direct"), // 交换机:交换机名称、类型
            key = {
     "waring","info"} //routingkey
    ))
    public void receive1(String message){

        System.out.println("receive 1 waring or info:"+message);
    }

    @RabbitListener(bindings = @QueueBinding(
            value = @Queue, // 队列:不指定名称则是临时队列
            exchange = @Exchange(value = "routingName",type = "direct"), // 交换机:交换机名称、类型
            key = {
     "error"} //routingkey
    ))
    public void receive2(String message){

        System.out.println("receive 2 error:"+message);
    }
}
console
6、路由模式routing topics类型 动态路由
发送者
@Test
public void routingTopics(){

    rabbitTemplate.convertAndSend("topicsName","user.name","用户名");
    rabbitTemplate.convertAndSend("topicsName","product.count","产品数量");
}
监听者
@Component
public class TopicsListener {


    @RabbitListener(bindings = @QueueBinding(
            value = @Queue,
            exchange = @Exchange(name = "topicsName",type = "topic"),
            key = {
     "user.*"}
    ))
    public void receive1(String message){

        System.out.println("用户相关信息:"+message);
    }

    @RabbitListener(bindings = @QueueBinding(
            value = @Queue,
            exchange = @Exchange(name = "topicsName",type = "topic"),
            key = {
     "product.*"}
    ))
    public void receive2(String message){

        System.out.println("产品信息:"+message);
    }

}
console
10、应用场景
1.异步处理
场景说明:用户注册后,需要发注册邮件和注册短信,传统的做法有两种 1.串行的方式 2.并行的方式
串行方式:将注册信息写入数据库后,发送注册邮件,再发送注册短信,以上三个任务全部完成后才返回给客户端。 这有一个问题是,邮件,短信并不是必须的,它只是一个通知,而这种做法让客户端等待没有必要等待的东西.
并行方式:将注册信息写入数据库后,发送邮件的同时,发送短信,以上三个任务完成后,返回给客户端,并行的方式能提高处理的时间。
消息队列:假设三个业务节点分别使用50ms,串行方式使用时间150ms,并行使用时间100ms。虽然并行已经提高的处理时间,但是,前面说过,邮件和短信对我正常的使用网站没有任何影响,客户端没有必要等着其发送完成才显示注册成功,应该是写入数据库后就返回.消息队列: 引入消息队列后,把发送邮件,短信不是必须的业务逻辑异步处理
由此可以看出,引入消息队列后,用户的响应时间就等于写入数据库的时间+写入消息队列的时间(可以忽略不计),引入消息队列后处理后,响应时间是串行的3倍,是并行的2倍。
广播儿~模型
2.应用解耦
场景:双11是购物狂节,用户下单后,订单系统需要通知库存系统,传统的做法就是订单系统调用库存系统的接口.
这种做法有一个缺点:
当库存系统出现故障时,订单就会失败。 订单系统和库存系统高耦合. 引入消息队列
-
订单系统:用户下单后,订单系统完成持久化处理,将消息写入消息队列,返回用户订单下单成功。 -
库存系统:订阅下单的消息,获取下单消息,进行库操作。 就算库存系统出现故障,消息队列也能保证消息的可靠投递,不会导致消息丢失.
3.流量削峰
场景: 秒杀活动,一般会因为流量过大,导致应用挂掉,为了解决这个问题,一般在应用前端加入消息队列。
作用:
1.可以控制活动人数,超过此一定阀值的订单直接丢弃(我为什么秒杀一次都没有成功过呢^^)
2.可以缓解短时间的高流量压垮应用(应用程序按自己的最大处理能力获取订单)
1.用户的请求,服务器收到之后,首先写入消息队列,加入消息队列长度超过最大值,则直接抛弃用户请求或跳转到错误页面.
2.秒杀业务根据消息队列中的请求信息,再做后续处理.
11、RabbitMQ的集群
1.普通集群(主从集群、副本集群)【一般不用】
All data/state required for the operation of a RabbitMQ broker is replicated across all nodes. An exception to this are message queues, which by default reside on one node, though they are visible and reachable from all nodes. To replicate queues across nodes in a cluster --摘自官网
默认情况下:RabbitMQ代理操作所需的所有数据/状态都将跨所有节点复制。这方面的一个例外是消息队列,默认情况下,消息队列位于一个节点上,尽管它们可以从所有节点看到和访问
1.1架构图
核心解决问题: 当集群中某一时刻master节点宕机,可以对Quene中信息,进行备份
重点:仅仅只是对虚拟机的备份,队列消息还是保存在主节点上。
1.2集群搭建
集群设计
192.168.0.102 作为主节点 master
192.168.0.103 作为从节点 slave
192.168.0.105 作为从节点 slave
服务器环境
1、分别在三台机器上安装好相同版本的rabbitmq以及环境
2、为了方便,这里固定一下ip和主机名
主机1:

[root@localhost ~]# vim /etc/sysconfig/network-scripts/ifcfg-eth0
>>>
修改:IPADDR=192.168.0.102

[root@localhost ~]# vim /etc/sysconfig/network
>>>
修改:HOSTNAME=mq1
主机2:

[root@localhost ~]# vim /etc/sysconfig/network-scripts/ifcfg-eth0
>>>
修改:IPADDR=192.168.0.103

[root@localhost ~]# vim /etc/sysconfig/network
>>>
修改:HOSTNAME=mq2
主机3:

[root@localhost ~]# vim /etc/sysconfig/network-scripts/ifcfg-eth0
>>>
修改:IPADDR=192.168.0.105

[root@localhost ~]# vim /etc/sysconfig/network
>>>
修改:HOSTNAME=mq3
3、应rabbitmq集群需要,修改hosts主机名和ip映射
[root@mq1 ~]# vim /etc/hosts

>>>
添加:
192.168.0.102 mq1
192.168.0.103 mq2
192.168.0.105 mq3
三台机器都需要加入这三个映射
4、同步erlang.cookie
官网要求三个服务的erlang.cookie必须一致
做法:只需要拿其中一台的配置文件覆盖到另外两台上即可
[root@mq1 ~]# scp /var/lib/rabbitmq/.erlang.cookie root@mq2 /var/lib/rabbitmq/
[root@mq1 ~]# scp /var/lib/rabbitmq/.erlang.cookie root@mq3 /var/lib/rabbitmq/
查看三个cookie是否一致
cat /var/lib/rabbitmq/.erlang.cookie
5、使用后台命令启动rabbitmq
[root@mq1 ~]# rabbitmq-server -detached
Warning: PID file not written; -detached was passed.

[root@mq2 ~]# rabbitmq-server -detached
Warning: PID file not written; -detached was passed.

[root@mq3 ~]# rabbitmq-server -detached
Warning: PID file not written; -detached was passed.
此时rabbitmq处于启动状态,但是这种启动方式不会加载插件,故访问不了web管理页面
6、将从节点加入主节点
首先先执行rabbitmq内部命令关闭服务,然后加入主节点,再启动
只需要操作两台从节点
[root@mq2 ~]# rabbitmqctl stop_app
Stopping rabbit application on node rabbit@mq2 ...
[root@mq2 ~]# rabbitmqctl join_cluster rabbit@mq1
Clustering node rabbit@mq2 with rabbit@mq
[root@mq2 ~]# rabbitmqctl start_app
Starting node rabbit@mq2 ...
 completed with 3 plugins.
[root@mq2 ~]#

# 可以看到这种启动可以加载插件,故此现在可以访问web管理页面
[root@mq3 ~]# rabbitmqctl stop_app
Stopping rabbit application on node rabbit@mq2 ...
[root@mq3 ~]# rabbitmqctl join_cluster rabbit@mq1
Clustering node rabbit@mq2 with rabbit@mq
[root@mq3 ~]# rabbitmqctl start_app
Starting node rabbit@mq2 ...
 completed with 3 plugins.
[root@mq3 ~]#
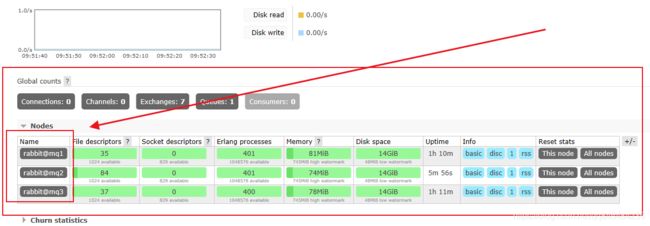
7、查看集群状态
任意机器都可以查看
[root@mq2 ~]# rabbitmqctl cluster_status
Cluster status of node rabbit@mq2 ...
[{
     nodes,[{
     disc,[rabbit@mq1,rabbit@mq2,rabbit@mq3]}]},
 {
     running_nodes,[rabbit@mq1,rabbit@mq3,rabbit@mq2]},
 {
     cluster_name,<<"rabbit@mq1">>},
 {
     partitions,[]},
 {
     alarms,[{
     rabbit@mq1,[]},{
     rabbit@mq3,[]},{
     rabbit@mq2,[]}]}]
[root@mq2 ~]#
此时集群服务已经搭建完成!
1.3说明
1、这种集群中只备份交换机!
2、队列不备份,只是从节点将队列导向了主节点。创建队列指定的node,则此队列仅在这台机器存在,其它机器只是导向。
比如:在mq1创建了队列1,而访问mq2的队列1时,mq2将会从mq1中获取队列消息返回给客户!
2.镜像集群
This guide covers mirroring (queue contents replication) of classic queues --摘自官网
By default, contents of a queue within a RabbitMQ cluster are located on a single node (the node on which the queue was declared). This is in contrast to exchanges and bindings, which can always be considered to be on all nodes. Queues can optionally be made mirrored across multiple nodes. --摘自官网
镜像队列机制就是将队列在三个节点之间设置主从关系,消息会在三个节点之间进行自动同步,且如果其中一个节点不可用,并不会导致消息丢失或服务不可用的情况,提升MQ集群的整体高可用性。
1.集群架构图
LVS ip漂移
HaProxy 负载均衡
2.配置集群架构
策略说明
	rabbitmqctl set_policy [-p ] [--priority ] [--apply-to ]

	-p Vhost: 可选参数,虚拟机名,针对指定vhost下的queue进行设置。
	Name:     policy的名称;
	Pattern: queue的匹配模式(正则表达式);
	Definition:镜像定义,包括三个部分ha-mode, ha-params, ha-sync-mode;
           		ha-mode:指明镜像队列的模式,有效值为 all/exactly/nodes;
                        all:表示在集群中所有的节点上进行镜像;
                        exactly:表示在指定个数的节点上进行镜像,节点的个数由ha-params指定。比如:三台服务,输入2,则随机选取两台做镜像;
                        nodes:表示在指定的节点上进行镜像,节点名称通过ha-params指定;
            	ha-params:ha-mode模式需要用到的参数;
                ha-sync-mode:进行队列中消息的同步方式,有效值为automatic(自动,建议)和manual(手动);
                priority:可选参数,policy的优先级。比如:多策略的情况下,数字越大优先级越高。
查看策略列表
[root@mq1 ~]# rabbitmqctl list_policies
Listing policies for vhost "/" ...
# 当前没有策略
添加策略
[root@mq1 ~]# rabbitmqctl set_policy ha-all '^hello' '{"ha-mode":"all","ha-sync-mode":"automatic"}'
Setting policy "ha-all" for pattern "^hello" to "{"ha-mode":"all","ha-sync-mode":"automatic"}" with priority "0" for vhost "/" ...
[root@mq1 ~]# rabbitmqctl list_policies
Listing policies for vhost "/" ...
vhost	name	pattern	apply-to	definition	priority
/	ha-all	^hello	all	{
     "ha-mode":"all","ha-sync-mode":"automatic"}	0
[root@mq1 ~]#
此时,三个服务已经完成镜像集群的配置了。
删除策略
[root@mq1 ~]# rabbitmqctl clear_policy ha-all
3.特殊点说明
1、两种集群都需要配置 join_cluster
也就是说都需要绑定hosts中的ip和主机名
2、配置集群之后,从节点都会拥有主节点的user和virtual Hosts
也就是说使用镜像模式时,只需要在主机创建账号


