SpringBoot
SpringBoot
1、SpringBoot 简介
设计目的:简化 Spring应用的 初始搭建及开发过程
SpringBoot = SpringMVC + Spring
2、SpringBoot 的特点
1. 嵌入 Tomcat ,无需部署 WAR 文件
2. 简化 Maven 配置
3. 自动配置 Spring,没有 xml 配置
3、SpringBoot 的约定大于配置
1. SpringBoot 项目必须在 src/main/resources 中放入 application.yml(.properties) 核心配置文件
2. SpringBoot 项目必须在 src/main/java 中所有子包之外构建全局入口类型:xxxApplication.java 一个项目中只能有一个
4、快速开始
搭建环境
在 pom.xml 中
<parent>
  <groupId>org.springframework.bootgroupId>
  <artifactId>spring-boot-starter-parentartifactId>
  <version>2.2.5.RELEASEversion>
parent>
<dependency>
  <groupId>org.springframework.bootgroupId>
  <artifactId>spring-boot-starter-webartifactId>
dependency>
根据约定创建相应的目录
第一个测试程序
//@EnableAutoConfiguration //作用:开启自动配置 初始化spring环境 初始化springmvc环境
//@ComponentScan	//作用:用来扫描相关注解  扫描范围:当前入口类及其所在的子包
//@SpringBootApplication = @ComponentScan + @EnableAutoConfiguration + @SpringBootConfiguration

@SpringBootApplication 注解就有了自动配置功能 、扫描包功能。
public class Application {


    public static void main(String[] args) {

        //SpringApplication spring应用类  作用:用来启动springboot应用
        //参数1:传入入口类的类对象   参数2:main函数的参数
        SpringApplication.run(Application.class,args);
    }
}
//cf.duanzifan.controller.HelloController
@RestController
@Requestmappering("/hello")
public class HelloController{

    @GetMapping("/hello")
    public String hello(){

        System.out.println("hello springboot!!!!!");
        return "hello world";
    }
}
5、注解详解
1. @EnableAutoConfiguration:开启自动配置,修饰范围:只能在类上
   根据 pom.xml 文件中依赖自动判断,例如:我们引入 spring-boot-starter-web,会自动根据引入的这个依赖构建相关环境【springmvc环境 web容器环境】

2. @ComponentScan:开启注解扫描,修饰范围:只能在类中
   扫描范围:默认当前包及其子包

3. @SpringBootApplication:有了此注解就有了自动配置和扫描包的作用
   @SpringBootApplication==@ComponentScan + @EnableAutoConfiguration + @SpringBootConfiguration

4. @RestController:用来实例化对象为控制器对象,并将类中方法的返回值转为json,修饰范围:用在类上
   @RestController==@Controller(实例化为一个控制器) + @ResponseBody(将方法返回值转为json,响应)

5. @RequestMapping:用来加入访问路径,修饰范围:方法上,类上
   @GetMapping:限定请求方式只能是 GET 并指定路径,修饰范围:方法上
   类似的:@PostMapping
6、main 方法
作用:
1. 通过标准的 java 入口的方式,委托给SpringApplication,并告知springboot主应用类是谁
2. 通过上面来启动 springboot 的 Tomcat 容器
3. args作用:可以在启动时指定外部参数。
7、自动配置 和 starters
自动配置:pom.xml
- spring-boot-starter-parent ====> spring-boot-dependencies:核心依赖全在这个的父工程中
- 我们在引入springboot依赖的时候,不需要指定版本,就是因为有这些版本仓库
starters:启动器,是一组方便的依赖关系描述符
spring-boot-starter-xxx
	例如
	spring-boot-starter-web
	就会自动导入web环境的所有依赖
8、配置Bean
在 Springboot 中提供了两中方式配置 class,管理javaBean
1. 注解			【推荐】
   @Configuration 注解类似于 @Component
2. xml			  【了解】
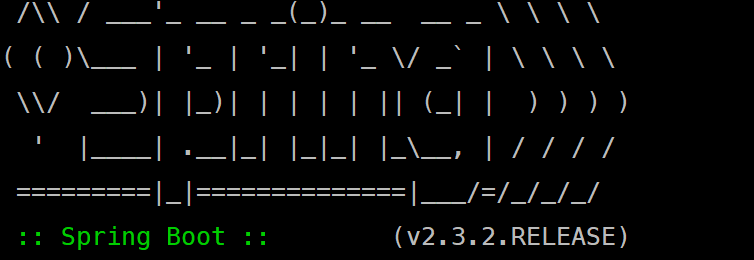
9、Spring-boot banner
在资源文件中创建 banner.txt 在里面书写内容就可以改变默认的 banner
- 默认banner
- 设置 banner
${AnsiColor.BRIGHT_YELLOW}

//                          _ooOoo_                               //
//                         o8888888o                              //
//                         88" . "88                              //
//                         (| ^_^ |)                              //
//                         O\  =  /O                              //
//                      ____/`---'\____                           //
//                    .'  \\|     |//  `.                         //
//                   /  \\|||  :  |||//  \                        //
//                  /  _||||| -:- |||||-  \                       //
//                  |   | \\\  -  /// |   |                       //
//                  | \_|  ''\---/''  |   |                       //
//                  \  .-\__  `-`  ___/-. /                       //
//                ___`. .'  /--.--\  `. . ___                     //
//              ."" '<  `.___\_<|>_/___.'  >'"".                  //
//            | | :  `- \`.;`\ _ /`;.`/ - ` : | |                 //
//            \  \ `-.   \_ __\ /__ _/   .-` /  /                 //
//      ========`-.____`-.___\_____/___.-`____.-'========         //
//                           `=---='                              //
//      ^^^^^^^^^^^^^^^^^^^^^^^^^^^^^^^^^^^^^^^^^^^^^^^^^^        //
//            佛祖保佑       永不宕机      永无BUG                //
10、yml 配置文件
server:
  port: 8080 #修改内嵌 tomcat 容器的端口号
  servlet:
    context-path: /springboot-01 #指定当前应用在部署到内嵌容器中的项目名

spring:
  mvc:
    view:
      prefix: /
      suffix: .jsp
11、properties 配置文件
server.port=8080
server.servlet.context-path=/springboot-01
spring.mvc.view.prefix=/
spring.mvc.view.suffix=.jsp
12、模板集成
springboot中有两种模板集成
1. jsp 页面模板 EL + jstl
2. thymeleaf 页面模板【推荐,默认】------------》【静态页面】
12.1 集成 jsp 模板
- 引入 jsp 的集成 jar 包
<dependency>
    <groupId>jstlgroupId>
    <artifactId>jstlartifactId>
    <version>1.2version>
dependency>

<dependency>
    <groupId>org.apache.tomcat.embedgroupId>
    <artifactId>tomcat-embed-jasperartifactId>
dependency>
-
配置视图解析器
在 application.properties 文件中写入
spring.mvc.view.prefix=/
spring.mvc.view.suffix=.jsp
- 解决 idea 和 springboot 的一个 bug,才能正常找到
- 修改 jsp 无需重启应用
server.port=8080
server.servlet.context-path=/springboot-01
spring.mvc.view.prefix=/
spring.mvc.view.suffix=.jsp
server.servlet.jsp.init-parameters.development=true
12.2 集成 thymeleaf 模板
Thymeleaf 是一个用于 web 和独立环境的现代服务器端 java 模板引擎
Thymeleaf可以完全替代 jsp,可以在有网络和无网络的环境下运行,既可以让美工在浏览器上查看静态效果,也可以让程序员在服务器查看带数据的动态页面的效果。
- 引入依赖
<dependency>
    <groupId>org.springframework.bootgroupId>
    <artifactId>spring-boot-starter-thymeleafartifactId>
dependency>
-
编写配置
完全可以不写
spring.thymeleaf.prefix=classpath:/templates/  # 使用模板的目录
spring.thymeleaf.suffix=.html                  # 使用模板的后缀
spring.thymeleaf.encoding=UTF-8                # 使用模板的编码
spring.thymeleaf.enabled=true                  # 开始thymleaf模板
spring.thymeleaf.servlet.content-type=text/html #使用模板的响应类型
注意:在文件夹 templates 中的模板,默认情况下 在
控制器的跳转下才能访问。
我们可以设置配置,让可以不用经过控制器也可以访问
spring.resources.static-locations=classpath:/templates/,classpath:/static/
@Controller
@RequestMapping("/user")
public class UserController {

    @RequestMapping("/findAll")
    public String findAll(){

        System.out.println("查询All");
        return "index";     //逻辑名  classpath:/templates/逻辑名.html
    }
}
13、thymeleaf 语法
使用时必须先在页面中加入 thymeleaf 的命名空间
<html lang="en" xmlns:th="http://www.thymleaf.org"/>
<html lang="en" xmlns:th="http://www.thymleaf.org">
    <head>
        <meta charset="UTF-8">
        <title>Titletitle>
    head>
    <body>
		======================================================================================
        <h1>展示单个数据h1>
        用户名:<span th:text="${username}">注意,这里面不能有内容,会被覆盖span>
        链接 : <span th:utext="${html}">注意:解析html用 utextspan>
        放入表单:<input type="text" th:value="${username}"/>
		======================================================================================
        <h1>展示对象数据h1>
        <ul>
            <li>name:<span th:text="${user.name}">span>li>
            <li>age:<span th:text="${user.age}">span>li>
        ul>
		======================================================================================
        <h1>有条件的展示数据h1>
        <span th:if="${user.age} <= 20" th:text="${user.name}"/>
		======================================================================================
        <h1>展示多个数据h1>
        <ul th:each="user:${users}">
            <li th:text="${user.name}">li>
            <li th:text="${user.age}">li>
        ul>
		======================================================================================
        <h1>展示多个数据(获取遍历状态)h1>
        <ul th:each="user,userStat:${users}">
            <li th:text="${user.name}">li>
            <li th:text="${user.age}">li>
            <li>集合中的总记录数:<span th:text="${userStat.size}"/>li>
        ul>
    body>
html>
@Controller
@RequestMapping("user")
public class UserController {

    @RequestMapping("findAll")
    public String findAll(HttpServletRequest request){

        request.setAttribute("username", "张三");

        request.setAttribute("html", "李四链接");

        request.setAttribute("user", new User("王五",23));
        List<User> users = Arrays.asList(new User("刘六",34),
                                         new User("田七",37),
                                         new User("老八",23));
        request.setAttribute("users", users);
        System.out.println("查询All");
        return "index1";
    }
}
14、SpringBoot 整合 MyBatis
- 引入依赖
<dependency>
    <groupId>org.mybatis.spring.bootgroupId>
    <artifactId>mybatis-spring-boot-starterartifactId>
    <version>2.1.1version>
dependency>

<dependency>
    <groupId>com.alibabagroupId>
    <artifactId>druidartifactId>
    <version>1.1.18version>
dependency>

<dependency>
    <groupId>mysqlgroupId>
    <artifactId>mysql-connector-javaartifactId>
    <version>5.1.48version>
dependency>
- 在 application.properties 中配置数据源
# 数据源的配置
spring.datasource.type=com.alibaba.druid.pool.DruidDataSource
spring.datasource.driver-class-name=com.mysql.jdbc.Driver
spring.datasource.url=jdbc:mysql://localhost:3306/dzf
spring.datasource.username=root
spring.datasource.password=root

# mybatis的配置
mybatis.mapper-locations=classpath:cf.duanzifan.mapper/*Mapper.xml
mybatis.type-aliases-package=cf.duanzifan.entity
- 开发 dao、service、controller
# 注意:要在 UserDao 接口上加入 @Mapper 注解,或者在 Application启动类上加上 @MapperScan,只有这样我们才能将dao层的实现类交给 Spring 工厂管理
15、springboot 的 devtools 热部署
为了进一步提高开发效率,springboot 为我们提供了全局项目热部署,日后在开发的过程中修改了部分代码以及相关配置文件后,不需要每次重启使得修改生效,在项目中开启了 springboot 的全局热部署之后只需要在修改后等待几秒即可使修改生效。
- 开启热部署
- 项目引入依赖
<dependency>
    <groupId>org.springframework.bootgroupId>
    <artifactId>spring-boot-devtoolsartifactId>
    <optional>trueoptional>
dependency>
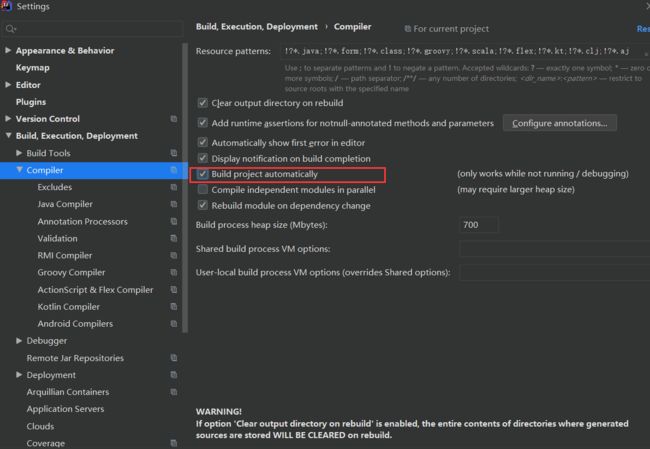
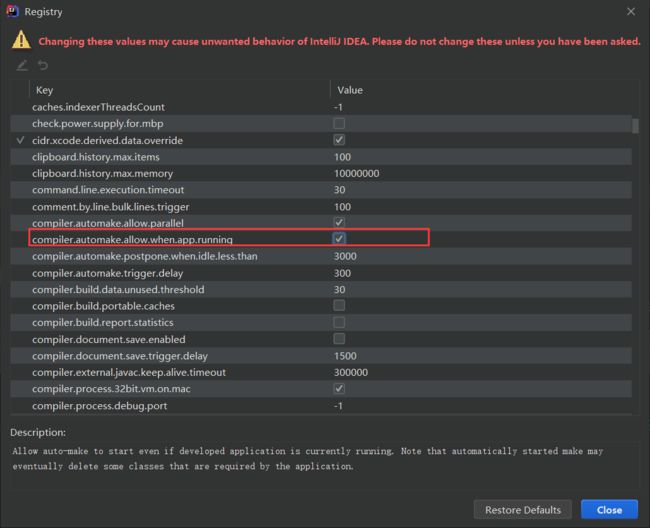
- 设置 idea 中支持自动编译
在代码界面快捷键:ctrl + alt + shift + /
当出现以下,就代表成功
16、logback 日志集成
- 日志的级别
> DEBUG < INFO < WARN < ERROR

> 日志级别由低到高:日志级别越高输出的日志信息越少
- 我们可以直接在 application.propeties 配置文件中设置日志的级别
logging.level.root=info
logging.level.cf.duanzifan.dao=debug
17、切面编程
- 引入依赖
<dependency>
    <groupId>org.springframework.bootgroupId>
    <artifactId>spring-boot-starter-aopartifactId>
dependency>
- 相关注解
1. @Aspect 用在类上,代表这个类是一个切面
2. @Before 用在方法上,代表这个方法是一个前置通知方法
3. @After 用在方法上,代表这个方法是一个后置通知方法
4. @Around 用在方法上,代表这个方法是一个环绕的方法
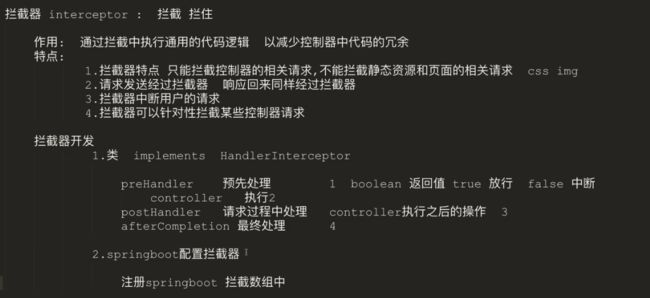
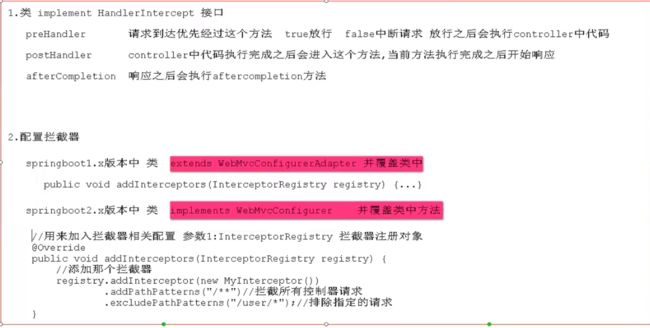
18、拦截器
ot=info
logging.level.cf.duanzifan.dao=debug
### 17、切面编程

- 引入依赖

```xml

    org.springframework.boot
    spring-boot-starter-aop

```

- 相关注解

~~~markdown
1. @Aspect 用在类上,代表这个类是一个切面
2. @Before 用在方法上,代表这个方法是一个前置通知方法
3. @After 用在方法上,代表这个方法是一个后置通知方法
4. @Around 用在方法上,代表这个方法是一个环绕的方法
18、拦截器
[外链图片转存中…(img-OE8gF7gQ-1599126798593)]
[外链图片转存中…(img-0CeHS7fr-1599126798597)]


