【图像识别】基于pytorch 的入门demo——CIFAR10数据集识别及其可视化
目录
环境配置
1.数据集
2.模型训练
3.训练结果
4.Batch_size的作用
5.参考资料
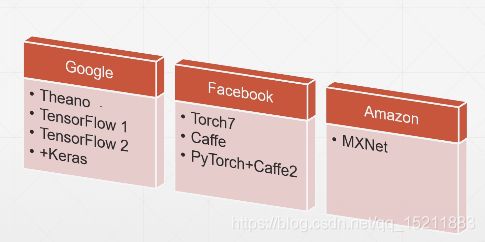
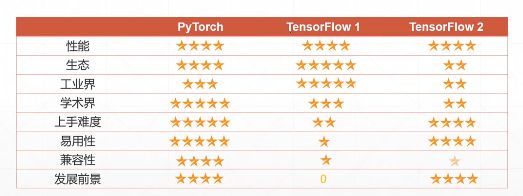
pytorch使用是动态图计算思想,符合一般的计算逻辑,集成了caffe,容易上手灵活方便,方便使用GPU 加速、自动求导数,更适用于学术界。tensorflow采用的是静态图计算思想,静态图需要提前定义计算图,然后使用创建的计算图运算,运算过程中不利于查看中间变量,但是框架的生态成熟,部署便利,更适合工业界。pytorch自然语言处理包:AllenNLP,计算机视觉包:Torchvision。
环境配置
win10 + GTX 1660Ti +Anaconda3 +Spyder+Pytorch1.0
Pytorch的配置非常简单,非常友好。 直接登录官网,https://pytorch.org/ 选择配置环境,执行Command即可。
spyder配置opencv环境,在Anaconda prompt中输入:
conda install –c https://conda.binstar.org/menpo opencv1.数据集
CIFAR-10和CIFAR-100是带有标签的数据集(详情:http://groups.csail.mit.edu/vision/TinyImages/)
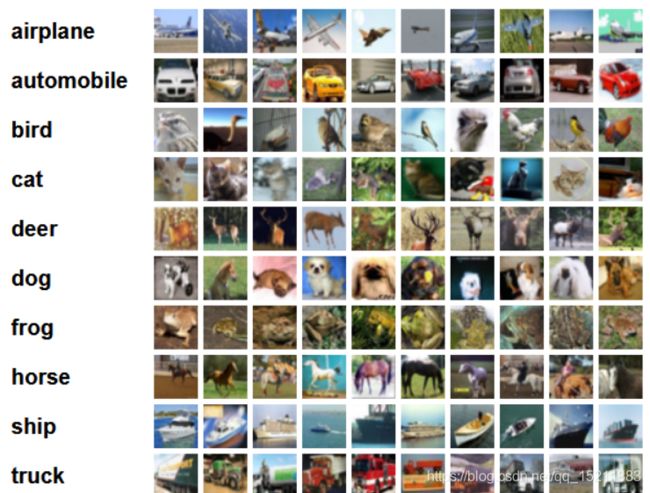
CIFAR-10数据集共有60000张彩色图像,每张大小:32*32*3,分为10个类,具体见图,每类6000张图。
训练集:50000张,构成了500个训练批batch,每一批batch_size为100张。
测试集:10000张,构成一个batch。每一类随机取1000张,共10类*1000=10000张。
10个类别
另外,pytorch的内置数据集很多:torchvision.datasets
class torchvision.datasets.MNIST(root, train=True, transform=None, target_transform=None, download=False)
class torchvision.datasets.FashionMNIST(root, train=True, transform=None, target_transform=None, download=False)
class torchvision.datasets.EMNIST(root, split, **kwargs)
class torchvision.datasets.CocoCaptions(root, annFile, transform=None, target_transform=None)
class torchvision.datasets.CocoDetection(root, annFile, transform=None, target_transform=None)
class torchvision.datasets.LSUN(root, classes='train', transform=None, target_transform=None)
class torchvision.datasets.ImageFolder(root, transform=None, target_transform=None, loader=)
class torchvision.datasets.DatasetFolder(root, loader, extensions, transform=None, target_transform=None)
class torchvision.datasets.CIFAR10(root, train=True, transform=None, target_transform=None, download=False)
class torchvision.datasets.CIFAR100(root, train=True, transform=None, target_transform=None, download=False)
class torchvision.datasets.STL10(root, split='train', transform=None, target_transform=None, download=False)
class torchvision.datasets.SVHN(root, split='train', transform=None, target_transform=None, download=False)
class torchvision.datasets.PhotoTour(root, name, train=True, transform=None, download=False)
2.模型训练
2.1 模型选择:
一方面可以自己定义自己Net,另外也可以使用PyTorch的torchvision.models提供的模型。
import torchvision.models as models
resnet18 = models.resnet18(pretrained=True)
alexnet = models.alexnet(pretrained=True)
squeezenet = models.squeezenet1_0(pretrained=True)
vgg16 = models.vgg16(pretrained=True)
densenet = models.densenet161(pretrained=True)
inception = models.inception_v3(pretrained=True)
此外,pytorch 刚刚发布了hub功能,见 https://pytorch.org/hub
model=torch.hub.load(model)2.2模型可视化
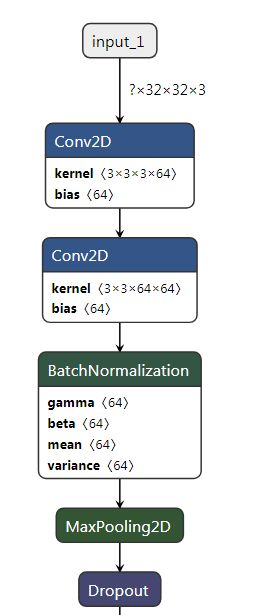
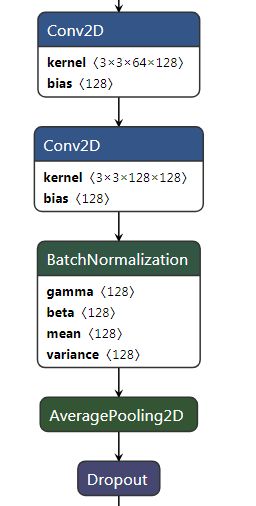
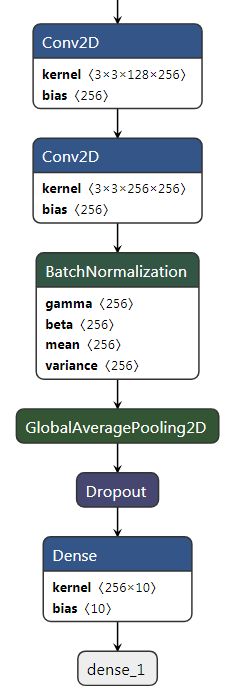
下方的代码为网上搜集到的,PS:可以使用netron工具进行模型可视化,用工具直接打开cifar10.pkl即可。
工具链接:https://github.com/lutzroeder/Netron ,可视化后的模型如下:
2.3训练过程:
1.构建模型框架
2.迭代输入数据集
3.计算前向损失(loss)
4.误差反向传播,更新网络的参数
2.4参数设置:
见代码
import torch                   #torch的包
import torch.nn as nn
import torch.nn.functional as F
import torchvision           #基于torch的计算技术视觉相关的开发包
import torchvision.transforms as transforms
import torch.optim as optim

import cv2 as cv
import numpy as np
import time
import matplotlib.pyplot as plt

from visdom import Visdom
import numpy as np

viz = Visdom(env='loss')
x1,y1=0,0
win = viz.line(
    X=np.array([x1]),
    Y=np.array([y1]),
    opts=dict(title='loss'))

#参数设置
batch_size = 50

start = time.time()
#1、对数据进行预处理
transform = transforms.Compose(
    [transforms.ToTensor(),       #转为tensor
     transforms.Normalize((0.5, 0.5, 0.5), (0.5, 0.5, 0.5))])#归一化
# =============================================================================
# transforms.Compose:
#         将多种操作组合在一起,此处将数据转换为tensor和数据归一化组合为函数tansform
# =============================================================================

#2、加载数据
#2.1下载训练集,并预处理
trainset = torchvision.datasets.CIFAR10(root='./', train=True,
                                        download=True, transform=transform)
#2.2加载训练集,并打乱图像的序号
trainloader = torch.utils.data.DataLoader(trainset, batch_size=batch_size,
                                          shuffle=False, num_workers=2)

#2.3下载测试集,并预处理
testset = torchvision.datasets.CIFAR10(root='./', train=False,
                                       download=True, transform=transform)

#2.4加载测试集,由于是测试无需打乱图像序号
testloader = torch.utils.data.DataLoader(testset, batch_size=batch_size,
                                         shuffle=False, num_workers=2)

#2.5加载label,使用元组,不可改变
classes = ('plane', 'car', 'bird', 'cat','deer', 'dog', 'frog', 'horse', 'ship', 'truck')

end = time.time()
print("运行时间:%.2f秒"%(end-start))

#3构建深度学习网络架构
class Net(nn.Module):
    def __init__(self):
        super(Net, self).__init__()
        self.conv1 = nn.Conv2d(3, 64, 3, padding = 1)
        self.conv2 = nn.Conv2d(64, 64, 3, padding =1)
        self.conv3 = nn.Conv2d(64, 128, 3, padding = 1)
        self.conv4 = nn.Conv2d(128, 128, 3, padding = 1)
        self.conv5 = nn.Conv2d(128, 256, 3, padding = 1)
        self.conv6 = nn.Conv2d(256, 256, 3, padding = 1)
        self.maxpool = nn.MaxPool2d(2, 2)
        self.avgpool = nn.AvgPool2d(2, 2)
        self.globalavgpool = nn.AvgPool2d(8, 8)
        self.bn1 = nn.BatchNorm2d(64)
        self.bn2 = nn.BatchNorm2d(128)
        self.bn3 = nn.BatchNorm2d(256)
        self.dropout50 = nn.Dropout(0.5)
        self.dropout10 = nn.Dropout(0.1)
        self.fc = nn.Linear(256, 10)

    def forward(self, x):
        x = self.bn1(F.relu(self.conv1(x)))
        x = self.bn1(F.relu(self.conv2(x)))
        x = self.maxpool(x)
        x = self.dropout10(x)
        x = self.bn2(F.relu(self.conv3(x)))
        x = self.bn2(F.relu(self.conv4(x)))
        x = self.avgpool(x)
        x = self.dropout10(x)
        x = self.bn3(F.relu(self.conv5(x)))
        x = self.bn3(F.relu(self.conv6(x)))
        x = self.globalavgpool(x)
        x = self.dropout50(x)
        x = x.view(x.size(0), -1)
        x = self.fc(x)
        return x


if __name__ == '__main__':
    net = Net()
    criterion = nn.CrossEntropyLoss()    #交叉熵损失函数
    optimizer = optim.Adam(net.parameters(), lr=0.1)#lr=0.001
    device = torch.device("cuda:0" if torch.cuda.is_available() else "cpu")
    net.to(device)

    for epoch in range(1):
        running_loss = 0.

        for i, data in enumerate(trainloader):
            inputs, labels = data
            inputs, labels = inputs.to(device), labels.to(device)
            optimizer.zero_grad()
            outputs = net(inputs)
            loss = criterion(outputs, labels)
            loss.backward()
            optimizer.step()
            print('[%d, %5d] loss: %.4f' %(epoch + 1, (i+1)*batch_size, loss.item()))
            x1+=i
            viz.line(
                    X=np.array([x1]),
                    Y=np.array([loss.item()]),
                    win=win,#win要保持一致
                    update='append')

    print('Finished Training')
    torch.save(net, 'cifar10.pkl')
    # net = torch.load('cifar10.pkl')

    correct = 0
    total = 0
    with torch.no_grad():
        for data in testloader:
            images, labels = data
            images, labels = images.to(device), labels.to(device)
            outputs = net(images)
            _, predicted = torch.max(outputs.data, 1)
            total += labels.size(0)
            correct += (predicted == labels).sum().item()

    print('Accuracy of the network on the 10000 test images: %d %%' % (
        100 * correct / total))

    class_correct = list(0. for i in range(10))
    class_total = list(0. for i in range(10))

    with torch.no_grad():
        for data in testloader:
            images, labels = data
            images, labels = images.to(device), labels.to(device)
            outputs = net(images)
            _, predicted = torch.max(outputs, 1)
            c = (predicted == labels).squeeze()
            for i in range(4):
                label = labels[i]
                class_correct[label] += c[i].item()
                class_total[label] += 1


    for i in range(10):
        print('Accuracy of %5s : %2d %%' % (
            classes[i], 100 * class_correct[i] / class_total[i]))
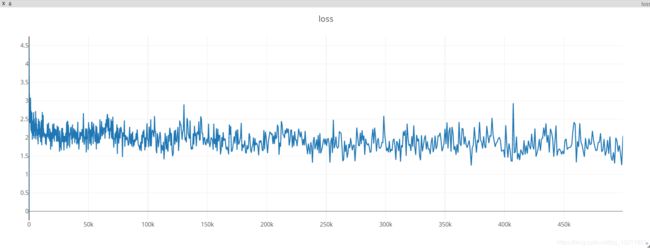
2.5 训练过程可视化
打开Anaconda Prompt输入命令。(conda install visdom命令安装失败)
pip install visdom启动服务:
python -m visdom.server打开浏览器:
http://localhost:8097/3.训练结果
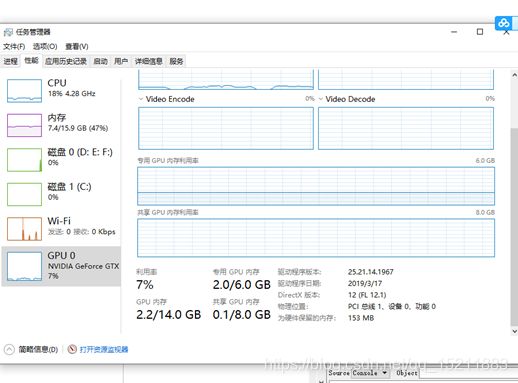
GPU上训练就是快呀!!!CPU i3 三个半小时左右跑完,GTX 1660 TI 三分钟左右就出一次结果。
4.Batch_size的作用
| Batch_size=100; 测试结果 Accuracy of the network on the 10000 test images: 67 % Accuracy of plane : 65 % Accuracy of car : 84 % Accuracy of bird : 52 % Accuracy of cat : 46 % Accuracy of deer : 44 % Accuracy of dog : 43 % Accuracy of frog : 79 % Accuracy of horse : 78 % Accuracy of ship : 77 % Accuracy of truck : 75 % |
Batch_size=50; 测试结果 Accuracy of the network on the 10000 test images: 66 % Accuracy of plane : 76 % Accuracy of car : 82 % Accuracy of bird : 37 % Accuracy of cat : 25 % Accuracy of deer : 56 % Accuracy of dog : 57 % Accuracy of frog : 72 % Accuracy of horse : 67 % Accuracy of ship : 76 % Accuracy of truck : 87 % |
Batch_size=10; 测试结果 Accuracy of the network on the 10000 test images: 62 % Accuracy of plane : 59 % Accuracy of car : 77 % Accuracy of bird : 49 % Accuracy of cat : 37 % Accuracy of deer : 50 % Accuracy of dog : 52 % Accuracy of frog : 69 % Accuracy of horse : 73 % Accuracy of ship : 75 % Accuracy of truck : 77 % |
结论与思考:
- 在一定范围内,batch_size越大,越有利于模型的快速收敛,较大的batch _size更接近训练集的整体数据结构,因此,可以保证迭代过程中的梯度方向越准确,最后网络收敛情况就会好。
- 然而,并不是batch_size越大越好,使用large-batch训练得到的网络具有较差的泛化能力。训练集的数据结构和测试集的数据结构是相似的,但是二者并不是完全的相同,large-batch有利于提高训练集的收敛精度,但是模型过于刻画了训练集的数据结构,势必导致对测试集的数据模型的刻画能力降低。
- batch_size的减小,整体识别率下降,但是对部分类别的识别率升高了,猜测根batch的数据分布接近训练集的分布有关,改变了SGD的梯度下降方向,随着batch_size减小,增加了迭代次数,使得模型收敛更精确。
- 训练的核心在于构建具有足够代表性的训练集,并用模型去刻画训练集的数据结构,且该模型对非显著特征应当具有泛化学习能力。
5.参考资料
1、https://blog.csdn.net/Kansas_Jason/article/details/84503367
2、https://blog.csdn.net/shareviews/article/details/83094783(推荐一看)
3、https://blog.csdn.net/leviopku/article/details/81980249(Netron可视化工具)
4、 莫烦大神网页:https://morvanzhou.github.io/
5、Pytorch中文网:https://ptorch.com/
6、Pytorch中文文档:https://ptorch.com/docs/1/
7、Pytorch中文论坛:https://discuss.ptorch.com/
8、深度学习模型可视化工具:https://blog.csdn.net/baidu_40840693/article/details/83006347
