Spring的Bean管理(XML方式)
Spring的Bean管理(XML方式)
- 1.Spring的工厂类
-
- 1.2.工厂接口类
- 1.2.工厂实现类
- 2.三种实例化Bean的方式
-
- 2.1.使用类构造器实例化(默认无参数)
- 2.2.使用静态工厂方法实例化(简单工厂模式)
- 2.3.使用实例工厂方法实例化(工厂方法模式)
- 1.4.使用选择
- 3.Bean的常用配置
-
- 3.1.Bean的常用属性
-
- 3.1.1.Bean的作用域 —— scope属性
- 3.1.2.Bean的生命周期 —— init-method属性和destroy-method属性
-
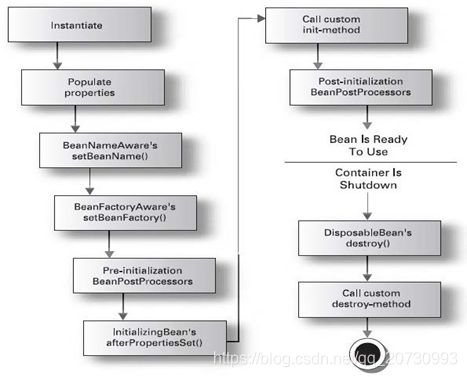
- 完整生命周期
-
- 示例
- BeanPostProcessor的作用(铺垫spring AOP 偏底层,初学了解就行)
- 4.Spring属性注入
-
- 4.1.Spring的属性注入 - 构造方法注入
- 4.2.Spring的属性注入 - set方法注入
- 4.3.Spring的属性注入 - p名称空间
- 4.4.Spring的属性注入 - SpEL注入
- 4.5.Spring的属性注入 - 复杂类型的属性注入
-
- 数组类型的属性注入
- List集合类型的属性注入
- Set集合类型的属性注入
- Map集合类型的属性注入
- Properties类型的属性注入
1.Spring的工厂类
1.2.工厂接口类
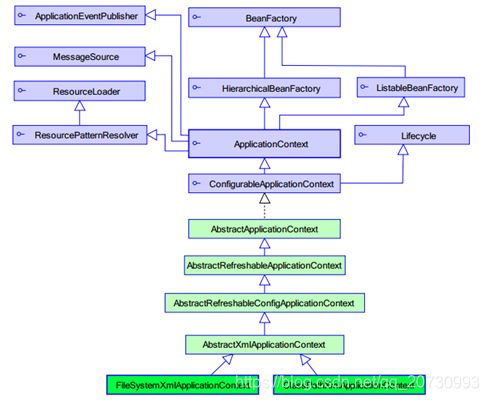
老版本的Sring用的是BeanFactory接口类,新版的Spring用的是ApplicationContext接口类
区别一:Spring核心工厂是BeanFactory。ApplicationContext接口作为BeanFactory的子接口,拥有更多的功能,它可以进行国际化处理、事件传递和bean自动装配以及各种不同应用层的Context实现
区别二:创建实例化的时间不同。ApplicationContext是在加载配置文件的时候实例化配置中以单例模式生成的类,BeanFactory是在实例化工厂类后,第一次调用getBean()方法时才实例化配置中的类。
使用:开发中基本都在使用ApplicationContext, web项目使用WebApplicationContext ,很少用到BeanFactory
写法对比:
//用 BeanFactory 接口类
BeanFactory beanFactory = new XmlBeanFactory(new ClassPathResource("applicationContext.xml"));

//用 ApplicationContext 接口类
ApplicationContext applicationContext = new ClassPathXmlApplicationContext("applicationContext.xml");
1.2.工厂实现类
创建Spring工厂的时候可以用ClassPathXmlApplicationContext类,也可以使用FileSystemXmlApplicationContext类
用ClassPathXmlApplicationContext是获取项目中相对resources文件夹的相对位置下的配置文件。
用FileSystemXmlApplicationContext是用来获取系统文件目录绝对路径下的配置文件。
写法对比:
//用ClassPathXmlApplicationContext类,applicationContext.xml文件在resources目录下
ApplicationContext applicationContext = new ClassPathXmlApplicationContext("applicationContext.xml");

//用FileSystemXmlApplicationContext类,applicationContext.xml文件在C:/目录下
ApplicationContext applicationContext = new ClassPathXmlApplicationContext("C:\\applicationContext.xml");
2.三种实例化Bean的方式
2.1.使用类构造器实例化(默认无参数)
案例
新建一个需要实例化的类Bean1.java:package com.imooc.ioc.demo2;
/**
* Bean的实例化的三种方式:采用无参数的构造方法的方式
*/
public class Bean1 {
public Bean1(){
System.out.println("Bean1被实例化了...");
}
}
在spring配置文件applicationContext中进行
<bean id="bean1" class="com.springioc.demo2.Bean1"/>
测试类中获得类实例:
	@Test
    public void bean1Test() {

        // 创建工厂
        ApplicationContext applicationContext = new ClassPathXmlApplicationContext("applicationContext.xml");
        // 通过工厂获得类的实例:
        Bean1 bean1 = (Bean1) applicationContext.getBean("bean1");
    }
2.2.使用静态工厂方法实例化(简单工厂模式)
案例
新建一个需要实例化的类Bean2.java:package com.springioc.demo2;
/**
* Bean的实例化三种方式:静态工厂实例化方式
*/
public class Bean2 {
}
创建一个静态工厂Bean2Factory:
package com.springioc.demo2;

/**
 * Bean2的静态工厂
 */
public class Bean2Factory {


    public static Bean2 createBean2() {

        System.out.println("Bean2Factory的方法已经执行了...");
        return new Bean2();
    }

}
在spring配置文件applicationContext中进行
<bean id="bean2" class="com.springioc.demo2.Bean2Factory" factory-method="createBean2"/>
测试类中获得类实例:
	@Test
    public void bean2Test() {

        // 创建工厂
        ApplicationContext applicationContext = new ClassPathXmlApplicationContext("applicationContext.xml");
        // 通过工厂获得类的实例:
        Bean2 bean2 = (Bean2)applicationContext.getBean("bean2");
    }
运行结果:

注意:如果spring配置文件中没有注释掉bean1的配置的话,此处运行结果会输出两条,bean1和bean2都会被实例化。
原因是在创建ApplicationContext工厂的时候,会实例化配置中的所有
2.3.使用实例工厂方法实例化(工厂方法模式)
案例
新建一个需要实例化的类Bean2.java:package com.springioc.demo2;
/**
* Bean的实例化三种方式:实例工厂实例化
*/
public class Bean3 {
}
创建一个工厂 Bean3Factory:
package com.springioc.demo2;

/**
 * Bean3的实例工厂
 */
public class Bean3Factory {

    public Bean3 createBean3(){

        System.out.println("Bean3Factory执行了...");
        return new Bean3();
    }
}
在spring配置文件applicationContext中进行
    <bean id="bean3Factory" class="com.springioc.demo2.Bean3Factory"/>
    <bean id="bean3" factory-bean="bean3Factory" factory-method="createBean3"/>
测试类中获得类实例:
	@Test
    public void bean3Test() {

        // 创建工厂
        ApplicationContext applicationContext = new ClassPathXmlApplicationContext("applicationContext.xml");
        // 通过工厂获得类的实例:
        Bean3 bean3 = (Bean3) applicationContext.getBean("bean3");
    }
1.4.使用选择
一般使用第一种(使用类构造器实例化(默认无参数))
如果类的构造非常的复杂或者是特殊需要,用第二种(使用静态工厂方法实例化(简单工厂模式))或者第三种(使用实例工厂方法实例化(工厂方法模式))
3.Bean的常用配置
3.1.Bean的常用属性
例如:
	<bean id="bean1" class="com.springioc.demo2.Bean1"/>
	<bean name="/bean1" class="com.springioc.demo2.Bean1"/>
-
id和name
- 一般情况下,装配一个Bean时,通过指定一个id属性作为Bean的名称
- id 属性在IOC容器中必须是唯一的
- 如果Bean的名称中含有特殊字符,就需要使用name属性
-
class
- class用于设置一个类的完全路径名称,主要作用是IOC容器生成类的实例
3.1.1.Bean的作用域 —— scope属性
| 属性值 | 说明 |
|---|---|
| singleton(默认) | 在SpringIOC容器中仅存在一个Bean实例,Bean以单实例的方式存在 |
| prototype | 每次调用getBean()时都会返回一个新的实例(多例) |
| request | 每次HTTP请求都会创建一个新的Bean,该作用域仅适用于WebApplicationContext环境 |
| session | 同一个HTTP Session共享一个Bean,不同的HTTP Session使用不同的Bean。该作用域仅适用于WebApplicationContext环境 |
prototype可以在spring整合Struts2的时候会用到,Struts2的action是多例的,所以需要将bean配置为多例。
3.1.2.Bean的生命周期 —— init-method属性和destroy-method属性
Spring初始化bean或销毁bean时,有时需要作一些处理工作,因此spring可以在创建和拆卸bean的时候调用bean的两个生命周期方法。
<bean id="person" class="com.springioc.demo3.Person" init-method="init" destroy-method="destroy"/>
init-method:指定Bean的初始化方法,当bean被载入到容器的时候调用init
destroy-method:指定Bean销毁方法,当bean从容器中删除的时候调用destroy,前提是scope=“singleton” ,销毁方法只有当spring容器applicationContext关闭时才调用
例子:
新建一个Bean:
package com.springioc.demo3;

public class Man {

    public Man() {

        System.out.println("Man被实例化...");
    }

    public void setup() {

        System.out.println("Man被初始化...");
    }

    public void teardown() {

        System.out.println("Man被销毁了...");
    }
}
配置spring配置文件:
<bean id="Man" class="com.springioc.demo3.Man" init-method="setup" destroy-method="teardown"/>
测试类测试:
	@Test
    public void ManTest() {

        //创建工厂ApplicationContext接口没有关闭工厂的方法,所以用实现类接收
        ClassPathXmlApplicationContext applicationContext = new ClassPathXmlApplicationContext("applicationContext.xml");
        //实例化Man类
        Man man = (Man) applicationContext.getBean("Man");
        //关闭工厂
        applicationContext.close();
    }
输出结果:

在关闭applicationContext工厂的时候会执行bean的摧毁方法。
完整生命周期
- instantiate bean对象实例化
- populate properties 封装属性
- 如果Bean实现BeanNameAware 执行 setBeanName
- 如果Bean实现BeanFactoryAware 或者 ApplicationContextAware 设置工厂setBeanFactory 或者上下文对象 setApplicationContext
- 如果存在类实现 BeanPostProcessor(后处理Bean) ,执行postProcessBeforeInitialization
- 如果Bean实现InitializingBean 执行 afterPropertiesSet
- 调用 指定初始化方法 init如果存在类实现BeanPostProcessor(处理Bean) ,执行postProcessAfterInitialization
- 如果存在类实现 BeanPostProcessor(处理Bean),执行postProcessAfterInitialization
- 执行业务处理
- 如果Bean实现 DisposableBean 执行 destroy
- 调用 指定销毁方法customerDestroy
示例
编辑Man.java:
package com.springioc.demo3;

import org.springframework.beans.BeansException;
import org.springframework.beans.factory.BeanNameAware;
import org.springframework.beans.factory.DisposableBean;
import org.springframework.beans.factory.InitializingBean;
import org.springframework.context.ApplicationContext;
import org.springframework.context.ApplicationContextAware;

public class Man implements BeanNameAware, ApplicationContextAware, InitializingBean, DisposableBean {


    private String name;

    public void setName(String name) {

        System.out.println("第二步:设置属性");
        this.name = name;
    }

    public Man() {

        System.out.println("第一步:Man被实例化...");
    }

    public void setup() {

        System.out.println("第七步:Man被初始化...");
    }

    public void teardown() {

        System.out.println("第十一步:Man被销毁了...");
    }

	//获取该类在容器中配置的名称,id或者name属性值
    public void setBeanName(String name) {

        System.out.println("第三步:设置Bean的名称" + name);
    }

    public void setApplicationContext(ApplicationContext applicationContext) throws BeansException {

        System.out.println("第四步:了解工厂信息");
    }

    public void afterPropertiesSet() throws Exception {

        System.out.println("第六步:属性设置后");
    }

    public void run() {

        System.out.println("第九步:执行业务方法");
    }

    public void destroy() throws Exception {

        System.out.println("第十步:执行Spring的销毁方法");
    }
}
新建BeanPostProcessor的实现类MyBeanPostProcessor.java:
每次实例化bean的时候都会被调用
package com.springioc.demo3;

import org.springframework.beans.BeansException;
import org.springframework.beans.factory.config.BeanPostProcessor;

public class MyBeanPostProcessor implements BeanPostProcessor {


    public Object postProcessBeforeInitialization(Object bean, String beanName) throws BeansException {

        System.out.println("第五步:初始化前方法...");
        return bean;
    }

    public Object postProcessAfterInitialization(Object bean, String beanName) throws BeansException {

        System.out.println("第八步:初始化后方法...");
        return bean;
    }
}
配置applicationContext.xml:
	<bean id="Man" class="com.springioc.demo3.Man" init-method="setup" destroy-method="teardown">
        <property name="name" value="张三"/>
    bean>

    <bean class="com.springioc.demo3.MyBeanPostProcessor"/>
测试类:
	@Test
    public void ManTest() {

        //创建工厂
        ClassPathXmlApplicationContext applicationContext = new ClassPathXmlApplicationContext("applicationContext.xml");
        //实例化Man类
        Man man = (Man) applicationContext.getBean("Man");
        man.run();
        //关闭工厂
        applicationContext.close();
    }
BeanPostProcessor的作用(铺垫spring AOP 偏底层,初学了解就行)
以案例来讲作用
新建一个接口UserDao:
package com.springioc.demo3;

public interface UserDao {

    public void add();

    public void delete();

    public void showAll();

    public void update();
}
新建对应实现类UserDaoImpl:
package com.springioc.demo3;

public class UserDaoImpl implements UserDao {

    public void add() {

        System.out.println("添加用户。。。");
    }

    public void delete() {

        System.out.println("删除用户。。。");
    }

    public void showAll() {

        System.out.println("查询用户。。。");
    }

    public void update() {

        System.out.println("修改用户。。。");
    }
}
在BeanPostProcessor中进行加强:
package com.springioc.demo3;

import org.springframework.beans.BeansException;
import org.springframework.beans.factory.config.BeanPostProcessor;

import java.lang.reflect.InvocationHandler;
import java.lang.reflect.Method;
import java.lang.reflect.Proxy;

public class MyBeanPostProcessor implements BeanPostProcessor {


    public Object postProcessBeforeInitialization(Object bean, String beanName) throws BeansException {

        return bean;
    }

    public Object postProcessAfterInitialization(final Object bean, String beanName) throws BeansException {

        if ("userDao".equals(beanName)) {

            Object proxy = Proxy.newProxyInstance(bean.getClass().getClassLoader(), bean.getClass().getInterfaces(), new InvocationHandler() {

                public Object invoke(Object proxy, Method method, Object[] args) throws Throwable {

                    if ("delete".equals(method.getName())) {

                        System.out.println("权限校验===================");
                        return method.invoke(bean, args);
                    }
                    return method.invoke(bean, args);
                }
            });
            return proxy;
        } else {

            return bean;
        }
    }
}
配置applicationContext:
	<bean class="com.springioc.demo3.MyBeanPostProcessor"/>
    <bean id="userDao" class="com.springioc.demo3.UserDaoImpl"/>
编写实现类:
	@Test
    public void ZQTest() {

        ClassPathXmlApplicationContext applicationContext = new ClassPathXmlApplicationContext("applicationContext.xml");
        UserDao userDao = (UserDao) applicationContext.getBean("userDao");
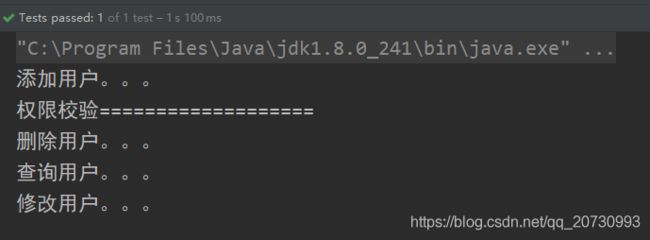
        userDao.add();
        userDao.delete();
        userDao.showAll();
        userDao.update();
    }
4.Spring属性注入
spring支持构造函数注入和setter方法注入
4.1.Spring的属性注入 - 构造方法注入
- 通过构造方法注入Bean 的属性值或依赖的对象,它保证了 Bean 实例在实例化后就可以使用。
- 构造器注入在
元素里声明的属性
例如:
User.java:
package com.springioc.demo4;

public class User {


    private String name;
    private int age;

    public User(String name, int age) {

        this.name = name;
        this.age = age;
    }

    @Override
    public String toString() {

        return "User{" +
                "name='" + name + '\'' +
                ", age=" + age +
                '}';
    }
}
配置applicationContext:
	<bean id="user" class="com.springioc.demo4.User">

        <constructor-arg name="name" value="张三"/>
        <constructor-arg name="age" value="20"/>
    bean>
编写测试类:
	@Test
    public void testUser() {

        ApplicationContext applicationContext = new ClassPathXmlApplicationContext("applicationContext.xml");
        User user = (User) applicationContext.getBean("user");
        System.out.println(user);
    }
4.2.Spring的属性注入 - set方法注入
- 使用set方法注入,在Spring配置文件中,通过设置注入的属性
例如:
Person.java:
package com.springioc.demo4;

public class Person {

    private String name;
    private int age;
    private Dog dog;

    public String getName() {

        return name;
    }

    public void setName(String name) {

        this.name = name;
    }

    public int getAge() {

        return age;
    }

    public void setAge(int age) {

        this.age = age;
    }

    public Dog getDog() {

        return dog;
    }

    public void setDog(Dog dog) {

        this.dog = dog;
    }

    @Override
    public String toString() {

        return "Person{" +
                "name='" + name + '\'' +
                ", age=" + age +
                ", dog=" + dog +
                '}';
    }
}
Dog.java:
package com.springioc.demo4;

public class Dog {

    private String name;

    public String getName() {

        return name;
    }

    public void setName(String name) {

        this.name = name;
    }

    @Override
    public String toString() {

        return "Dog{" +
                "name='" + name + '\'' +
                '}';
    }
}
配置applicationContext:
	<bean name="person" class="com.springioc.demo4.Person">
        <property name="name" value="李四"/>
        <property name="age" value="25"/>

        <property name="dog" ref="dog"/>
    bean>

    <bean name="dog" class="com.springioc.demo4.Dog">
        <property name="name" value="二哈"/>
    bean>
编写测试类:
	@Test
    public void testPerson() {

        ApplicationContext applicationContext = new ClassPathXmlApplicationContext("applicationContext.xml");
        Person person = (Person) applicationContext.getBean("person");
        System.out.println(person);
    }
4.3.Spring的属性注入 - p名称空间
- 使用p命名空间
- 为了简化XML文件配置,Spring从2.5开始引入一个新的p名称空间
- p:<属性名>=“xxx” 引入常量值
- p:<属性名>-ref=“xxx” 引用其它Bean对象
使用p名称空间需要在spring的配置文件的xml约束中添加配置xmlns:p="http://www.springframework.org/schema/p"
	<beans xmlns="http://www.springframework.org/schema/beans"
       xmlns:p="http://www.springframework.org/schema/p"
       xmlns:xsi="http://www.w3.org/2001/XMLSchema-instance"
       xsi:schemaLocation="http://www.springframework.org/schema/beans http://www.springframework.org/schema/beans/spring-beans.xsd">
写法对比:
set方法注入
	<bean name="person" class="com.springioc.demo4.Person">
        <property name="name" value="李四"/>
        <property name="age" value="25"/>
        <property name="dog" ref="dog"/>
    bean>

    <bean name="dog" class="com.springioc.demo4.Dog">
        <property name="name" value="二哈"/>
    bean>
p名称空间注入
<bean name="person" class="com.springioc.demo4.Person" p:name="李四" p:age="25" p:dog-ref="dog">bean>
<bean name="dog" class="com.springioc.demo4.Dog" p:name="二哈">bean>
4.4.Spring的属性注入 - SpEL注入
-
SpEL:spring expression language ,spring表达式语言,对依赖注入进行简化
-
语法:#{表达式}
-
SpEL表达式语言
语法:#{ }
#{ ‘hello’ } :使用字符串
#{ beanId }: 使用另一个bean
#{ beanId.content.toUpperCase() }: 使用指定名属性,并使用方法
#{ T ( java.lang.Math ) . PI }: 使用静态字段或方法
如果存在三个类:
Category.java:
package com.springioc.demo4;

public class Category {

    private String name;

    public String getName() {

        return name;
    }

    public void setName(String name) {

        this.name = name;
    }

    @Override
    public String toString() {

        return "Category{" +
                "name='" + name + '\'' +
                '}';
    }
}
Product.java:
package com.springioc.demo4;

public class Product {

    private String name;
    private Double price;
    private Category category;

    public String getName() {

        return name;
    }

    public void setName(String name) {

        this.name = name;
    }

    public Double getPrice() {

        return price;
    }

    public void setPrice(Double price) {

        this.price = price;
    }

    public Category getCategory() {

        return category;
    }

    public void setCategory(Category category) {

        this.category = category;
    }

    @Override
    public String toString() {

        return "Product{" +
                "name='" + name + '\'' +
                ", price=" + price +
                ", category=" + category +
                '}';
    }
}
ProductInfo.java:
package com.springioc.demo4;

public class ProductInfo {

    public double getPrice() {

        return Math.random() * 10;
    }
}
配置applicationContext.xml:
	<bean name="category" class="com.springioc.demo4.Category">
        <property name="name" value="#{
      '食品'}"/>
    bean>

    <bean name="productInfo" class="com.springioc.demo4.ProductInfo"/>

    <bean name="product" class="com.springioc.demo4.Product">
        <property name="name" value="#{
      '牛奶'}"/>

        <property name="price" value="#{category.getName()}"/>
        <property name="category" value="#{category}"/>
    bean>
运行测试:
	@Test
    public void testProduct() {

        ApplicationContext applicationContext = new ClassPathXmlApplicationContext("applicationContext.xml");
        Product Product = (Product) applicationContext.getBean("product");
        System.out.println(Product);
    }
4.5.Spring的属性注入 - 复杂类型的属性注入
数组类型的属性注入
package com.springioc.demo5;

public class CollectionBean {

    private String[] arrs;

    public String[] getArrs() {

        return arrs;
    }

    public void setArrs(String[] arrs) {

        this.arrs = arrs;
    }
}
注入方式:
	<bean name="collectionBean" class="com.springioc.demo5.CollectionBean">
        <property name="arrs">
            <list>
                <value>一value>
                <value>二value>
                <value>三value>
            list>
        property>
    bean>
List集合类型的属性注入
package com.springioc.demo5;

import java.util.*;

public class CollectionBean {

    private List<String> list;

    public List<String> getList() {

        return list;
    }

    public void setList(List<String> list) {

        this.list = list;
    }
}
注入方式:
	<bean name="collectionBean" class="com.springioc.demo5.CollectionBean">
        <property name="list">
            <list>
                <value>一value>
                <value>二value>
                <value>三value>
            list>
        property>
    bean>
Set集合类型的属性注入
package com.springioc.demo5;

import java.util.*;

public class CollectionBean {

    private Set<String> set;

    public Set<String> getSet() {

        return set;
    }

    public void setSet(Set<String> set) {

        this.set = set;
    }
}
注入方式:
	<bean name="collectionBean" class="com.springioc.demo5.CollectionBean">
        <property name="set">
            <set>
                <value>一value>
                <value>二value>
                <value>三value>
            set>
        property>
    bean>
Map集合类型的属性注入
package com.springioc.demo5;

import java.util.*;

public class CollectionBean {

    private Map<String, Integer> map;

    public Map<String, Integer> getMap() {

        return map;
    }

    public void setMap(Map<String, Integer> map) {

        this.map = map;
    }
}
注入方式:
	<bean name="collectionBean" class="com.springioc.demo5.CollectionBean">
        <property name="map">
            <map>
                <entry key="一" value="1"/>
                <entry key="二" value="2"/>
                <entry key="三" value="3"/>
            map>
        property>
    bean>
Properties类型的属性注入
package com.springioc.demo5;

import java.util.*;

public class CollectionBean {

    private Properties Properties;

    public java.util.Properties getProperties() {

        return Properties;
    }

    public void setProperties(java.util.Properties properties) {

        Properties = properties;
    }
}
注入方式:
	<bean name="collectionBean" class="com.springioc.demo5.CollectionBean">
        <property name="properties">
            <props>
                <prop key="一">1prop>
                <prop key="二">2prop>
                <prop key="三">3prop>
            props>
        property>
    bean>


