锦囊篇|一文摸懂EventBus
使用方法
在app下的build.gradle的dependencies中进行引入,当然高版本也容易出现问题。
implementation 'org.greenrobot:eventbus:3.2.0'
使用三步骤:
(1) 定义事件
public class MessageEvent {

    public final String message;

    public MessageEvent(String message) {

        this.message = message;
    }
}
(2)定义注册和注销
// 当对应的消息发送到时会被调用的方法
// 根据对应的实体类来对应处理的方式
@Subscribe(threadMode = ThreadMode.MAIN)
public void onMessageEvent(MessageEvent event) {

    Toast.makeText(getActivity(), event.message, Toast.LENGTH_SHORT).show();
}

@Subscribe
public void handleSomethingElse(SomeOtherEvent event) {

    doSomethingWith(event);
}
// 生命周期start中注册
@Override
public void onStart() {

    super.onStart();
    EventBus.getDefault().register(this);
}
// 生命周期stop中注销
@Override
public void onStop() {

    EventBus.getDefault().unregister(this);
    super.onStop();
}
(3)发送消息
EventBus.getDefault().post(new MessageEvent("Hello everyone!"));
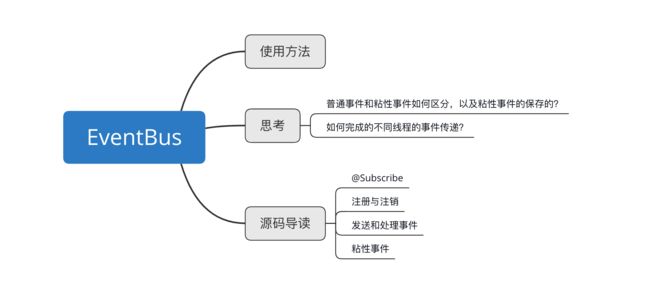
源码导读
每次在看源码之前,我们都需要干的第一件事情是知道这个东西是干什么的,在开始了解这个东西是怎么干的。
从上面的EventBus其实我们可以看出一个问题,就是EventBus.getDefault()的方法可以猜测一下这是一个单例模式来进行创建。
(1)Subscribe注解的使用
(2)注册和注销
(3)发送和处理事件
(4)粘性事件
Subscribe注解的使用
@Documented
@Retention(RetentionPolicy.RUNTIME)
@Target({
     ElementType.METHOD})
public @interface Subscribe {

    // 线程的模式,默认为POSTING
    ThreadMode threadMode() default ThreadMode.POSTING;
    // 是否坚持粘性事件,默认不支持
    boolean sticky() default false;
    // 一个优先级标识,默认为0
    int priority() default 0;
}
我们能够看到内部存在一个ThreadMode的变量,而这个变量在我们进行自定义使用时也有使用到过,那这个的工作方式就有待我们去进行深究了。
public enum ThreadMode {

    // 在当前的线程中直接处理。
    POSTING,
    // 在主线程中发送事件,则直接处理,但是要求处理量小;在子线程中,就通过Handler发送后,再由主线程处理
    MAIN,
    // 总是入队列进行等待,通过Handler发送事件后,再由主线程处理
    MAIN_ORDERED,
    // 在主线程中发送事件,入队列依次处理;在子线程中发送事件,则直接处理。
    BACKGROUND,
    // 总是入队列等待,通过线程池异步处理。
    ASYNC
}
之后的内容中,我会抽取一个模式来进行验证。
注册和注销
EventBus.getDefault().register(this);
EventBus.getDefault().unregister(this);
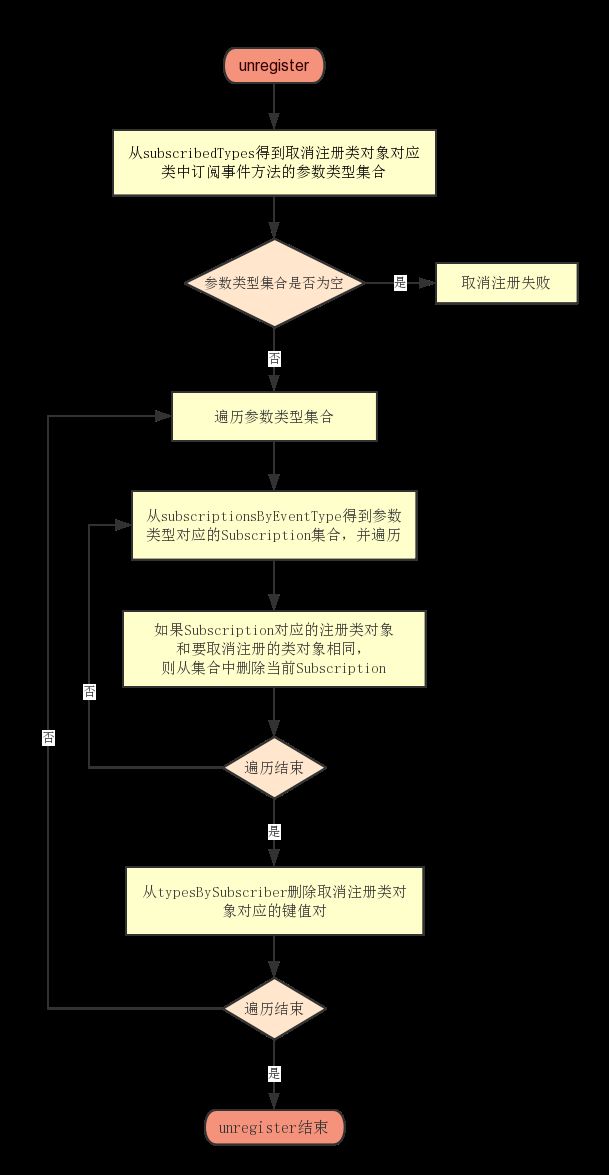
不过这次我们反其道而行之,从注销来关注整个EventBus它大致涉及了哪些操作。
注销
public synchronized void unregister(Object subscriber) {

        // 获得context对应的订阅事件的参数类型集合
        List<Class<?>> subscribedTypes = typesBySubscriber.get(subscriber);
        if (subscribedTypes != null) {

            // 循环遍历,删去对应的数据
            for (Class<?> eventType : subscribedTypes) {

                // 删除content对应的eventType
                unsubscribeByEventType(subscriber, eventType); // 1 -->
            }
            // 本质就是一个map,而context就是一个key,删去key罢了
            // 不过key值对应的是Activity
            typesBySubscriber.remove(subscriber);
        }
    }
// 1 --> 由注释1直接调用的方法
private void unsubscribeByEventType(Object subscriber, Class<?> eventType) {

        List<Subscription> subscriptions = subscriptionsByEventType.get(eventType);
        if (subscriptions != null) {

            int size = subscriptions.size();
            for (int i = 0; i < size; i++) {

                Subscription subscription = subscriptions.get(i);
                if (subscription.subscriber == subscriber) {

                    subscription.active = false;
                    subscriptions.remove(i);
                    i--;
                    size--;
                }
            }
        }
    }
在这两端代码中,我们可以看到的全局变量有这样几个。
// Map构成的类,使用时Key对应Activity,value对应type
// 存储的是Activity下对应的所有事件类型
private final Map<Object, List<Class<?>>> typesBySubscriber;
// Map构成的类,使用时Key对应type,value对应订阅集合
// 存储的是对应的type下的subscriptions
private final Map<Class<?>, CopyOnWriteArrayList<Subscription>> subscriptionsByEventType;
注册
在上面的时候我们盲猜了一下EvemtBus.getDefault()这个函数调用使用的是单例模式,不过还是要通过代码来进行验证。
static volatile EventBus defaultInstance;

public static EventBus getDefault() {

        EventBus instance = defaultInstance;
        if (instance == null) {

            synchronized (EventBus.class) {

                instance = EventBus.defaultInstance;
                if (instance == null) {

                    instance = EventBus.defaultInstance = new EventBus();
                }
            }
        }
        return instance;
    }
想来也能很清楚了,这是一个DCL的模式来进行完成单例的创建的。
如果不清
DCL的单例创建模式,建议看一下这篇文章:设计模式的十八般武艺
那到此为止,你应该明白为什么我们能通过EventBus.getDefault()这个函数就能完成不同Activity之间的操作了吧。那接下来要干的事情就是要进行最为关键的注册。
public void register(Object subscriber) {

        Class<?> subscriberClass = subscriber.getClass();
        // 就是当前的Activity中寻找到带有@Subscribe注解的方法集合
        List<SubscriberMethod> subscriberMethods = subscriberMethodFinder.findSubscriberMethods(subscriberClass);
        synchronized (this) {

            // 线程同步方式完成订阅事件的绑定
            for (SubscriberMethod subscriberMethod : subscriberMethods) {

                subscribe(subscriber, subscriberMethod); // 1 -->
            }
        }
    }
查询
查询查什么?,其实还是一个很简单的逻辑,我们在代码中加入了一个标志性的注释嘛,想起来了嘛,查询查的就是我们的带@Subscribe的方法们。
List<SubscriberMethod> findSubscriberMethods(Class<?> subscriberClass) {

        // 先是从缓存中取,有则直接返回,无则寻找
        List<SubscriberMethod> subscriberMethods = METHOD_CACHE.get(subscriberClass);
        if (subscriberMethods != null) {

            return subscriberMethods;
        }
        // 因为我们一般使用的都是getDefault()来进行一个注册,所以ignoreGeneratedIndex默认为false。去查看EventBusBuilder即可,会看到未赋值,也就是默认值的false
        if (ignoreGeneratedIndex) {

            subscriberMethods = findUsingReflection(subscriberClass);
        } else {

            // 默认调用的方法,将订阅的方法进行收集
            subscriberMethods = findUsingInfo(subscriberClass);
        }
        if (subscriberMethods.isEmpty()) {

            throw new EventBusException("Subscriber " + subscriberClass
                    + " and its super classes have no public methods with the @Subscribe annotation");
        } else {

            // 对查询到的数据进行一个缓存
            METHOD_CACHE.put(subscriberClass, subscriberMethods);
            return subscriberMethods;
        }
    }
这个工作流程是非常清晰的,我们的下一步就是要进入findUsingInfo()这个函数。
private List<SubscriberMethod> findUsingInfo(Class<?> subscriberClass) {

        FindState findState = prepareFindState();
        findState.initForSubscriber(subscriberClass);
        while (findState.clazz != null) {

            findState.subscriberInfo = getSubscriberInfo(findState);
            if (findState.subscriberInfo != null) {

                SubscriberMethod[] array = findState.subscriberInfo.getSubscriberMethods();
                for (SubscriberMethod subscriberMethod : array) {

                    if (findState.checkAdd(subscriberMethod.method, subscriberMethod.eventType)) {

                        findState.subscriberMethods.add(subscriberMethod);
                    }
                }
            } else {

                // 一般进入这个方法,通过反射的方式判断方法使用是否满足一些基本条件
                // 是否是public修饰,是否为一个参数,是否为静态,是否为抽象类
                findUsingReflectionInSingleClass(findState);
            }
            // 用于跳过对一些Android SDK的查询操作
            // 可以防止一些ClassNotFoundException的出现
            findState.moveToSuperclass();
        }
        // 对遍历获得的方法进行重构
        // 对findState进行回收
        return getMethodsAndRelease(findState);
    }
ok,fine!!到此为止我们就能够获得我们打过注解的方法们了。
正式注册
接下来是一段长到要命的代码,不过会尽量给出详细的注释帮助理解。
private void subscribe(Object subscriber, SubscriberMethod subscriberMethod) {

        // 找到对应函数的参数类型
        Class<?> eventType = subscriberMethod.eventType;
        // 新订阅的方法
        Subscription newSubscription = new Subscription(subscriber, subscriberMethod);
        // 订阅事件集合
        CopyOnWriteArrayList<Subscription> subscriptions = subscriptionsByEventType.get(eventType);
        // 如果subscriptionsByEventType中并不存在对应的eventType,就创建并存储
        if (subscriptions == null) {

            subscriptions = new CopyOnWriteArrayList<>();
            subscriptionsByEventType.put(eventType, subscriptions);
        } else {

            if (subscriptions.contains(newSubscription)) {

                throw new EventBusException("Subscriber " + subscriber.getClass() + " already registered to event "
                        + eventType);
            }
        }
        // 将新订阅的方法插入订阅集合中
        int size = subscriptions.size();
        for (int i = 0; i <= size; i++) {

            if (i == size || subscriberMethod.priority > subscriptions.get(i).subscriberMethod.priority) {

                subscriptions.add(i, newSubscription);
                break;
            }
        }
        // 以context作为key,来存储订阅事件
        List<Class<?>> subscribedEvents = typesBySubscriber.get(subscriber);
        if (subscribedEvents == null) {

            subscribedEvents = new ArrayList<>();
            typesBySubscriber.put(subscriber, subscribedEvents);
        }
        subscribedEvents.add(eventType);
        // 对粘性事件的一个具体操作
        if (subscriberMethod.sticky) {

           // 。。。。。。
        }
    }
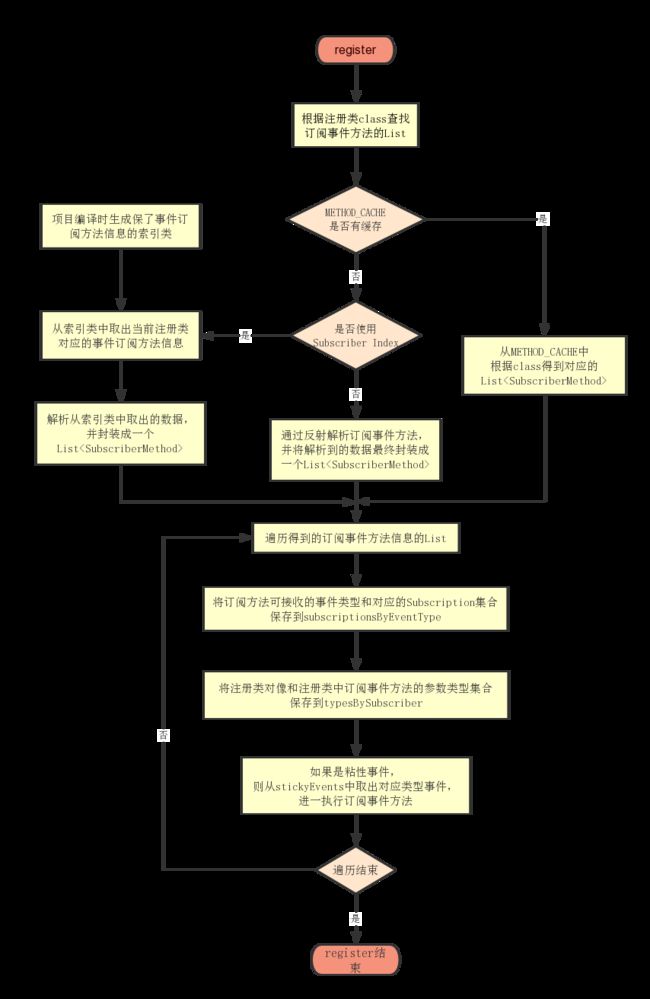
这么一大串看下来,想来很多人很跳过,毕竟代码真的太多了。其实还是一样抽主干,它针对的变量还是两个变量typesBySubscriber、subscriptionsByEventType。为什么这么说呢? 就是一个反推的思想,注册中要保存的东西,在注销的时候是一定要删除的,那我们去看看注销就知道了。
总结
| 注册 | 注销 |
|---|---|
 |
 |
发送和处理事件
发送事件
EventBus.getDefault().post(new MessageEvent("MessageEvent"));
既然是要知道发送事件,那自然就要去看看post()这个函数,当然会有另一个函数也就是postSticky()这个函数,他是为了发送粘性事件而来的,我们之后会讲述到。
public void post(Object event) {

        // 一个PostingThreadState 类型的ThreadLocal
        // PostingThreadState是存储了事件队列,线程模式等等信息的类
        PostingThreadState postingState = currentPostingThreadState.get();
        List<Object> eventQueue = postingState.eventQueue;
        // 将事件塞到事件队列中
        eventQueue.add(event);

        if (!postingState.isPosting) {

            // 判断是否为主线程
            postingState.isMainThread = isMainThread();
            postingState.isPosting = true;
            if (postingState.canceled) {

                throw new EventBusException("Internal error. Abort state was not reset");
            }
            try {

                // 循环着发送事件
                while (!eventQueue.isEmpty()) {

                    postSingleEvent(eventQueue.remove(0), postingState);
                }
            } finally {

                postingState.isPosting = false;
                postingState.isMainThread = false;
            }
        }
    }
能够发现上述的整个代码中其实还是一系列变量值的更改,而正事儿到postSingleEvent()才正式开始,因为你如果回忆一下我们开始的时候就讲过的一个变量ThreadMode也就能想到了,他是根据不同的线程的环境给出发送信息方案的,那这个在下面的内容中肯定也会用到。
private void postSingleEvent(Object event, PostingThreadState postingState) throws Error {

        Class<?> eventClass = event.getClass();
        boolean subscriptionFound = false;
        // 判断是否向父类查询
        if (eventInheritance) {

            List<Class<?>> eventTypes = lookupAllEventTypes(eventClass);
            int countTypes = eventTypes.size();
            for (int h = 0; h < countTypes; h++) {

                Class<?> clazz = eventTypes.get(h);
                subscriptionFound |= postSingleEventForEventType(event, postingState, clazz);
            }
        } else {

            subscriptionFound = postSingleEventForEventType(event, postingState, eventClass);
        }
        // 。。。。
    }
我们发现还没有被用到,但是上述的查询方法中出现了一个共同的特征,就是调用了postSingleEventForEventType(),那就继续深入探寻。
private boolean postSingleEventForEventType(Object event, PostingThreadState postingState, Class<?> eventClass) {

        CopyOnWriteArrayList<Subscription> subscriptions;
        synchronized (this) {

            // 获取事件对应的subscriptions集合
            subscriptions = subscriptionsByEventType.get(eventClass);
        }
        if (subscriptions != null && !subscriptions.isEmpty()) {

            // 通过轮训的方式对事件进行处理
            for (Subscription subscription : subscriptions) {

                postingState.event = event;
                postingState.subscription = subscription;
                boolean aborted;
                try {

                    // 对事件真正的做出处理
                    postToSubscription(subscription, event, postingState.isMainThread);
                    aborted = postingState.canceled;
                } finally {

                    postingState.event = null;
                    postingState.subscription = null;
                    postingState.canceled = false;
                }
                if (aborted) {

                    break;
                }
            }
            return true;
        }
        return false;
    }
这个postToSubscription()方法,最后判定就是我们最开始说的threadMode,根据我们在@Subscribe中设置的值来给出相对应的处理方式。
处理事件
这里只讲解一种,因为其余的终究还是基于Handler来进行通信,所以只挑默认方法的POSTING讲解。
关于
Handler详解:锦囊篇|一文深入Handler
private void postToSubscription(Subscription subscription, Object event, boolean isMainThread) {

        switch (subscription.subscriberMethod.threadMode) {

            case POSTING:
                invokeSubscriber(subscription, event);
                break;
            case MAIN:
                // 如果是在主线程中,就直接处理
                if (isMainThread) {

                    invokeSubscriber(subscription, event);
                } else {
      // 不是在主线程,就发送到主线程中再进行处理
                    mainThreadPoster.enqueue(subscription, event);
                }
                break;
            // 。。。。。
        }
}
这是发送部分的未讲解部分,其实已经和处理部分重合,如果在当前线程能够直接处理的方案他们最后都会调用到这样的一个函数invokeSubscriber()。
之前我们说过POSTING方法是直接在当前的线程作出处理的,查看源码也不难发现它的方案就是直接不对isMainThread这个变量进行判定的。
void invokeSubscriber(Subscription subscription, Object event) {

        try {

            subscription.subscriberMethod.method.invoke(subscription.subscriber, event);
        } catch (InvocationTargetException e) {

            handleSubscriberException(subscription, event, e.getCause());
        } catch (IllegalAccessException e) {

            throw new IllegalStateException("Unexpected exception", e);
        }
    }
显然最后也就是调用了一个Method.invoke()方法来对我们的方法进行处理,这里也就直接对应了我们的相对应的定义的方法了。
粘性事件
EventBus.getDefault().postSticky(new MessageEvent("MessageEvent"));
通过postSticky()方法来进行一个调用
public void postSticky(Object event) {

        synchronized (stickyEvents) {

            // 对应每次的粘性事件,保证我们最后获取时拿到的都是最新的
            stickyEvents.put(event.getClass(), event);
        }
        // 用锁机制存放后再发送,防止直接消费
        post(event);
    }
最后调用的还是一个post()方法,但是这里我们需要想起的是我们之前尚未分析的subscribe()中针对粘性事件做出处理的方法。(可以回到注册中进行查看)
if (subscriberMethod.sticky) {

            if (eventInheritance) {

                // 也就是对父类中的一种归并考虑
                Set<Map.Entry<Class<?>, Object>> entries = stickyEvents.entrySet();
                for (Map.Entry<Class<?>, Object> entry : entries) {

                    Class<?> candidateEventType = entry.getKey();
                    if (eventType.isAssignableFrom(candidateEventType)) {

                        Object stickyEvent = entry.getValue();
                        checkPostStickyEventToSubscription(newSubscription, stickyEvent); // 1 -->
                    }
                }
            } else {

                // 将数据做了一层缓存进行存放
                Object stickyEvent = stickyEvents.get(eventType);
                checkPostStickyEventToSubscription(newSubscription, stickyEvent); // 1 -->
            }
        }
// 1 --》 不论是if还是else最终都会调用到的注释1方法
private void checkPostStickyEventToSubscription(Subscription newSubscription, Object stickyEvent) {

        if (stickyEvent != null) {

            // If the subscriber is trying to abort the event, it will fail (event is not tracked in posting state)
            // --> Strange corner case, which we don't take care of here.
            // 这个方法在之前已经做过了分析
            postToSubscription(newSubscription, stickyEvent, isMainThread());
        }
    }
其实粘性事件的最终和发送事件殊途同归,都是需要调用postToSubscription()来将方法进行一个发送,只是,他多做了一个缓存的地方,也就是stickyEvents这个变量拿来对粘性事件进行一个存储操作。
总结
参考资料
- EventBus 原理解析 – She Huan

