unity c#移动脚本_Unity:使用C#脚本移动游戏对象
unity c#移动脚本
So now that you know what Rigidbodies are and how to attach them, let's go ahead and put them to actual use. One of the best ways, that we can think of, to explain the working of Rigidbodies is by making the player move using the arrow keys.
因此,既然您知道什么是刚体以及如何固定它们,就让我们继续进行实际使用。 我们可以想到的最好的方法之一是,通过使用箭头键使玩家移动来解释刚体的工作。
To do so, open up the Movement script that we made earlier. In case you deleted it or if you're working on a clean, new project, simply create a new script and name it Movement. Open it up in your IDE, and you'll see the familiar Start() and Update() methods that we have explained earlier.
为此,请打开我们之前制作的“ 运动”脚本。 如果您删除了它,或者正在处理一个干净的新项目,只需创建一个新脚本并将其命名为Movement即可 。 在您的IDE中打开它,您将看到我们之前介绍的熟悉的Start()和Update()方法。
Now, let's have a look at each line of code in detail and try to understand what's going on here. Don't worry if you can't grasp all of it at once, you'll learn as we progress forward.
现在,让我们详细查看每一行代码,并尝试了解这里发生的情况。 如果您无法一次掌握所有内容,请放心,我们会不断进步,您将学习。
using System.Collections;
using System.Collections.Generic;
using UnityEngine;

public class Movement : MonoBehaviour {

    public RigidBody2D starBody,
    public float speed;

    void start()
    {
        // use this function to initialize
        // anything
    }

    // Update is called once per frame
    void update()
    {
        starBody.velocity() = new Vector2(Input.GetAxisRaw("Horizontal")*speed, Input.GetAxisRaw("Vertical")*2);
    }

}
Line → public Rigidbody2D starBody: Simply declares an instance of the Rigidbody2D, named starBody. Make note of the public access modifier, We will be coming to that soon.
线→ 公共Rigidbody2D starBody:简单声明的实例Rigidbody2D ,命名starBody 。 记下public访问修饰符,我们很快就会谈到。
Line → public float speed: Simple declaration of a floating point value named speed. Once again, make a note of the public access modifier used here.
Line→ public float speed :简单声明一个名为speed的浮点值。 再次记下此处使用的public访问修饰符。
Line → void Start(): Note that this method is completely empty. We haven't even assigned any value to speed and starBody. You'd expect to get NullReferenceExceptions or UnassignedReferenceExceptions thrown everywhere and general chaos, if we didn't give those variables something to work with, right? And yet, this method remains mysteriously empty.
Line→ void Start() :请注意,此方法完全为空。 我们甚至没有给speed和starBody分配任何值。 如果我们不给那些变量提供一些有用的东西,那么您会期望到处抛出NullReferenceExceptions或UnassignedReferenceExceptions以及普遍混乱。 然而,这种方法仍然神秘地空着。
Line → ([Inside Update method] starBody.velocity = new Vector2(Input.GetAxisRaw ...): This is where the main action is going on around your game character. Let's dig into this one line, shall we? The first few words are starBody.velocity = means, we are assigning a velocity to the Rigidbody currently referenced by starBody. While new Vector2(...) means that a Rigidbody's velocity is defined as a Vector2, where the input parameters are the velocity along the X-axis and Y-axis respectively.
行→ ([[内部更新方法] starBody.velocity = new Vector2(Input.GetAxisRaw ...)) :这是围绕您的游戏角色进行的主要动作 。让我们深入探讨这一行,对吧?单词是starBody.velocity =意味着,我们正在为starBody当前引用的Rigidbody分配速度。而new Vector2(...)意味着将Rigidbody的速度定义为Vector2 ,其中输入参数是沿X的速度轴和Y轴。
Now, for the actual magic in this code: Input.GetAxisRaw("Horizontal") and Input.GetAxisRaw("Vertical") What are these things? Well, the Input class is provided with MonoDevelop for handling the input. It has definitions for what you'd call Input Axes defined as Horizontal and Vertical.
现在,对于此代码中的实际魔术: Input.GetAxisRaw("Horizontal")和Input.GetAxisRaw("Vertical")这些是什么? 好吧,MonoDevelop提供了Input类来处理输入。 它具有定义为“ 水平”和“ 垂直”的输入轴的定义。
What's basically going on is that the game is detecting input corresponding to the Horizontal and Vertical input axes, and setting them to -1, 0 or 1 depending on the button you press. So, when you press the Right arrow key, it means you're setting the value of the Horizontal axis to 1. As soon as you let go of that arrow key, the value on that axis jumps back to 0. Now, in game language it simply means,
什么是主要事情是,游戏被检测对应于水平和垂直轴输入输入,并且将它们设置为-1 , 0或1取决于你按下按钮。 因此,当您按向右箭头键时 ,意味着您将水平轴的值设置为1 。 放开该箭头键后,该轴上的值就会跳回到0。现在,在游戏语言中,这仅意味着,
move the character by 1 unit horizontally per frame when the Right arrow key is pressed. 按下向右箭头键时,每帧将字符水平移动1个单位。
Keeping it at 1 means the object will travel rather slowly. Hence, we multiply that value with the speed float, thus saying,
保持为1表示对象将缓慢移动。 因此,我们将该值乘以速度浮点,这样说:
move the character by 1 times the speed, and since we know that anything times 1 is the same value, we're effectively saying move the character horizontally by this speed when the axis buttons are pressed. 将字符以1倍的速度移动,并且由于我们知道1的任何值都是相同的值,因此我们实际上是在按轴按钮时以该速度水平移动字符 。
NOTE: By default, the axis buttons on a standard keyboard are the Up and Down arrows, as well as W and S for the Vertical axis, and Left and Right arrows, as well as A and D for the Horizontal axis.
注意:默认情况下,标准键盘上的轴按钮是向上和向下箭头,垂直轴是W和S ,水平轴是左箭头和右箭头,以及A和D。
Moving on, what's going in that one line is basically the following sentence:
继续,那一行的内容基本上是下面的句子:
Give this rigidbody a velocity in the game world, where the horizontal velocity is (Horizontal Axis * speed) and the vertical velocity is (Vertical Axis * speed) 在游戏世界中给此刚体一个速度,其中水平速度为(水平轴*速度),垂直速度为(垂直轴*速度)
Now, to finish, save this script and head on back to Unity. To attach the script to an object, simply drag and drop it over that object, or go to Add Component → Scripts.
现在,要完成操作,请保存此脚本并回到Unity。 要将脚本附加到对象,只需将其拖放到该对象上,或转到添加组件→脚本 。

Now, remember how we asked you to make note of the public access modifiers when we were writing our scripts? Have a look at the script's component.
现在,还记得我们在编写脚本时是如何要求您记录public访问修饰符的吗? 看一下脚本的组件。

You'll notice that along with the script, Unity automatically generated 2 fields for inputting both a Rigidbody2D and a speed float. That's the magic of Unity. Values and class instances declared publically can be seen in the Editor where you can make adjustments without having to constantly have to look in your code all the time.
您会注意到,与脚本一起,Unity自动生成了两个用于输入Rigidbody2D和速度浮动的字段。 那就是团结的魔力。 公开声明的Values和class实例可以在编辑器中看到,您可以在其中进行调整,而不必始终无休止地查看代码。
To set the Rigidbody2D for the first field, click on the small circle with a dot in it right next to the field. This will open up a list of available Rigidbodies in the scene which you can use. For the time being, since we only have one Rigidbody in the entire scene, click on the one that appears in the list.
要为第一个字段设置Rigidbody2D,请在该字段旁边的小圆上单击一个圆点。 这将打开您可以使用的场景中的可用刚体列表。 目前,由于整个场景中只有一个刚体,因此请单击列表中出现的那个。

What did you just accomplished by doing this? Remember how we didn't assign anything to the starBody variable back when we were writing the script? This is where we assign it. We can do assigning of components and values with a simple UI instead of having to write it in the code.
通过这样做您刚刚完成了什么? 还记得我们在编写脚本时如何不给starBody变量分配任何东西吗? 这是我们分配它的地方。 我们可以使用简单的UI分配组件和值,而不必在代码中编写。
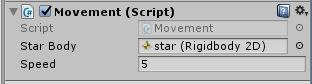
Next, set a speed value in the next field. Don't set it too high, or your character might fly off before you can see where he even went. This is a problem because our Camera is stationary, so positioning it back into view will become a task much easier said, than done. We would suggest setting the speed to around 5.
接下来,在下一个字段中设置速度值。 请勿将其设置得太高,否则您的角色可能会飞起来,然后才能看到他的去向。 这是一个问题,因为我们的相机是固定的,因此将其重新定位到视野中将比说起来容易得多。 我们建议将速度设置为5左右。
This is what your script component should look like once you finish:
完成后,这就是脚本组件的外观:
Now click on play button and let's see what happens. If everything went right, you'll notice that you can now move your character with the arrow keys. Awesome!
现在单击播放按钮,让我们看看会发生什么。 如果一切正常,您会注意到您现在可以使用箭头键移动角色。 太棒了!
翻译自: https://www.studytonight.com/game-development-in-2D/making-player-move
unity c#移动脚本