VIVADO FFT核的实现
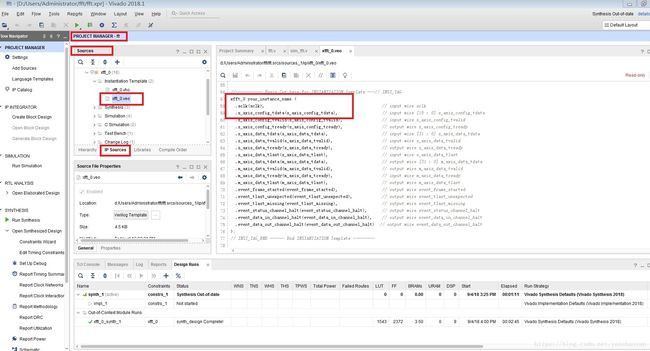
在VIVADO中建立一个FFT核,只要依下图步骤就可以开始配置一个FFT核:
需要配置的参数有三个标签页,需要一一配置
第一个标签页里主要配置通道数,点数,时钟,吞吐量,结构,以及是否可以运行时配置,需要注意的是结构的配置会影响调整因子。
第二配置页主要是数据宽度,格式,控制信号,输出方式,和可选的控制信号。需要注意的是输据的输入是自然方式(Natural Order),输出可以是自然方式也可以是倒序方式(Reversed Order),如果选用倒序方式输出,在后面处理中就要注意这一特性。
第三配置页主要配置内部数据块的使用和优化的方式
所有这些配置完成后,可以左侧一列中察看配置的结果,IP Symbol中主要察看各种接口,Implementation Detals 中有较多的信息,比如结构,长度,数据宽度等,需要注的是CONFIG TDATA这一项,与配置接口的参数有关,在使用中需要正确配置。在当前的配置, FWD_INV使用1bit,bit10:bit1用于调整因子,前面已经说过不同的结构调整因子不同,详细的可以参看FFT的核文献。
之后点击OK就可以完成配置,并生成FFT核,并在Project Manager的source中找IP Sources的资源,核的模板就是xfft_0.veo
我们就用这个模板创造我们的实例
有一些接口是不需要的,对它进行重新封装,配置参数是固定的,直接设成固定值,需要注意的是当前配置参数中,调整因子是0,即不调整,这在数据比较小的时候,不会出现问题,当输入数据比较大时,需要适当的设置,以免在进行蝶形运算时出现溢出的情况。
//
module fft_core_test(
    clk,
    config_en,
    dat_rdy,
    dat_last,
    dat_in_RE,
    dat_in_IM,
    fft_core_rdy,
    freq_o_en,
    freq_o_RE,
    freq_o_IM
    );

    input clk;
    input config_en;
    input dat_rdy;
    input dat_last;
    input [15:0] dat_in_RE,dat_in_IM;
    output fft_core_rdy;
    output freq_o_en;
    output [15:0] freq_o_RE,freq_o_IM;

    wire fft_core_rdy;
    wire freq_o_en;
    wire [15:0] freq_o_RE,freq_o_IM;
    //fft core
    wire aclk = clk;
    wire [15 : 0] s_axis_config_tdata = 16'b0_0000_0000_0000_00_1;     //scal_sch:  [14:1]   FWD_INC:[0]
    wire s_axis_config_tvalid = config_en;
    wire s_axis_config_tready;
    wire [31 : 0] s_axis_data_tdata = {dat_in_IM,dat_in_RE};
    wire s_axis_data_tvalid = dat_rdy;
    wire s_axis_data_tready;
        assign fft_core_rdy = s_axis_data_tready;
    wire s_axis_data_tlast = dat_last;
    wire [31 : 0] m_axis_data_tdata;
    assign  {freq_o_IM,freq_o_RE} = m_axis_data_tdata;

    wire m_axis_data_tvalid;
    assign freq_o_en = m_axis_data_tvalid;
    wire m_axis_data_tready = 1'b1;
    wire m_axis_data_tlast;
    wire event_frame_started;
    wire event_tlast_unexpected;
    wire event_tlast_missing;
    wire event_status_channel_halt;
    wire event_data_in_channel_halt;
    wire event_data_out_channel_halt;


xfft_0 your_instance_name (
  .aclk(aclk),                                                // input wire aclk
  .s_axis_config_tdata(s_axis_config_tdata),                  // input wire [15 : 0] s_axis_config_tdata
  .s_axis_config_tvalid(s_axis_config_tvalid),                // input wire s_axis_config_tvalid
  .s_axis_config_tready(s_axis_config_tready),                // output wire s_axis_config_tready
  .s_axis_data_tdata(s_axis_data_tdata),                      // input wire [31 : 0] s_axis_data_tdata
  .s_axis_data_tvalid(s_axis_data_tvalid),                    // input wire s_axis_data_tvalid
  .s_axis_data_tready(s_axis_data_tready),                    // output wire s_axis_data_tready
  .s_axis_data_tlast(s_axis_data_tlast),                      // input wire s_axis_data_tlast
  .m_axis_data_tdata(m_axis_data_tdata),                      // output wire [31 : 0] m_axis_data_tdata
  .m_axis_data_tvalid(m_axis_data_tvalid),                    // output wire m_axis_data_tvalid
  .m_axis_data_tready(m_axis_data_tready),                    // input wire m_axis_data_tready
  .m_axis_data_tlast(m_axis_data_tlast),                      // output wire m_axis_data_tlast
  .event_frame_started(event_frame_started),                  // output wire event_frame_started
  .event_tlast_unexpected(event_tlast_unexpected),            // output wire event_tlast_unexpected
  .event_tlast_missing(event_tlast_missing),                  // output wire event_tlast_missing
  .event_status_channel_halt(event_status_channel_halt),      // output wire event_status_channel_halt
  .event_data_in_channel_halt(event_data_in_channel_halt),    // output wire event_data_in_channel_halt
  .event_data_out_channel_halt(event_data_out_channel_halt)  // output wire event_data_out_channel_halt
);
endmodule
然后新建一个用于simulation的testbench文件, 用于sim的testbench文件是出现 在simulation Sources中的,也可以按源文件的方式建立testbench,这样出现的testbench出现在 Design Sources中,开发环境可能会认为这一文件也是正式的工程文件,可能会报出一些问题,具体自己试。
module sim_fft( );

    reg all_en;
    reg clk;
    reg config_ena;
    reg dat_rdy;
    reg dat_last;
    reg [15:0] dat_c;
    wire [15:0] dat_in_RE,dat_in_IM;
    wire fft_core_rdy_t;
    wire freq_o_en_t;
    wire [15:0] freq_o_RE_t,freq_o_IM_t;

    integer handle1;
    initial
    begin//sequence block
      handle1 =$fopen("fsave.txt");
      #200000  $fclose(handle1);
      $stop;
    end


    initial
    begin
        clk = 0;
        dat_rdy = 0;
        dat_last = 0;
        //dat_in_RE=0;
        dat_c =0;
        config_ena = 0;
        all_en=0;
        #200 all_en = 1;
        //#20 config_ena =1;
        //#100 config_ena =0;
        forever #10 clk = ~clk;
    end
    //
    reg [15:0]  cnt=0;
    reg [15:0] index = 0;
    always @(posedge clk)
    begin
        if(all_en)
            begin
            cnt <= cnt + 1'b1;
            if(cnt == 0)
            begin
                config_ena  <=1;
            end
            else if(cnt == 3)
                config_ena  <= 0;
            else if(cnt == 5)
            begin
                dat_rdy <= 1;
                dat_c <= 0;
               // dat_in_IM <= 0;
                index = 0;
            end
            else if(cnt == 16'd1028)
            begin
                dat_last <= 1'b1;
                dat_c <= (dat_c + 12'h100);
            end
            else if(cnt == 16'd1029)
            begin
                dat_rdy <= 1'b0;
                dat_last <= 1'b0;
            end
            else
            begin
                //dat_last <= 1'b0;
                dat_c <=(dat_c + 12'h100);
            end

            if(dat_rdy)
                index <= index +1;
        end
    end

    always @(posedge clk)
    begin
        if(dat_rdy)
            $fwrite(handle1,"%d  %d \n",dat_in_RE,dat_in_IM);
        else if(freq_o_en_t)
            $fwrite(handle1,"%d  %d \n",freq_o_RE_t,freq_o_IM_t);
    end


     assign dat_in_RE ={ 8'b0,{ dat_c[15]? ~dat_c[15:8] : dat_c[15:8]}};
     assign dat_in_IM =0;
fft_core_test   fft_core_inst(
    .clk(clk),
    .config_en(config_ena),
    .dat_rdy(dat_rdy),
    .dat_last(dat_last),
    .dat_in_RE(dat_in_RE[15:0]),
    .dat_in_IM(dat_in_IM[15:0]),
    .fft_core_rdy(fft_core_rdy_t),
    .freq_o_en(freq_o_en_t),
    .freq_o_RE(freq_o_RE_t),
    .freq_o_IM(freq_o_IM_t)
    );
endmodule
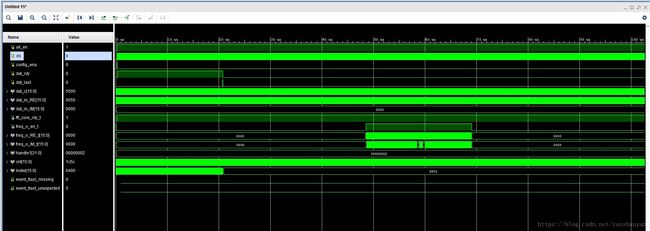
然后启动编译,之后就可以启动功能仿真。仿真的结果如下图。仿真的时候要注意一下event_tlast_unexpected和 event_tlast_missing; 这两个信号,如果出现则说明接口的时序配置有问题,跟FFT内部的配置不一致.
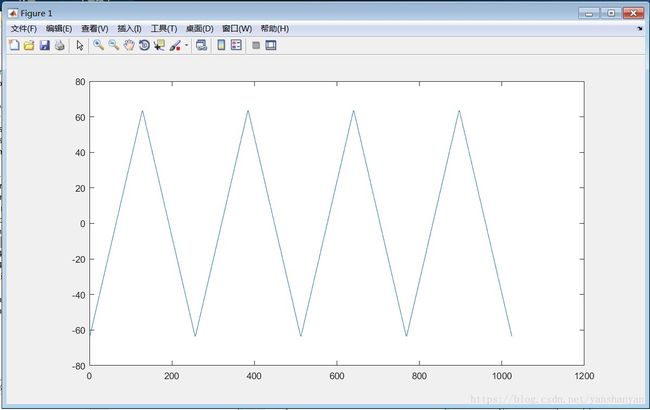
在前面的testbench文件中,我们可以看到产生了一个三角波用于测试,同时我们把原始输入到FFT核 中的数据和FFT核输出的数据保存了下来,以便于用MATLAB进行分析。
clear;

file_name='fsave.txt';
fid = fopen(file_name,'r');
c = fscanf(fid,'%d');
fclose(fid);
 for i=1: length(c)
    if(c(i)>32767)
        b(i) =  c(i)-65536;
    else b(i) =  c(i);
    end
end
d1=b(1:2:end);
d2=b(2:2:end);
comp1=d1(1:1024) + j*d2(1:1024);
comp2=d1(1025:2048) + j*d2(1025:2048);

c1avr=sum(comp1)/length(comp1);
c1=comp1-c1avr;
%  c1=comp1;

c1fft=abs(fft(c1,1024));
c2fft=abs(comp2);
plot(c1);
figure
subplot(2,1,1);
plot(c1fft);
subplot(2,1,2);
plot(c2fft);
figure
subplot(2,1,1);
plot(c1fft(1:50));
subplot(2,1,2);
plot(c2fft(1:50));
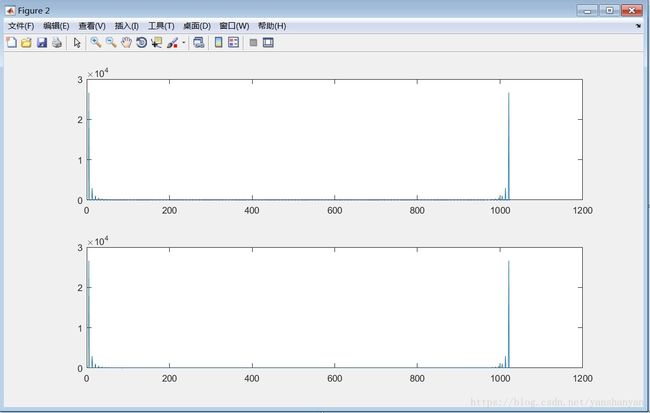
下图为保存数据画出来的三角波,在这里进行了一个去直流的过程,所以MATLAB的进行FFT的结果中应该不含直流分量,而FFT核运算出的数据中应该有直流分量。
下图中,第一个MATLAB进行的FFT结果,第二个FFT核输出的结果
只看前50个点的数据。可以看到两种方式输出数据中的频率分量都是对准的,而且在第二个图中(FFT核输数据)可以看到直流分量是有的。


