Springboot与缓存(详解)
Springboot与缓存(详解)
至于cache缓存器,在上一篇博客已经介绍过了,这里我就不在赘述了,直接进入正题。
Radis入门
Springboot与缓存的简单介绍
1. 第一步导入对应的pom依赖
			org.springframework.boot
			spring-boot-starter-cache


			org.springframework.boot
			spring-boot-starter-web


			org.mybatis.spring.boot
			mybatis-spring-boot-starter
			1.3.1


			org.springframework.boot
			spring-boot-starter-data-redis


			mysql
			mysql-connector-java
			runtime


			org.springframework.boot
			spring-boot-starter-test
			test


				org.springframework.boot
				spring-boot-maven-plugin
2. 创建对应的配置文件
spring.datasource.url=jdbc:mysql://localhost:3306/spring_cache
spring.datasource.username=root
spring.datasource.password=root
#spring.datasource.driver-class-name=com.mysql.jdbc.Driver

# 开启驼峰命名匹配规则
mybatis.configuration.map-underscore-to-camel-case=true

#打印日志
logging.level.com.xieyunjie.cache.mapper=debug

#打开自动配置报告
debug=false

#redis的主机地址
spring.redis.host=192.168.1.107
3. 创建自己的config配置文件
myCacheConfig配置文件
@Configuration
public class MyCacheConfig {

    @Bean("myKeyGenerator")
    public KeyGenerator keyGenerator(){
        return new KeyGenerator(){

            @Override
            public Object generate(Object target, Method method, Object... params) {
                return method.getName()+"["+ Arrays.asList(params).toString()+"]";
            }
        };
    }
}
RedisConfig配置文件
@Configuration
public class MyRedisConfig {

    //序列化器的作用将对象保存在redis中的时候通过json字符串的形式进行展示。
    //操作员工的
    @Bean
    public RedisTemplate empRedisTemplate(
            RedisConnectionFactory redisConnectionFactory)
            throws UnknownHostException {
        RedisTemplate template = new RedisTemplate();
        //序列化器
        template.setConnectionFactory(redisConnectionFactory);
        Jackson2JsonRedisSerializer ser = new Jackson2JsonRedisSerializer(Employee.class);
        template.setDefaultSerializer(ser);
        return template;
    }

    //操作部门的
    @Bean
    public RedisTemplate deptRedisTemplate(
            RedisConnectionFactory redisConnectionFactory)
            throws UnknownHostException {
        RedisTemplate template = new RedisTemplate();
        template.setConnectionFactory(redisConnectionFactory);
        Jackson2JsonRedisSerializer ser = new Jackson2JsonRedisSerializer(Department.class);
        template.setDefaultSerializer(ser);
        return template;
    }


    //CacheManagerCustomizers可以来定制缓存的一些规则
    //自定义员工的缓存模拟器,将上个方法当成参数放进里面,进行自动注入
    @Primary  //将某个缓存管理器作为默认的
    @Bean
    public RedisCacheManager employeeCacheManager(RedisTemplate empRedisTemplate){
        RedisCacheManager cacheManager = new RedisCacheManager(empRedisTemplate);
        //key多了一个前缀

        //使用前缀,默认会将CacheName作为key的前缀
        cacheManager.setUsePrefix(true);

        return cacheManager;
    }

    //自定义部门的缓存模拟器,将上个方法当成参数放进里面,进行自动注入
    @Bean
    public RedisCacheManager deptCacheManager(RedisTemplate deptRedisTemplate){
        RedisCacheManager cacheManager = new RedisCacheManager(deptRedisTemplate);
        //key多了一个前缀

        //使用前缀,默认会将CacheName作为key的前缀
        cacheManager.setUsePrefix(true);

        return cacheManager;
    }
4. 创建对应的实体类
public class Employee implements Serializable {

	private Integer id;
	private String lastName;
	private String email;
	private Integer gender; //性别 1男  0女
	private Integer dId;


	public Employee() {
		super();
	}


	public Employee(Integer id, String lastName, String email, Integer gender, Integer dId) {
		super();
		this.id = id;
		this.lastName = lastName;
		this.email = email;
		this.gender = gender;
		this.dId = dId;
	}

	public Integer getId() {
		return id;
	}
	public void setId(Integer id) {
		this.id = id;
	}
	public String getLastName() {
		return lastName;
	}
	public void setLastName(String lastName) {
		this.lastName = lastName;
	}
	public String getEmail() {
		return email;
	}
	public void setEmail(String email) {
		this.email = email;
	}
	public Integer getGender() {
		return gender;
	}
	public void setGender(Integer gender) {
		this.gender = gender;
	}
	public Integer getdId() {
		return dId;
	}
	public void setdId(Integer dId) {
		this.dId = dId;
	}
	@Override
	public String toString() {
		return "Employee [id=" + id + ", lastName=" + lastName + ", email=" + email + ", gender=" + gender + ", dId="
				+ dId + "]";
	}
5. 创建对应的service层
@CacheConfig(cacheNames="emp"/*,cacheManager = "employeeCacheManager"*/) //抽取缓存的公共配置
@Service
public class EmployeeService {

    @Autowired
    EmployeeMapper employeeMapper;

    /**
     * 将方法的运行结果进行缓存;以后再要相同的数据,直接从缓存中获取,不用调用方法;
     * CacheManager管理多个Cache组件的,对缓存的真正CRUD操作在Cache组件中,每一个缓存组件有自己唯一一个名字;
     *

     *
     * 原理:
     *   1、自动配置类;CacheAutoConfiguration
     *   2、缓存的配置类
     *   org.springframework.boot.autoconfigure.cache.GenericCacheConfiguration
     *   org.springframework.boot.autoconfigure.cache.JCacheCacheConfiguration
     *   org.springframework.boot.autoconfigure.cache.EhCacheCacheConfiguration
     *   org.springframework.boot.autoconfigure.cache.HazelcastCacheConfiguration
     *   org.springframework.boot.autoconfigure.cache.InfinispanCacheConfiguration
     *   org.springframework.boot.autoconfigure.cache.CouchbaseCacheConfiguration
     *   org.springframework.boot.autoconfigure.cache.RedisCacheConfiguration
     *   org.springframework.boot.autoconfigure.cache.CaffeineCacheConfiguration
     *   org.springframework.boot.autoconfigure.cache.GuavaCacheConfiguration
     *   org.springframework.boot.autoconfigure.cache.SimpleCacheConfiguration【默认】
     *   org.springframework.boot.autoconfigure.cache.NoOpCacheConfiguration
     *   3、哪个配置类默认生效:SimpleCacheConfiguration;
     *
     *   4、给容器中注册了一个CacheManager:ConcurrentMapCacheManager
     *   5、可以获取和创建ConcurrentMapCache类型的缓存组件;他的作用将数据保存在ConcurrentMap中;
     *
     *   运行流程:
     *   @Cacheable:
     *   1、方法运行之前,先去查询Cache(缓存组件),按照cacheNames指定的名字获取;
     *      (CacheManager先获取相应的缓存),第一次获取缓存如果没有Cache组件会自动创建。
     *   2、去Cache中查找缓存的内容,使用一个key,默认就是方法的参数;
     *      key是按照某种策略生成的;默认是使用keyGenerator生成的,默认使用SimpleKeyGenerator生成key;
     *          SimpleKeyGenerator生成key的默认策略;
     *                  如果没有参数;key=new SimpleKey();
     *                  如果有一个参数:key=参数的值
     *                  如果有多个参数:key=new SimpleKey(params);
     *   3、没有查到缓存就调用目标方法;
     *   4、将目标方法返回的结果,放进缓存中
     *
     *   @Cacheable标注的方法执行之前先来检查缓存中有没有这个数据,默认按照参数的值作为key去查询缓存,
     *   如果没有就运行方法并将结果放入缓存;以后再来调用就可以直接使用缓存中的数据;
     *
     *   核心:
     *      1)、使用CacheManager【ConcurrentMapCacheManager】按照名字得到Cache【ConcurrentMapCache】组件
     *      2)、key使用keyGenerator生成的,默认是SimpleKeyGenerator
     *
     *
     *   几个属性:
     *      cacheNames/value:指定缓存组件的名字;将方法的返回结果放在哪个缓存中,是数组的方式,可以指定多个缓存;
     *
     *      key:缓存数据使用的key;可以用它来指定。默认是使用方法参数的值  1-方法的返回值
     *              编写SpEL; #i d;参数id的值   #a0  #p0  #root.args[0]
     *              getEmp[2]
     *
     *      keyGenerator:key的生成器;可以自己指定key的生成器的组件id
     *              key/keyGenerator:二选一使用;
     *
     *
     *      cacheManager:指定缓存管理器;或者cacheResolver指定获取解析器
     *
     *      condition:指定符合条件的情况下才缓存;
     *              ,condition = "#id>0"
     *          condition = "#a0>1":第一个参数的值》1的时候才进行缓存
     *
     *      unless:否定缓存;当unless指定的条件为true,方法的返回值就不会被缓存;可以获取到结果进行判断
     *              unless = "#result == null"
     *              unless = "#a0==2":如果第一个参数的值是2,结果不缓存;
     *      sync:是否使用异步模式
     * @param id
     * @return
     *
     */
    @Cacheable(value = {"emp"}/*,keyGenerator = "myKeyGenerator",condition = "#a0>1",unless = "#a0==2"*/)
    public Employee getEmp(Integer id){
        System.out.println("查询"+id+"号员工");
        Employee emp = employeeMapper.getEmpById(id);
        return emp;
    }

    /**
     * @CachePut:既调用方法,又更新缓存数据;同步更新缓存
     * 修改了数据库的某个数据,同时更新缓存;
     * 运行时机:
     *  1、先调用目标方法
     *  2、将目标方法的结果缓存起来
     *
     * 测试步骤:
     *  1、查询1号员工;查到的结果会放在缓存中;
     *          key:1  value:lastName:张三
     *  2、以后查询还是之前的结果
     *  3、更新1号员工;【lastName:zhangsan;gender:0】
     *          将方法的返回值也放进缓存了;
     *          key:传入的employee对象  值:返回的employee对象;
     *  4、查询1号员工?
     *      应该是更新后的员工;
     *          key = "#employee.id":使用传入的参数的员工id;
     *          key = "#result.id":使用返回后的id
     *             @Cacheable的key是不能用#result
     *      为什么是没更新前的?【1号员工没有在缓存中更新】
     *
     */
    @CachePut(/*value = "emp",*/key = "#result.id")
    public Employee updateEmp(Employee employee){
        System.out.println("updateEmp:"+employee);
        employeeMapper.updateEmp(employee);
        return employee;
    }

    /**
     * @CacheEvict:缓存清除
     *  key:指定要清除的数据
     *  allEntries = true:指定清除这个缓存中所有的数据
     *  beforeInvocation = false:缓存的清除是否在方法之前执行
     *      默认代表缓存清除操作是在方法执行之后执行;如果出现异常缓存就不会清除
     *
     *  beforeInvocation = true:
     *      代表清除缓存操作是在方法运行之前执行,无论方法是否出现异常,缓存都清除
     *
     *
     */
    @CacheEvict(value="emp",beforeInvocation = true/*key = "#id",*/)
    public void deleteEmp(Integer id){
        System.out.println("deleteEmp:"+id);
        //employeeMapper.deleteEmpById(id);
        int i = 10/0;
    }

    // @Caching 定义复杂的缓存规则
    @Caching(
         cacheable = {
             @Cacheable(/*value="emp",*/key = "#lastName")
         },
         put = {
             @CachePut(/*value="emp",*/key = "#result.id"),
             @CachePut(/*value="emp",*/key = "#result.email")
         }
    )
    public Employee getEmpByLastName(String lastName){
        return employeeMapper.getEmpByLastName(lastName);
    }
6. 创建对应的mapper接口
@Mapper
public interface EmployeeMapper {

    @Select("SELECT * FROM employee WHERE id = #{id}")
    public Employee getEmpById(Integer id);

    @Update("UPDATE employee SET lastName=#{lastName},email=#{email},gender=#{gender},d_id=#{dId} WHERE id=#{id}")
    public void updateEmp(Employee employee);

    @Delete("DELETE FROM employee WHERE id=#{id}")
    public void deleteEmpById(Integer id);

    @Insert("INSERT INTO employee(lastName,email,gender,d_id) VALUES(#{lastName},#{email},#{gender},#{dId})")
    public void insertEmployee(Employee employee);

    @Select("SELECT * FROM employee WHERE lastName = #{lastName}")
    Employee getEmpByLastName(String lastName);
}
7. 创建对应的控制器
@RestController
public class EmployeeController {

    @Autowired
    EmployeeService employeeService;

    @GetMapping("/emp/{id}")
    public Employee getEmployee(@PathVariable("id") Integer id){
        Employee employee = employeeService.getEmp(id);
        return employee;
    }

    @GetMapping("/emp")
    public Employee update(Employee employee){
        Employee emp = employeeService.updateEmp(employee);

        return emp;
    }

    @GetMapping("/delemp")
    public String deleteEmp(Integer id){
        employeeService.deleteEmp(id);
        return "success";
    }

    @GetMapping("/emp/lastname/{lastName}")
    public Employee getEmpByLastName(@PathVariable("lastName") String lastName){
       return employeeService.getEmpByLastName(lastName);
    }
8. 进行测试
进行测试保存对象

默认时对应的是jdk的序列化,对应下图:
自定义序列化后对应的如下:
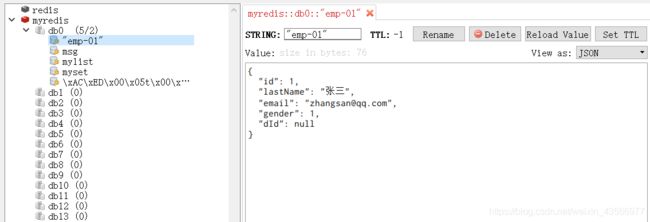
连接数据库,浏览器进行测试
第一次查询
带有查询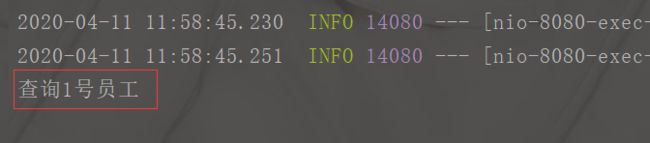
清空控制台,再次刷新没有查询,说明是在缓存中拿到的数据

这里也添加上了数据:

完整源码到时候一块上传!谢谢!