Vue第10天笔记:Vue动画(了解)、yarn命令的安装、webpack:介绍、基本步骤使用、npm中 --save和 --save-dev的区别、scripts的使用、配置到文件中、自动生成插件
前一天复习
1. 自定义指令
  (1) 定义使用
    Vue.directive(指令名, 指令的配置对象)
  (2) 五个钩子函数
    bind
    inserted
    update
  (3) 钩子函数的参数
    el 指令所在的元素
    binding 指令相关的信息对象
      (1) name 指令名
      (2) value 指令值
      (3) arg 指令的参数
      (4) modifiers 指令的修饰符

2. 动画
  vue中的动画, 用于快速实现转场动画 (进入离开 显示隐藏)
  (1) 用 transition 标签, 将需要动画的盒子包裹


  (2) 就有了动态切换的六个类
      v-enter
      v-enter-to
      v-enter-active
      v-leave
      v-leave-to
      v-leave-active

  (3) 给transition添加 name 属性, 可以自定义切换类名的前缀

        box-enter
        box-enter-to
        box-enter-active
        box-leave
        box-leave-to
        box-leave-active
vue - 动画(了解)
vue 动画 - 过渡实现
转场动画, 切换元素的显示隐藏
-
vue中提供了transition标签包裹元素
-
配合6个类名实现这个效果 (特定的时机, 添加特定的类名)
transtion 没指定 name, 6个类名, 默认都是 v- 开头的
transition 指定 name 属性, name=“fade”, 6个类的名字都是 fade开头的
v-enter 盒子准备要显示时
v-enter-to 盒子完全显示时
v-enter-active 盒子在显示的动画过程中
v-leave 盒子准备要离开时
v-leave-to 盒子完全离开时
v-leave-active 盒子在离开的动画过程中
vue 动画 - 动画实现
入场: 0 => 2 => 1
xx-enter-active 入场动画
xx-leave-active 离场动画
定义动画
@keyframes 动画名称 {

    0% {

        ...
    }
    50% {

        ...
    }
    100% {

        ...
    }
}

使用动画
.box {

    animation: 动画名称 动画时间;
}
vue 动画 - 通过 animate.css 实现
-
transition 包裹住元素
-
配置 enter-active-class
leave-active-class
代码演示:
  <style>
    div {

      width: 300px;
      height: 200px;
      margin: 100px auto;
      background-color: pink;
      border-radius: 10px;
    }
  style>
head>
<body>

  <div class="animate__animated animate__bounce">我是盒子div>
body>
    <style>
      h1 {

        width: 400px;
        height: 300px;
        line-height: 300px;
        border-radius: 30px;
        margin: 100px auto;
        background-color: pink;
        text-align: center;
      }

    </style>
  </head>
  <body>
    <div id="app">
      <button @click="isShow = !isShow">切换</button>
      <transition
        enter-active-class="animate__animated animate__rubberBand"
        leave-active-class="animate__animated animate__bounceOut"
      >
        <h1 v-if="isShow">我是内容</h1>
      </transition>
    </div>

    <script src="./vue.js"></script>
    <script>
      // 先引入animate.css
      // (1) 使用transition标签包裹盒子
      // (2) 就有了动态切换的六个类, 只需要关注 v-enter-active v-leave-active
      //     将进入的过程中的类名 v-enter-active =>  animate__animated animate__bounce
      //     将离开的过程中的类名 v-leave-active =>  animate__animated animate__bounceOut

      const vm = new Vue({

        el: '#app',
        data: {

          msg: 'hello vue',
          isShow: false
        }
      })
    </script>
  </body>
yarn
快速、可靠、安全的依赖管理工具。和 npm 类似, 都是包管理工具, 可以用于下载包
下载地址: https://yarn.bootcss.com/docs/install/#windows-stable
1. 初始化
	yarn init  /  yarn init -y

2. 添加依赖
	yarn add [package]
	yarn add [package]@[version]

3. 移除包
	yarn remove [package]

4. 安装项目全部依赖
	yarn 或者 yarn install

5. 全局
	安装: yarn global add [package]
	卸载: yarn global remove [package]
webpack 概述
webpack 是一个现代 javascript 应用程序的 静态模块打包器 (module bundler)
webpack英文官网
官方中文官网: https://webpack.docschina.org/
webpack 能做什么
webpack是一个静态模块打包器
- 语法转换
- less/sass转换成css
- ES6转换成ES5
- typescript转换成js
- html/css/js 代码压缩合并 (打包)
- webpack可以在开发期间提供一个开发服务器
- 自动开启浏览器
- 自动监视文件变化
- 自动刷新浏览器
- 项目一定先打包再上线
webpack 的模块的说明
在 webpack 中, 一切的静态资源都称之为模块 (html/css/js/图片…)
- html
- css
- js
- 图片
- 字体图标
- MP3
- MP4
- 。。。
静态资源:不需要经过后台处理的
webpack还兼容所有的模块化语法:
1. nodejs中, commonjs
2. 浏览器中, seajs  和  requirejs
3. es6 中新增的模块化语法
可以在浏览器中使用 commonjs 规范
webpack 的基本使用
配置,重在理解,而是理解每个配置,在干什么事情
注意:文档有可能不全的,先按照我们笔记步骤,先配置,先上手
以后开发:对着官网,对着博客,去配(博客的事件,找近几年的)
webpack打包的基本步骤
-
建目录 dist(打包后放文件的地方), src(未打包放的地方)/main.js(核心入口文件:从这个文件开始打包的)
-
初始化:
yarn init -y -
安装包(将webpack记录成了开发依赖,只在开发中使用):
yarn add webpack webpack-cli -D -
在package.json中, 配置scripts
"scripts": { "build": "webpack ./src/main.js -o ./dist/bundle.js" }, -
npm run build 打包 或者 yarn build
提示:如果yarn add包能装,但是yarn build执行报错,大概率是node版本问题(卸载node,重装版本即可)
npm中 --save和 --save-dev的区别
-
–save 简写-S: 将安装包作为项目的依赖 (目前为默认值)
早期的 npm 安装包的时候, 必须加上 --save 才会添加到 package.json 项目依赖中去
将包姬路城项目依赖(实际上线也要用的依赖)
npm i vue
等价于
npm i vue --save(默认值)
等价于
npm i vue -S
或者
yarn add vue 等价于 yarn add vue -S -
–save-dev 简写 -D: 将安装包记录成开发阶段的依赖(上线不要的,但开发过程中要的)
npm i webpack --save-dev
等价于
npm i webpack -D
npm i webpack-cli --save-dev 等价于 npm i webpack-cli -D
注意:yarn 只支持简写,只能跟 -S -D
tips:
- dependences: 项目依赖, 项目上线也要用的
- devDependencies: 开发依赖, 只在开发中使用, 上线时不要用的
npm中scripts的使用
在package.json文件中, 可以配置 scripts … 配置自己的命令
"scripts": {
	"pp": "yarn add jquery"
}
运行方式: npm run xx
特殊的命令: start / stop 可以省略 run
npm run start  => npm start
npm run stop  => npm stop
- 对于npm来说,如果命令的名字是 start 或者 stop ,那么可以省略 run
- 对于yarn来说,无论什么命令都不用加 run
使用 yarn 直接不需要加 run
npm run pp  =>  yarn pp
npm run build => yarn build
webpack配置到配置文件中
生产环境:上线的环境,代码需要压缩合并处理的 production
开发环境:还在开发中,代码一般不压缩的(可以查看源码)development
-
建目录 dist src/main.js
-
初始化
yarn init -y -
安装依赖包
yarn add webpack webpack-cli -D -
配置scripts
scripts: {

	"build": "webpack --config webpack.config.js"
}
--config webpack.config.js这个配置文件名为默认值, 不加也会默认找这个文件 -
提供 webpack.config.js
参考文档: https://webpack.docschina.org/concepts/#入口-entry-
const path = require('path')

module.exports = {

  // entry: 配置入口文件 (从哪个文件开始打包)
  entry: './src/main.js',

  // output: 配置输出 (打包到哪去)
  output: {

    // 打包输出的目录 (必须是绝对路径)
    path: path.join(__dirname, 'dist'),
    // 打包生成的文件名
    filename: 'bundle.js'
  },

  // 打包模式 production 压缩/development 不压缩
  mode: 'development'
}
小测试:
假定在main.js中导入一个 aa.js, 多个文件需要打包, wepack会打包成一个文件, 可以节约请求的次数
require('./aa.js')
console.log('这是main模块')
基于 webpack 实现隔行变色
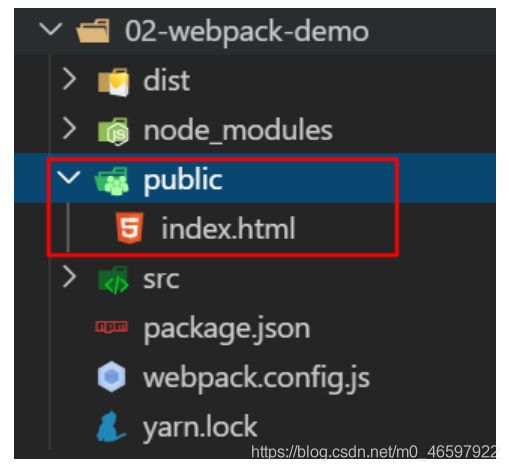
- 新建 public/index.html 编写代码
-
在 index.html 中新建一些 li 玩玩
<html lang="en">
<head>
  <meta charset="UTF-8">
  <meta name="viewport" content="width=device-width, initial-scale=1.0">
  <meta http-equiv="X-UA-Compatible" content="ie=edge">
  <title>Documenttitle>
head>
<body>

<div id="app">

  <ul>
    <li>我是第1个lili>
    <li>我是第2个lili>
    <li>我是第3个lili>
    <li>我是第4个lili>
    <li>我是第5个lili>
    <li>我是第6个lili>
    <li>我是第7个lili>
    <li>我是第8个lili>
    <li>我是第9个lili>
  ul>
div>

<script src="../dist/bundle.js">script>
body>
html>
需求:
-
使用 jquery 隔行变色
安装jquery
yarn add jquerymain.js// 需求: 通过jquery实现隔行变色 const $ = require('jquery') $(function() { $('#app li:nth-child(odd)').css('color', 'red') $('#app li:nth-child(even)').css('color', 'green') }) -
让最后一行的文字变成当前日期
安装 moment
yarn add momentmain.js// 需求: 通过jquery实现隔行变色 const $ = require('jquery') const moment = require('moment') $(function() { $('#app li:nth-child(odd)').css('color', 'red') $('#app li:nth-child(even)').css('color', 'green') $('#app li:last-child').text(moment().format('YYYY年MM月DD日')) })
自动生成html - html-webpack-plugin插件
目前我们都是在 index.html 中手动引入打包后的资源,这种引入方式是有缺点的
比如: 文件名依赖问题,假如 webpack 配置中的输出文件名修改了,需要及时在 index.html 中同步修改
-
下载
yarn add html-webpack-plugin -D -
在
webpack.config.js文件中,引入这个模块 :
 ```js
 // 引入自动生成 html 的插件
 const HtmlWebpackPlugin = require('html-webpack-plugin')
 ```
-
配置
// plugins:插件
plugins: [
  new HtmlWebpackPlugin({
        template: './public/index.html' })
]
配置好了之后, public 目录的 index.html 就不需要引入打包后的文件了, 会自动被插件生成 html 引入
public/index.html
<html lang="en">
<head>
  <meta charset="UTF-8">
  <meta name="viewport" content="width=device-width, initial-scale=1.0">
  <meta http-equiv="X-UA-Compatible" content="ie=edge">
  <title>Documenttitle>
head>
<body>

<div id="app">

  <ul>
    <li>我是第1个lili>
    <li>我是第2个lili>
    <li>我是第3个lili>
    <li>我是第4个lili>
    <li>我是第5个lili>
    <li>我是第6个lili>
    <li>我是第7个lili>
    <li>我是第8个lili>
    <li>我是第9个lili>
  ul>
div>


body>
html>
ta name=“viewport” content=“width=device-width, initial-scale=1.0”>
Document- 我是第1个li
- 我是第2个li
- 我是第3个li
- 我是第4个li
- 我是第5个li
- 我是第6个li
- 我是第7个li
- 我是第8个li
- 我是第9个li
