Floodlight Mininet自定义拓扑及自定义流表
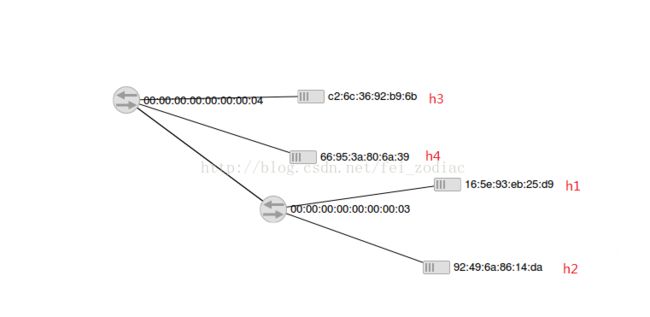
实验拓扑:
目的:(1)自定义构建以上拓扑
(2)实现h1,h2能通信,h3,h4不能通信,h1,h2与h3,h4之间能相互通信
基本操作这里就不仔细介绍了,可以参考之前的两篇文。
1.构建拓扑,用python实现以上自定义拓扑
代码:
from mininet.topo import Topo, Node

class MyTopo( Topo ):
    "Simple topology example."

    def __init__( self, enable_all = True ):
        "Create custom topo."

        # Add default members to class.
        super( MyTopo, self ).__init__()

        # Set Node IDs for hosts and switches
        leftHost1 = 1
        leftHost2 = 2
        leftSwitch = 3
        rightSwitch = 4
        rightHost1 = 5
        rightHost2 = 6

        # Add nodes

        self.add_node( leftSwitch, Node( is_switch=True ) )
        self.add_node( rightSwitch, Node( is_switch=True ) )
        self.add_node( leftHost1, Node( is_switch=False ) )
        self.add_node( leftHost2, Node( is_switch=False ) )
        self.add_node( rightHost1, Node( is_switch=False ) )
        self.add_node( rightHost2, Node( is_switch=False ) )

        # Add edges
        self.add_edge( leftHost1, leftSwitch )
        self.add_edge( leftHost2, leftSwitch )
        self.add_edge( leftSwitch, rightSwitch )
        self.add_edge( rightSwitch, rightHost1 )
        self.add_edge( rightSwitch, rightHost2 )

        # Consider all switches and hosts 'on'
        self.enable_all()


topos = { 'mytopo': ( lambda: MyTopo() ) }
2.在floodlight的web页面点击host如下图
可以看到链接交换机03的host端口号为1,2,那么可以推断04交换机链接到03交换机的3端口。同样链接交换机04的host端口号为2,3,那么可以推断03交换机链接到04交换机的1端口(写流表就是根据这些信息来的)。
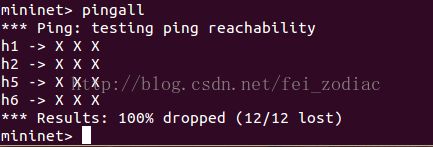
3.此时使用pingall,得到相互ping不通,(在删除.property文件中的Forwarding则默认相互不通,参考上一篇文)如下图
4.写流表
python代码:
import httplib
import json

class StaticFlowPusher(object):

    def __init__(self, server):
        self.server = server

    def get(self, data):
        ret = self.rest_call({}, 'GET')
        return json.loads(ret[2])

    def set(self, data):
        ret = self.rest_call(data, 'POST')
        return ret[0] == 200

    def remove(self, objtype, data):
        ret = self.rest_call(data, 'DELETE')
        return ret[0] == 200

    def rest_call(self, data, action):
        path = '/wm/staticflowentrypusher/json'
        headers = {
            'Content-type': 'application/json',
            'Accept': 'application/json',
            }
        body = json.dumps(data)
        conn = httplib.HTTPConnection(self.server, 8080)
        conn.request(action, path, body, headers)
        response = conn.getresponse()
        ret = (response.status, response.reason, response.read())
        print ret
        conn.close()
        return ret

pusher = StaticFlowPusher('192.168.131.129')

flow1 = {
    'switch':"00:00:00:00:00:00:00:03",
    "name":"flow-mod-1",
    "cookie":"0",
    "priority":"32768",
    "ingress-port":"1",
    "active":"true",
    "actions":"output=flood"
    }

flow2 = {
    'switch':"00:00:00:00:00:00:00:03",
    "name":"flow-mod-2",
    "cookie":"0",
    "priority":"32768",
    "ingress-port":"2",
    "active":"true",
    "actions":"output=flood"
    }

flow3 =	{
    'switch':"00:00:00:00:00:00:00:03",
    "name":"flow-mod-3",
    "cookie":"0",
    "priority":"32768",
    "ingress-port":"3",
    "active":"true",
    "actions":"output=flood"
    }

flow4 = {
    'switch':"00:00:00:00:00:00:00:04",
    "name":"flow-mod-4",
    "cookie":"0",
    "priority":"32768",
    "ingress-port":"2",
    "active":"true",
    "actions":"output=1"
    }

flow5 = {
    'switch':"00:00:00:00:00:00:00:04",
    "name":"flow-mod-5",
    "cookie":"0",
    "priority":"32768",
    "ingress-port":"3",
    "active":"true",
    "actions":"output=1"
    }

flow6 =	{
    'switch':"00:00:00:00:00:00:00:04",
    "name":"flow-mod-6",
    "cookie":"0",
    "priority":"32768",
    "ingress-port":"1",
    "active":"true",
    "actions":"output=flood"
    }
pusher.set(flow1)
pusher.set(flow2)
pusher.set(flow3)
pusher.set(flow4)
pusher.set(flow5)
pusher.set(flow6)


