Spring Boot + Spring Cloud(server+client+eureka) Demo
一、说在前面
参考:
https://www.cnblogs.com/cralor/p/9239976.html
https://www.cnblogs.com/shamo89/p/8016908.html
https://windmt.com/2018/04/19/spring-cloud-7-config-sample/
https://windmt.com/2018/04/19/spring-cloud-8-config-with-eureka/
https://windmt.com/2018/04/19/spring-cloud-9-config-eureka-bus/
https://blog.csdn.net/m0_37556444/article/details/82812816
Spring Boot 和 Spring Cloud 的版本要对应,不然会报错。这里Spring Boot 版本 2.0.3,Spring Cloud 版本 Finchley.SR2。(Finchley对应2.0.x应该均可,2.1.x亲测不行)。
二、开始
新建一个Maven工程,pom文件如下:
    4.0.0

    com.lzy
    springCloudConfigDemo
    pom
    1.0-SNAPSHOT

        config-server
        config-client
        eureka-server
        config-client2


    springCloudConfigDemo
    Demo project for Spring Cloud Config


        org.springframework.boot
        spring-boot-starter-parent
        2.0.3.RELEASE


        1.8
        Finchley.SR2


            org.springframework.boot
            spring-boot-starter


            org.springframework.boot
            spring-boot-starter-web


            org.springframework.boot
            spring-boot-starter-test
            test


                org.springframework.cloud
                spring-cloud-dependencies
                ${spring-cloud.version}
                pom
                import


                org.springframework.boot
                spring-boot-maven-plugin
三、Server端
主Maven工程下新建module工程config-server,pom文件继承主工程的pom文件,额外引入必须依赖,pom文件如下:
    4.0.0

        com.lzy
        springCloudConfigDemo
        1.0-SNAPSHOT


    config-server
    1.0-SNAPSHOT
    jar
    config-server
    Demo project for Spring Boot


        UTF-8
        UTF-8
        1.8


            org.springframework.cloud
            spring-cloud-config-server


                org.springframework.boot
                spring-boot-maven-plugin
配置application.properties文件如下:
spring.application.name=configServer
server.port=8888

#从本地读取配置文件
spring.profiles.active=native
spring.cloud.config.server.native.search-locations=classpath:/shared
首先测试从本地读取配置文件:spring.profiles.active=native. 第6行设置本地搜索路径。
在启动类上加@EnableConfigServer注解:
package com.lzy.configserver;

import org.springframework.boot.SpringApplication;
import org.springframework.boot.autoconfigure.SpringBootApplication;
import org.springframework.cloud.config.server.EnableConfigServer;

@EnableConfigServer
@SpringBootApplication
public class ConfigServerApplication {
    public static void main(String[] args){
        SpringApplication.run(ConfigServerApplication.class, args);
    }
}
四、Client端
主Maven工程下新建module工程config-client,pom文件继承主工程的pom文件,额外引入必须依赖,pom文件如下:
    4.0.0


        springCloudConfigDemo
        com.lzy
        1.0-SNAPSHOT


    config-client
    1.0-SNAPSHOT
    jar
    config-client


        UTF-8
        UTF-8
        1.8


            org.springframework.cloud
            spring-cloud-starter-config


                org.springframework.boot
                spring-boot-maven-plugin
配置bootstrap.properties文件如下(这些与 Spring Cloud Config 相关的属性必须配置在 bootstrap.properties 中,config 部分内容才能被正确加载,因为 config 的相关配置会先于 application.properties,而 bootstrap.properties 的加载也是先于 application.properties。):
spring.application.name=config-client
server.port=8081

#读取的配置文件类型(dev,test,prod)
spring.cloud.config.profile=prod
#开启快速失败
spring.cloud.config.fail-fast=true

#未注册到eureka时指定服务器端
#spring.cloud.config.uri=http://localhost:8888
第4行是读取的配置文件类型,配置文件命名规则{application}-{profile}.yml/.properties。profile即配置文件(dev,test,prod等)。第10行是服务器端为注册到eureka时,需指定uri,后面注册到eureka之后,不需要这句。
五、测试从本地读取配置文件
在config-server工程的resources目录下,创建/shared文件夹,存放配置文件,如config-client-prod.yml,内容:
a: prod在config-client工程下,进行测试:
package com.lzy.configclient.controller;

import org.springframework.beans.factory.annotation.Value;
import org.springframework.cloud.context.config.annotation.RefreshScope;
import org.springframework.web.bind.annotation.RequestMapping;
import org.springframework.web.bind.annotation.RestController;

@RestController
public class MyController {

    @Value("${a}")
    String a;

    @RequestMapping("/a")
    public String getA(){
        return a;
    }
}
先启动Server端,在浏览器访问http://localhost:8888/config-client-prod.yml,显示

再启动Client端,在浏览器访问http://localhost:8081/a,显示

client端成功从server端读取了配置文件信息。
六、从git读取配置文件
config-server工程下,修改application.properties文件如下:
spring.application.name=configServer
server.port=8888

#从git读取配置文件
spring.cloud.config.server.git.uri=https://github.com/xxx/springcloud
#spring.cloud.config.server.git.username=xxx
#spring.cloud.config.server.git.password=xxx
spring.cloud.config.server.git.search-paths=config-repo
#spring.cloud.config.server.git.default-label=master   默认是master分支,可以不用写
并在github创建仓库springcloud,创建文件如/config-repo/config-client-prod.yml,内容如下:
a: version1.0先启动Server端,在浏览器访问http://localhost:8888/config-client-prod.yml,显示

再启动Client端,在浏览器访问http://localhost:8081/a,显示

client端成功从server端读取了配置文件信息。
若git仓库中的配置文件修改了之后,client端并不能立刻获取到更新,需要重启客户端获得更新,另外一种不需要重启客户端的方式如下:
Refresh
在config-client的pom文件中添加如下依赖:
    org.springframework.boot
    spring-boot-starter-actuator
在config-client的bootstrap.properties文件中添加如下内容,其实只需暴露refresh端点即可,bus-refresh端点是后续使用,可以一并暴露(注:传统的management.security管理已被标记为不推荐。)
#暴露refresh和bus-refresh端点
management.endpoints.web.exposure.include=refresh,bus-refresh
读取变量的MyController类加@RefreshScope注解:
package com.lzy.configclient.controller;

import org.springframework.beans.factory.annotation.Value;
import org.springframework.cloud.context.config.annotation.RefreshScope;
import org.springframework.web.bind.annotation.RequestMapping;
import org.springframework.web.bind.annotation.RestController;

@RestController
@RefreshScope
public class MyController {
    @Value("${a}")
    String a;
    @RequestMapping("/a")
    public String getA(){
        return a;
    }
}
修改git仓库中配置文件内容为:
a: version2.0在浏览器访问http://localhost:8888/config-client-prod.yml,即显示更新之后的内容,但是访问http://localhost:8081/a,依然显示version1.0,说明client端并没有获取更新,此时在终端输入命令:curl -X POST http://localhost:8081/actuator/refresh 向client发送POST请求,之后刷新http://localhost:8081/a,即可获取到更新后的值。(向server端发送PSOT请求并不起作用)
七、server和client注册到eureka
可将多个server端和多个client端注册到eureka,每个client可从任意server读取配置文件。
创建eureka-server子工程,pom文件如下:
    4.0.0

        springCloudConfigDemo
        com.lzy
        1.0-SNAPSHOT


    eureka-server
    1.0-SNAPSHOT
    jar
    eureka-server


        UTF-8
        UTF-8
        1.8


            org.springframework.cloud
            spring-cloud-starter-netflix-eureka-server


                org.springframework.boot
                spring-boot-maven-plugin
application.properties文件如下:
server.port=8082
eureka.instance.hostname=localhost
eureka.client.register-with-eureka=false
eureka.client.fetch-registry=false
eureka.client.service-url.defaultZone=http://${eureka.instance.hostname}:${server.port}/eureka/
启动类加注解@EnableEurekaServer:
package com.lzy.eurekaserver;

import org.springframework.boot.SpringApplication;
import org.springframework.boot.autoconfigure.SpringBootApplication;
import org.springframework.cloud.netflix.eureka.server.EnableEurekaServer;

@EnableEurekaServer
@SpringBootApplication
public class EurekaServerApplication {
    public static void main(String[] args) {
        SpringApplication.run(EurekaServerApplication.class, args);
    }
}
config-server和config-client均添加以下依赖:
    org.springframework.cloud
    spring-cloud-starter-netflix-eureka-client


    org.springframework.cloud
    spring-cloud-starter-bus-amqp
config-server的application.properties文件添加如下内容( When running on localhost, you need not do anything. If you run remotely, use Spring Cloud Connectors or Spring Boot conventions to define the broker credentials。在本机,不需要配置rabbitMQ,但是需要安装rabbitMQ):
#eureka
eureka.client.service-url.defaultZone=http://localhost:8082/eureka/

#bus
spring.cloud.bus.enabled=true
spring.cloud.bus.trace.enabled=true


#暴露refresh和bus-refresh端点
management.endpoints.web.exposure.include=refresh,bus-refresh
分别配置eureka的defaultZone,spring bus 是用于刷新更新数据。
config-client的bootstrap.properties文件添加如下内容,并注释掉spring.cloud.config.uri=http://localhost:8888。
#注册到eureka后,开启Config服务发现支持
spring.cloud.config.discovery.enabled=true
#指定Server端的name, 即spring.application.name的值
spring.cloud.config.discovery.service-id=configServer

#eureka
eureka.client.service-url.defaultZone=http://localhost:8082/eureka/

#bus
spring.cloud.bus.trace.enabled=true
spring.cloud.bus.enabled=true
依次启动eureka-server,config-server,config-client,访问http://localhost:8082/,显示:

看到server和client均已注册到eureka。
可以以不同端口启动多个server端和多个client端,并通过spring bus 对更改的配置文件数据刷新到每一个client。以下讨论全部刷新和局部刷新情况:
1.向server发送,不指定client,如 curl -X POST http://localhost:8888/actuator/bus-refresh(server端口8888),这种情况所有client均刷新数据。
2.向server发送,指定client,如 curl -X POST http://localhost:8888/actuator/bus-refresh/config-client:8081,这里通过Application Context id 来指定client,其组成默认是client的配置文件bootstrap.properties的 spring.application.name:server.port,(在Spring Cloud Bus 官方文档中,Service ID Must Be Unique 这一小节讲解 Application Context id 必须是唯一的,可通过spring.application.index来达成,但是在实际操作中,提示spring.application.index以弃用,现在id一定是唯一的)。这种情况任何client均不会刷新。
3.向某client发送,不指定client,如 curl -X POST http://localhost:8081/actuator/bus-refresh ,这种情况所有client均刷新数据。
4.向某client a发送,指定client b,如 curl -X POST http://localhost:8081/actuator/bus-refresh/config-client:8999。(这里a是8081端口,b是8999端口)
这种情况下,client a 和 client b 都会刷新(a可以等于b,那就只刷新一个)。
没找到可以指定多个client的方式。。。
八、解决手动发送POST请求
通过git的webhook功能。
首先利用ngrok生成访问本机地址 http://localhost:8888(server的端口)的外网对应地址,例如 http://159e4e1f.ngrok.io。
创建webhook时,Payload URL 填写 http://159e4e1f.ngrok.io/actuator/bus-refresh 。
webhook创建完成之后,修改git上的配置文件,发现发送POST请求失败,如下
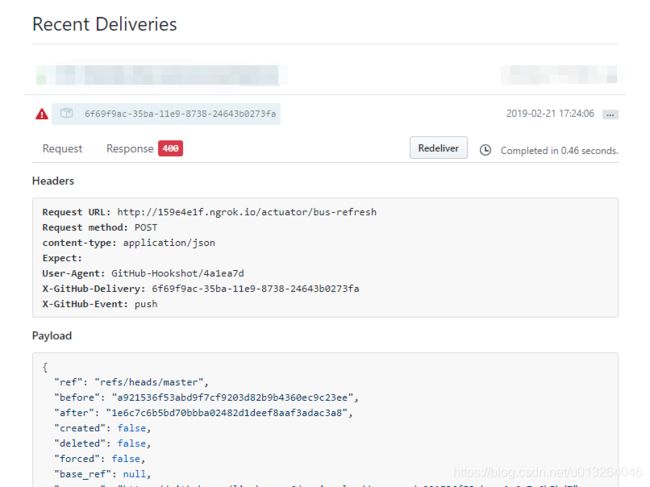
此处参考https://blog.csdn.net/m0_37556444/article/details/82812816解决。在发送POST请求时,git会默认加上Payload一大段内容,导致spring boot因为无法正常反序列化这串载荷而报了400错误。通过修改body,将其置空来解决这个问题。
附上代码:
wrapper类:
package com.lzy.configserver.wrapper;

import javax.servlet.ReadListener;
import javax.servlet.ServletInputStream;
import javax.servlet.http.HttpServletRequest;
import javax.servlet.http.HttpServletRequestWrapper;
import java.io.ByteArrayInputStream;
import java.io.IOException;

public class MyRequestWrapper extends HttpServletRequestWrapper {

    public MyRequestWrapper(HttpServletRequest request) {
        super(request);
    }

    @Override
    public ServletInputStream getInputStream() throws IOException {
        byte[] bytes = new byte[0];
        ByteArrayInputStream byteArrayInputStream = new ByteArrayInputStream(bytes);

        return new ServletInputStream() {
            @Override
            public boolean isFinished() {
                return byteArrayInputStream.read() == -1 ? true : false;
            }

            @Override
            public boolean isReady() {
                return false;
            }

            @Override
            public void setReadListener(ReadListener readListener) {

            }

            @Override
            public int read() throws IOException {
                return byteArrayInputStream.read();
            }
        };
    }
}
过滤器:
package com.lzy.configserver.config;

import com.lzy.configserver.wrapper.MyRequestWrapper;
import org.slf4j.Logger;
import org.slf4j.LoggerFactory;
import org.springframework.boot.web.servlet.FilterRegistrationBean;
import org.springframework.context.annotation.Bean;
import org.springframework.context.annotation.Configuration;
import javax.servlet.*;
import javax.servlet.http.HttpServletRequest;
import java.io.IOException;

@Configuration
public class WebConfig {
    private static Logger logger = LoggerFactory.getLogger(WebConfig.class);

    @Bean
    public FilterRegistrationBean testFilterRegistration() {
        FilterRegistrationBean registration = new FilterRegistrationBean();
        registration.setFilter(new MyFilter());
        registration.addUrlPatterns("/*");
        registration.addInitParameter("paramName", "paramValue");
        registration.setName("MyFilter");
        registration.setOrder(Integer.MAX_VALUE);
        return registration;
    }

    public class MyFilter implements Filter {
        @Override
        public void destroy() {
        }

        @Override
        public void doFilter(ServletRequest servletRequest, ServletResponse servletResponse, FilterChain filterChain)
                throws IOException, ServletException {
            HttpServletRequest httpServletRequest = (HttpServletRequest) servletRequest;
            String url = httpServletRequest.getRequestURI();
            logger.info("this is MyFilter,urI:" + httpServletRequest.getRequestURI());

            //只过滤/bus-refresh
            if(!url.endsWith("/bus-refresh")){
                filterChain.doFilter(servletRequest, servletResponse);
                return;
            }

            //使用HttpServletRequest包装原始请求达到修改post请求中body内容的目的
            MyRequestWrapper requestWrapper = new MyRequestWrapper(httpServletRequest);

            filterChain.doFilter(requestWrapper, servletResponse);
        }

        @Override
        public void init(FilterConfig filterConfig) throws ServletException {
        }
    }
}