Android Model正确使用姿势——AutoValue
- Android Model正确使用姿势AutoValue
- 前言
- 简介
- 简单使用
- ImmutableValue types
- 高级使用
- Nullable
- Gson序列化
- Serializable Parcelable
- Retrofit和Rxjava结合使用
- 相关插件
- RoboPOJOGenerator
- AutoValue plugin
- 原理介绍
- AutoFactory
- AutoService
- AutoCommon
-
- Auto相关使用
- IntentBuilder
- FragmentArgs
- 其他相关
- Kotlin Data Class
- Object-C
- 总结
- 参考连接
最近看到几篇博客是关于AutoValue的,然后自己十分喜欢,一下子觉的这样写代码很优雅,所以决定自己也写一篇文章介绍下AutoValue。
本文最先发表于Github,如有转载,请注明转载出处。
前言
首先说Android Model,在开发中网络请求,以及数据库操作等,我们都会定义一个Model,不同人对这个的说法不一样,比如有Entry,Bean,Pojo。
然后开发的过程中会遇到下面问题:
-
构成方法:自定义构造方法,如果实体比较复杂,可能会用到工厂模式或者是建造者模式
-
序列化:比如实现Serializable接口,Parcelable接口。
-
Json解析:有时候直接使用的是json数据,比如@SerializedName注解。
-
自定义方法:对Model的字段有setter,getter方法,toString的实现,在处理hash的时候,需要实现equals和hashcode方法。
以上这么问题,其实在Eclipse和Android Studio中都是有快捷功能帮我们自动生成,后面的代码示例,就是我用Android Studio自动生成的。
比如下面一个User类是我们的本次示例的一个Model,如果按照正常的写法,是这样的。
public abstract class User implements Serializable {

    @SerializedName("id")
    private int id;

    @SerializedName("name")
    private String name;

    public int getId() {
        return id;
    }

    public void setId(int id) {
        this.id = id;
    }

    public String getName() {
        return name;
    }

    public void setName(String name) {
        this.name = name;
    }

    @Override
    public boolean equals(Object o) {
        if (this == o) return true;
        if (o == null || getClass() != o.getClass()) return false;

        User user = (User) o;

        if (id != user.id) return false;
        return name != null ? name.equals(user.name) : user.name == null;

    }

    @Override
    public int hashCode() {
        int result = id;
        result = 31 * result + (name != null ? name.hashCode() : 0);
        return result;
    }

    @Override
    public String toString() {
        return "User{" +
                "id=" + id +
                ", name='" + name + '\'' +
                '}';
    }
}
- 1
- 2
- 3
- 4
- 5
- 6
- 7
- 8
- 9
- 10
- 11
- 12
- 13
- 14
- 15
- 16
- 17
- 18
- 19
- 20
- 21
- 22
- 23
- 24
- 25
- 26
- 27
- 28
- 29
- 30
- 31
- 32
- 33
- 34
- 35
- 36
- 37
- 38
- 39
- 40
- 41
- 42
- 43
- 44
- 45
- 46
- 47
- 48
- 49
- 50
- 51
简介
官方文档给出的解释是这样的,大致意思是说是一个生成Java不可变的值类型工具,仔细研读源代码后,使用的技术是Java Apt,这个后面再做详细解释。
AutoValue - Immutable value-type code generation for Java 1.6+.
简单使用
按照上面的例子,如果是AutoValue,代码是这样的。
首先需要在Android项目里面引入apt功能,在项目根目录的gradle中添加,
buildscript {
    repositories {
        jcenter()
    }
    dependencies {
        classpath 'com.android.tools.build:gradle:2.2.2'
        // 引入apt插件
        classpath 'com.neenbedankt.gradle.plugins:android-apt:1.8'
    }
}
其次在module(一般是app目录)中gradle使用apt插件。
apply plugin: 'com.android.application'
apply plugin: 'com.neenbedankt.android-apt'
最后加入AutoValue依赖。
dependencies {
    provided 'com.google.auto.value:auto-value:1.3'
    apt 'com.google.auto.value:auto-value:1.3'
}
修改User类,如下所示,User已经变成了一个抽象类,类似于使用Retrofit一样,申明已经变成了一个接口,然后实现类是由AutoValue生成的代码。
import com.google.auto.value.AutoValue;

@AutoValue
public abstract class User {

    public abstract int id();

    public abstract String name();

    public static User newInstance(int id, String name) {
        return new AutoValue_User(id, name);
    }
}
- 1
- 2
- 3
- 4
- 5
- 6
- 7
- 8
- 9
- 10
- 11
- 12
- 13
我们可以看看AutoValue到底干了什么?
AutoValue会自动生成一个AutoValue_User,这个类是继承了上面申明的User类,这个是默认default的访问权限,那么在其他package中是无法访问的,这样在其他代码里面也不会看到这么奇怪的名字。
同时所有的字段都是final类型,如果字段是对象类型的,那么还不能为空,这个问题先保留,后面再做详解。因为申明的是final类型,那么所有的字段都是没有setter方法的。
代码里同时也实现了equals、hashcode、toString方法。
 final class AutoValue_User extends User {

  private final int id;
  private final String name;

  AutoValue_User(
      int id,
      String name) {
    this.id = id;
    if (name == null) {
      throw new NullPointerException("Null name");
    }
    this.name = name;
  }

  @Override
  public int id() {
    return id;
  }

  @Override
  public String name() {
    return name;
  }

  @Override
  public String toString() {
    return "User{"
        + "id=" + id + ", "
        + "name=" + name
        + "}";
  }

  @Override
  public boolean equals(Object o) {
    if (o == this) {
      return true;
    }
    if (o instanceof User) {
      User that = (User) o;
      return (this.id == that.id())
           && (this.name.equals(that.name()));
    }
    return false;
  }

  @Override
  public int hashCode() {
    int h = 1;
    h *= 1000003;
    h ^= this.id;
    h *= 1000003;
    h ^= this.name.hashCode();
    return h;
  }
}
- 1
- 2
- 3
- 4
- 5
- 6
- 7
- 8
- 9
- 10
- 11
- 12
- 13
- 14
- 15
- 16
- 17
- 18
- 19
- 20
- 21
- 22
- 23
- 24
- 25
- 26
- 27
- 28
- 29
- 30
- 31
- 32
- 33
- 34
- 35
- 36
- 37
- 38
- 39
- 40
- 41
- 42
- 43
- 44
- 45
- 46
- 47
- 48
- 49
- 50
- 51
- 52
- 53
- 54
- 55
- 56
Immutable/Value types
刚刚上面说到,所有的字段都是final类型,那么而且实现类也是final的,有个专业术语叫Immutable。
Immutable/Value types 这个概念对有些朋友来说可能还比较陌生,简单来说就是一个数据对象一旦构造完成,就再也无法修改了。
这样有什么好处呢?最大的好处就是多线程访问可以省去很多同步控制,因为它们是不可变的,一旦构造完成,就不会存在多线程竞争访问问题了。多线程最麻烦的处理就是控制好读写问题,如果大家都是读,那么就不存控制了,所以省去了很多同步操作。
更多关于Immutable 的介绍,可以参阅 wiki 。
举个Java中的例子:String和StringBuilder,String是immutable的,每次对于String对象的修改都将产生一个新的String对象,而原来的对象保持不变,而StringBuilder是mutable,因为每次对于它的对象的修改都作用于该对象本身,并没有产生新的对象。
Immutable objects 比传统的mutable对象在多线程应用中更具有优势,它不仅能够保证对象的状态不被改变,而且还可以不使用锁机制就能被其他线程共享。
总结下Immutable对象的优缺点:
优点
- Immutable对象是线程安全的,可以不用被synchronize就在并发环境中共享
- Immutable对象简化了程序开发,因为它无需使用额外的锁机制就可以在线程间共享
- Immutable对象提高了程序的性能,因为它减少了synchroinzed的使用
- Immutable对象是可以被重复使用的,你可以将它们缓存起来重复使用,就像字符串字面量和整型数字一样。你可以使用静态工厂方法来提供类似于valueOf()这样的方法,它可以从缓存中返回一个已经存在的Immutable对象,而不是重新创建一个。
缺点
Immutable也有一个缺点就是会制造大量垃圾,由于他们不能被重用而且对于它们的使用就是”用“然后”扔“,字符串就是一个典型的例子,它会创造很多的垃圾,给垃圾收集带来很大的麻烦。当然这只是个极端的例子,合理的使用immutable对象会创造很大的价值。
高级使用
Nullable
上面说过如果类中有对象类型的成员变量,那么是为非空的,但是在实际情况下,有的字段的是值就是为null,所以在申明时候可申明为Nullable就可以了。
import android.support.annotation.Nullable;

import com.google.auto.value.AutoValue;
import com.google.gson.annotations.SerializedName;

@AutoValue
public abstract class NullableUser {

    @SerializedName("id")
    public abstract int id();

    @Nullable
    @SerializedName("name")
    public abstract String name();

    public static NullableUser newInstance(int id, String name) {
        return new AutoValue_NullableUser(id, name);
    }
}
- 1
- 2
- 3
- 4
- 5
- 6
- 7
- 8
- 9
- 10
- 11
- 12
- 13
- 14
- 15
- 16
- 17
- 18
- 19
生成代码:
final class AutoValue_NullableUser extends NullableUser {

  private final int id;
  private final String name;

  AutoValue_NullableUser(
      int id,
      @Nullable String name) {
    this.id = id;
    this.name = name;
  }
}
- 1
- 2
- 3
- 4
- 5
- 6
- 7
- 8
- 9
- 10
- 11
- 12
测试用例
    @Test(expected = NullPointerException.class)
    public void testUserNullPointException() throws Exception {
        User.newInstance(100, null);
    }

    @Test
    public void testUserNullable() {
        NullableUser user = NullableUser.newInstance(100, "test");

        System.out.println("user = " + user);
        Assert.assertEquals(user.id(), 100);
        Assert.assertEquals(user.name(), "test");
    }
- 1
- 2
- 3
- 4
- 5
- 6
- 7
- 8
- 9
- 10
- 11
- 12
- 13
Gson序列化
Gson 使用比较麻烦,在普通的Model中,只需要在字段上面添加 @SerializedName注解即可。但是使用AutoValue,稍微有点繁琐。
首先需要引入一个依赖包,这里是Auto value gson Github。
    provided 'com.ryanharter.auto.value:auto-value-gson:0.4.4'
    apt 'com.ryanharter.auto.value:auto-value-gson:0.4.4'
其次申明的抽象类中,每个方法上面添加对应的注解,然后再添加一个typeAdapter方法,申明这个方法,Gson就会根据这个找到对应的adapter,如下所示。
@AutoValue
public abstract class User {

    @SerializedName("id")
    public abstract int id();

    @SerializedName("name")
    public abstract String name();

    public static User newInstance(int id, String name) {
        return new AutoValue_User(id, name);
    }

    public static TypeAdapter typeAdapter(Gson gson) {
        return new AutoValue_User.GsonTypeAdapter(gson);
    }
}
- 1
- 2
- 3
- 4
- 5
- 6
- 7
- 8
- 9
- 10
- 11
- 12
- 13
- 14
- 15
- 16
- 17
typeAdapter方法模板如下,T就是你当前Model的名字,写完以后会出现错误,没事重新编译下就好了,这样就会重新生成了代码。
public static TypeAdapter typeAdapter(Gson gson) {
   return new AutoValue_T.GsonTypeAdapter(gson);
}
第三申明一个TypeAdapterFactory的一个实现类,这个类是abstract的,AutoValue也会自动生成其实现类。
@GsonTypeAdapterFactory
public abstract class MyAdapterFactory implements TypeAdapterFactory {

    public static TypeAdapterFactory create() {
        return new AutoValueGson_MyAdapterFactory();
    }
}
最后是单元测试,在json字符串转Model的时候,会使用一个Gson对象,这个对象不是平常使用的对象,需要自定义配置一些东西,然后这里就用到了上面所申明的MyAdapterFactory。
@Test
public void testUserToJson() {
User user = User.newInstance(100, "test");
String json = new Gson().toJson(user);
System.out.println(json);
Assert.assertEquals("{\"id\":100,\"name\":\"test\"}", json);
}
@Test
public void testUserParseFromJson() {
String json = "{\"id\":100,\"name\":\"test\"}";
Gson gson = new GsonBuilder().registerTypeAdapterFactory(MyAdapterFactory.create()).create();
User user = gson.fromJson(json, User.class);
System.out.println(user);
Assert.assertNotNull(user);
Assert.assertEquals(user.name(), "test");
Assert.assertEquals(user.id(), 100);
NullableUser nullableUser = gson.fromJson(json, NullableUser.class);
System.out.println(nullableUser);
Assert.assertNotNull(nullableUser);
Assert.assertEquals(nullableUser.name(), "test");
Assert.assertEquals(nullableUser.id(), 100);
}
- 1
- 2
- 3
- 4
- 5
- 6
- 7
- 8
- 9
- 10
- 11
- 12
- 13
- 14
- 15
- 16
- 17
- 18
- 19
- 20
- 21
- 22
- 23
- 24
- 25
- 26
- 27
- 28
- 29
Serializable & Parcelable
Serializable是Java自带的序列化方式,和AutoValue结合不影响原先使用,只需要在申明的Model中实现Serializable接口即可。
Parcelable是Android提供的序列化方式,如果需要和AutoValue结合使用,和Serializable基本差不多,实现相关接口,然后在Gradle文件引入相关apt依赖即可。
    apt 'com.ryanharter.auto.value:auto-value-parcel:0.2.5'
    // Optionally for TypeAdapter support
    // compile 'com.ryanharter.auto.value:auto-value-parcel-adapter:0.2.5'
auto-value-parcel Github地址
上面的auto-value-parcel-adapter是可选项,是auto-value-parcel提供自定义类型转化,相关使用可以参见Github地址。
检查下Autovalue自动给我们实现的代码,果然不出所料,全部自动生成了。
final class AutoValue_User extends $AutoValue_User {
  public static final Parcelable.Creator CREATOR = new Parcelable.Creator() {
    @Override
    public AutoValue_User createFromParcel(Parcel in) {
      return new AutoValue_User(
          in.readInt(),
          in.readString()
      );
    }
    @Override
    public AutoValue_User[] newArray(int size) {
      return new AutoValue_User[size];
    }
  };

  AutoValue_User(int id, String name) {
    super(id, name);
  }

  @Override
  public void writeToParcel(Parcel dest, int flags) {
    dest.writeInt(id());
    dest.writeString(name());
  }

  @Override
  public int describeContents() {
    return 0;
  }
}
- 1
- 2
- 3
- 4
- 5
- 6
- 7
- 8
- 9
- 10
- 11
- 12
- 13
- 14
- 15
- 16
- 17
- 18
- 19
- 20
- 21
- 22
- 23
- 24
- 25
- 26
- 27
- 28
- 29
- 30
Retrofit和Rxjava结合使用
Android 开发的时候,很多开发者使用Retrofit这个网络库,以及RxJava异步工具。下面举例如何结合使用AutoValue,Retrofit,Rxjava。
这里有个获取天气的接口,返回的结果是json,我们用这个来测试下Retrofit。
// https://api.thinkpage.cn/v3/weather/now.json?key=x4qjfuniyu97mt9y&location=beijing&language=zh-Hans&unit=c
{
  "results": [
    {
      "location": {
        "id": "WX4FBXXFKE4F",
        "name": "北京",
        "country": "CN",
        "path": "北京,北京,中国",
        "timezone": "Asia/Shanghai",
        "timezone_offset": "+08:00"
      },
      "now": {
        "text": "霾",
        "code": "31",
        "temperature": "10"
      },
      "last_update": "2016-12-02T14:45:00+08:00"
    }
  ]
}
- 1
- 2
- 3
- 4
- 5
- 6
- 7
- 8
- 9
- 10
- 11
- 12
- 13
- 14
- 15
- 16
- 17
- 18
- 19
- 20
- 21
申明Retrofit Api接口,一个普通的调用,一个是RxJava的方式。
public interface IWeatherApi {

    @GET("/v3/weather/now.json?key=x4qjfuniyu97mt9y&location=beijing&language=zh-Hans&unit=c")
    Call getWeather();

    @GET("/v3/weather/now.json?key=x4qjfuniyu97mt9y&location=beijing&language=zh-Hans&unit=c")
    Observable getWeatherWithRx();
}
Retrofit 接口创建
public class RetrofitUtil {
    public static  T createApi(@NonNull Class tClass, Gson gson) {
        return new Retrofit.Builder()
                .baseUrl("https://api.thinkpage.cn")
                .client(new OkHttpClient.Builder().build())
                .addConverterFactory(GsonConverterFactory.create(gson))
                .addCallAdapterFactory(RxJavaCallAdapterFactory.create())
                .build()
                .create(tClass);
    }
}
Weather Model申明
public abstract class Weather {

    @SerializedName("results")
    public abstract List results();

    public static TypeAdapter typeAdapter(Gson gson) {
        return new AutoValue_Weather.GsonTypeAdapter(gson);
    }
}
测试用例,注意:Retrofit使用Gson和前面使用Gson使用方式一样,需要自己自定义,不然无法解决json解析问题。
@Test
public void testRetrofitWithAutoValue() {
Gson gson = new GsonBuilder().registerTypeAdapterFactory(MyAdapterFactory.create()).create();
IWeatherApi weatherApi = RetrofitUtil.createApi(IWeatherApi.class, gson);
try {
Weather weather = weatherApi.getWeather().execute().body();
Assert.assertNotNull(weather);
System.out.println(weather);
weatherApi.getWeatherWithRx().subscribe(new Action1() {
@Override
public void call(Weather weather) {
System.out.println(weather);
}
});
} catch (IOException e) {
e.printStackTrace();
}
}
- 1
- 2
- 3
- 4
- 5
- 6
- 7
- 8
- 9
- 10
- 11
- 12
- 13
- 14
- 15
- 16
- 17
- 18
- 19
- 20
- 21
- 22
运行结果,正常的返回天气信息。
Weather{results=[ResultsItem{now=Now{code=31, temperature=9, text=霾}, lastUpdate=2016-12-02T14:15:00+08:00, location=Location{country=CN, path=北京,北京,中国, timezone=Asia/Shanghai, timezoneOffset=+08:00, name=北京, id=WX4FBXXFKE4F}}]}
Weather{results=[ResultsItem{now=Now{code=31, temperature=9, text=霾}, lastUpdate=2016-12-02T14:15:00+08:00, location=Location{country=CN, path=北京,北京,中国, timezone=Asia/Shanghai, timezoneOffset=+08:00, name=北京, id=WX4FBXXFKE4F}}]}
相关插件
RoboPOJOGenerator
GsonFormat是一款Android Studio的插件,它可以把json字符串,转变成Model对象,很多人都喜欢用它。
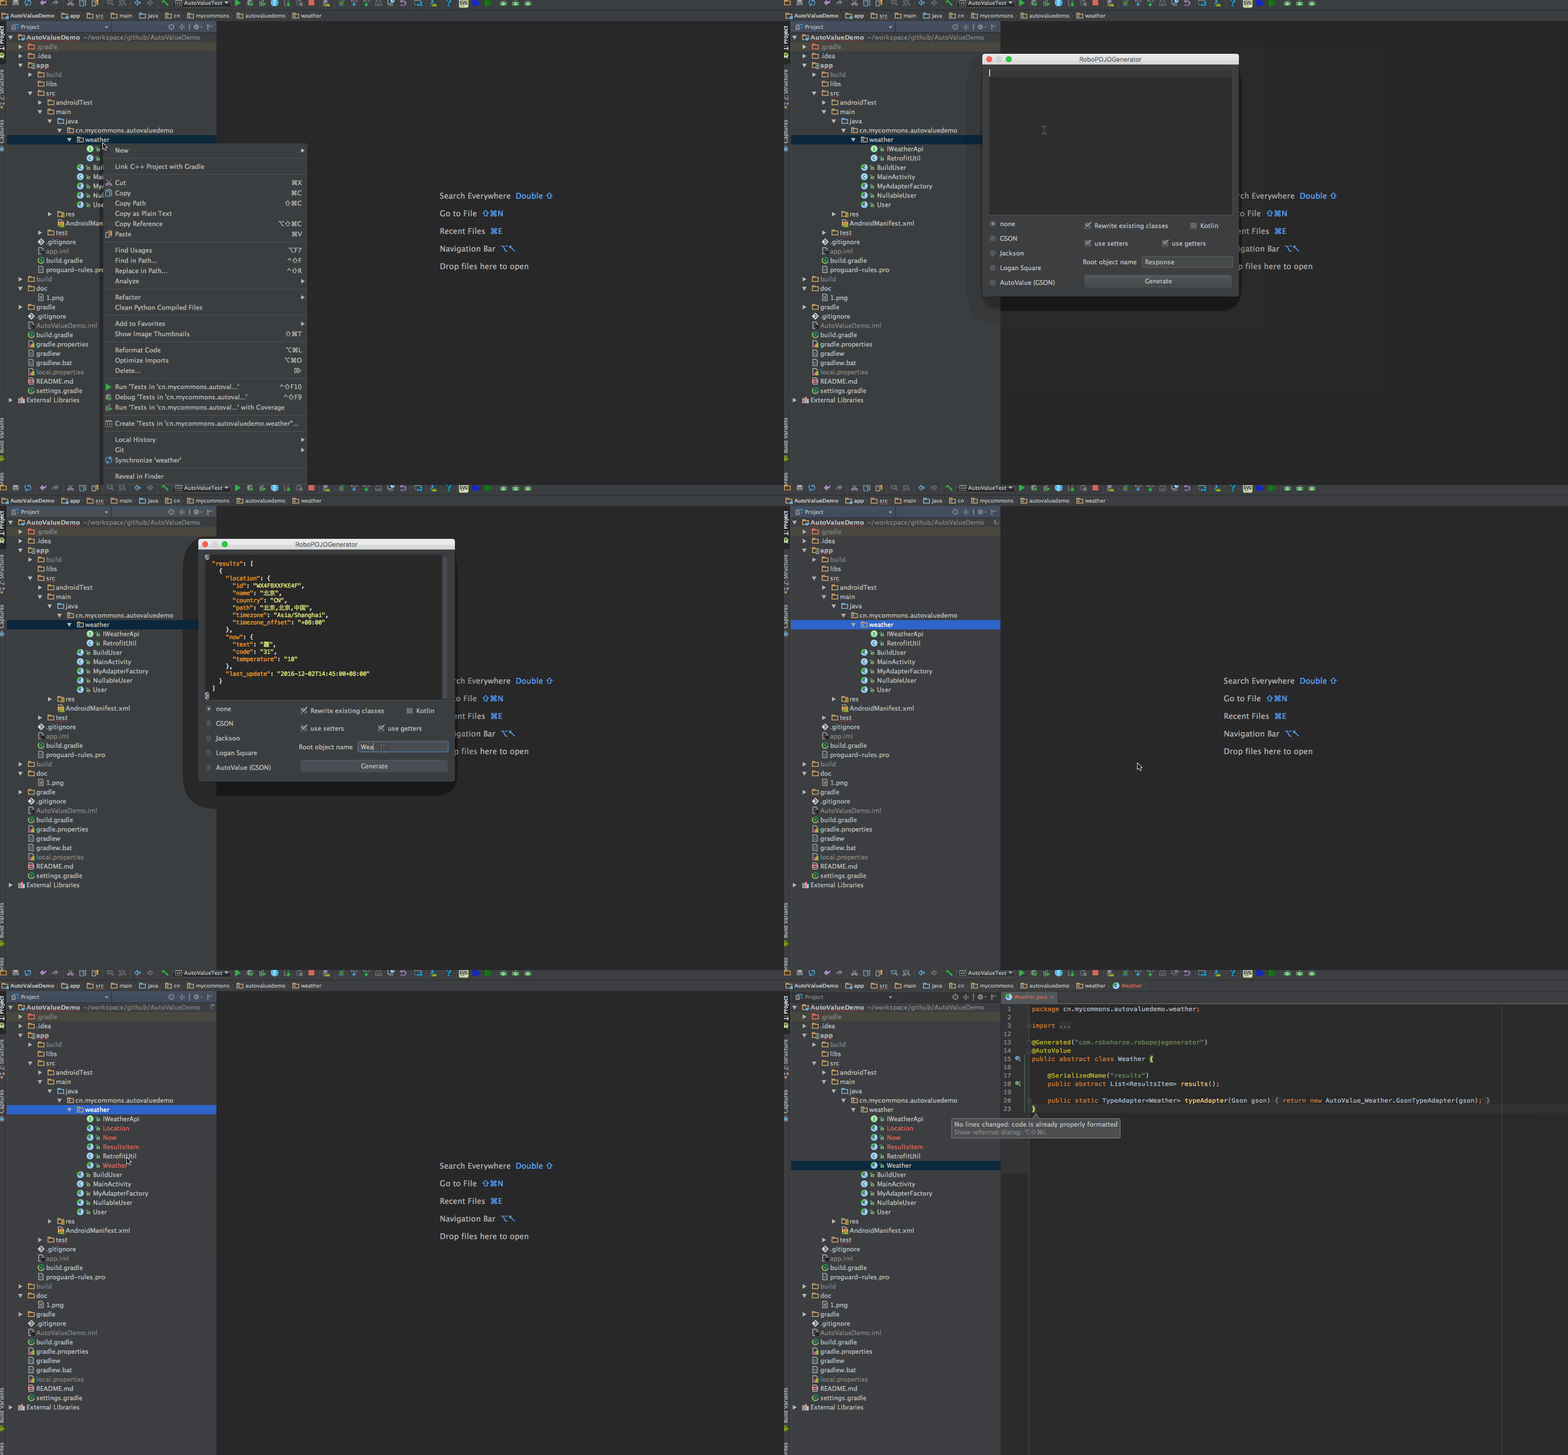
但是如果使用了AutoValue,那么原先的插件就不能使用了,没有关系,本来打算自己高仿GsonFormat重新写了一个插件,以实现我们的需求,后面又发现有一款插件可以实现——RoboPOJOGenerator。
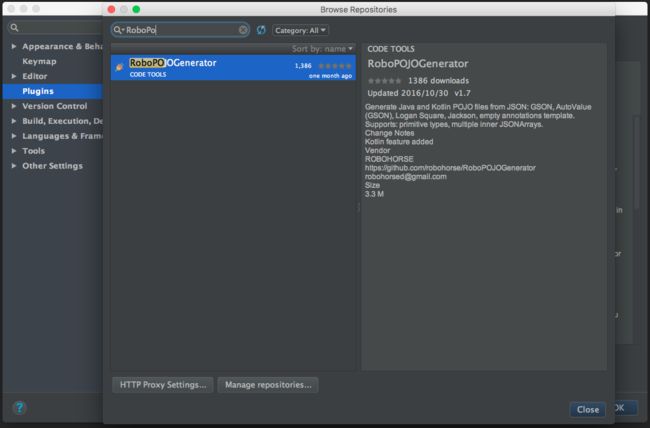
RoboPOJOGenerator使用, RoboPOJOGenerator Github地址
AutoValue plugin
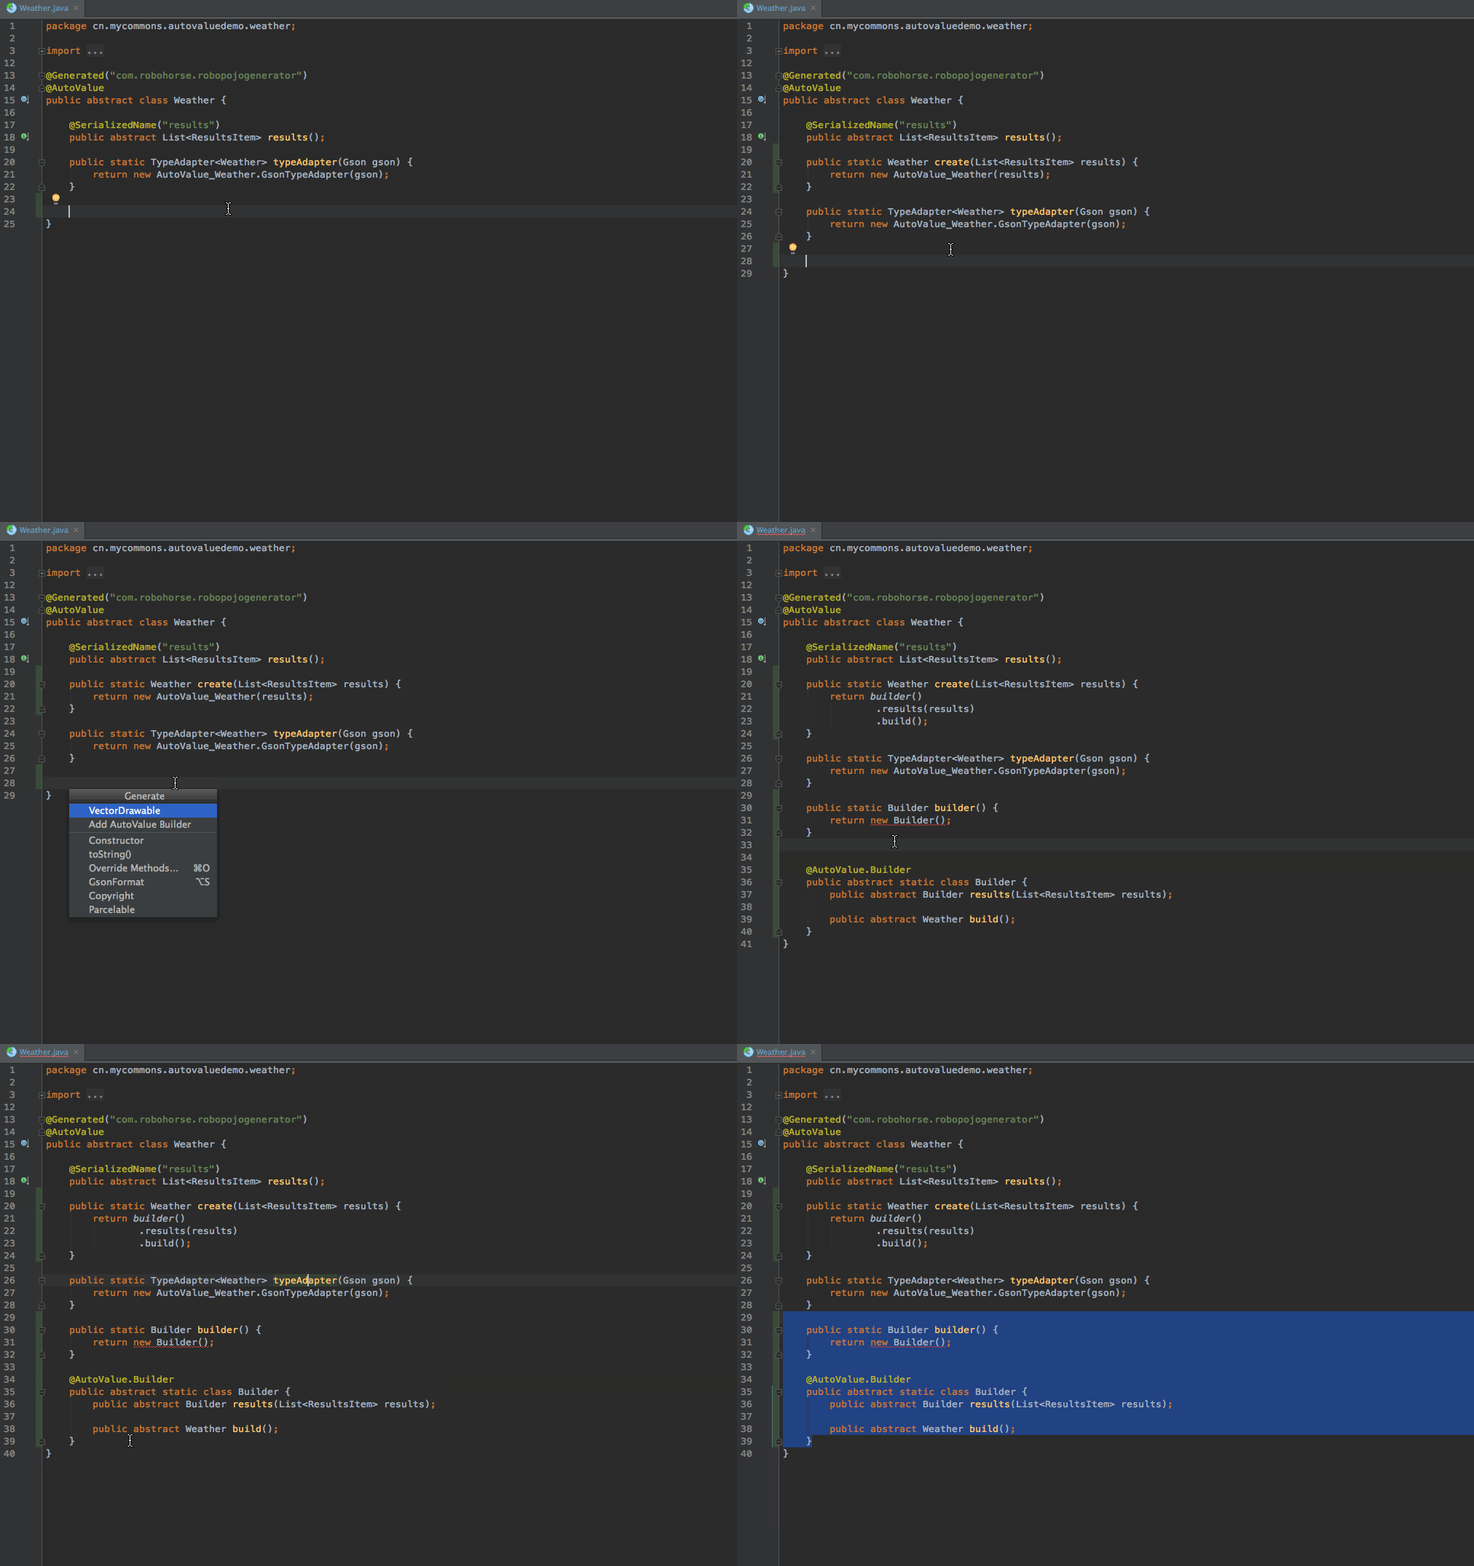
上面我们发现有了json字符串,有时候还要写factory和buildder方法,那么问题来了,没有插件能帮我们实现这个步骤,然代码更加的优雅,开发更加高效?
答案是肯定的,Autovalue plugin就是干这个事的。
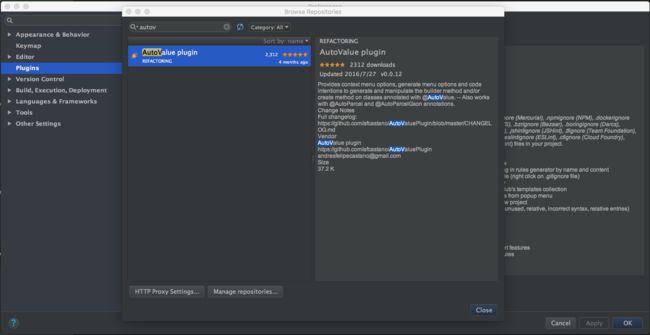
Auto value plugin Github
我们用刚刚上面的Weather做演示,相关演示:
原理介绍
本文重点介绍的AutoValue只是 Google Auto 中的一小部分,Auto中还有其他好玩的。
AutoFactory
AutoFactory和AutoValue类似,可以自动帮助代码生成工厂类,兼容Java 依赖注入标准(JSR-330)。
代码示例
@AutoFactory
public class FactoryUser {

    private final int id;

    private final String name;

    public FactoryUser(int id, String name) {
        this.id = id;
        this.name = name;
    }

    public int getId() {
        return id;
    }

    public String getName() {
        return name;
    }

    @Override
    public String toString() {
        return "FactoryUser{" +
                "id=" + id +
                ", name='" + name + '\'' +
                '}';
    }
}
- 1
- 2
- 3
- 4
- 5
- 6
- 7
- 8
- 9
- 10
- 11
- 12
- 13
- 14
- 15
- 16
- 17
- 18
- 19
- 20
- 21
- 22
- 23
- 24
- 25
- 26
- 27
- 28
生成后的代码
public final class FactoryUserFactory {
  @Inject
  public FactoryUserFactory() {
  }
  public FactoryUser create(int id, String name) {
    return new FactoryUser(id, name);
  }
}
测试代码
    @Test
    public void testFactoryUser() {
        FactoryUser user = new FactoryUserFactory().create(100, "test");

        System.out.println(user);
        Assert.assertNotNull(user);
        Assert.assertEquals(100, user.getId());
        Assert.assertEquals("test", user.getName());
    }
AutoService
AutoService比较简单,就是在使用Java APT的时候,使用AutoService注解,可以自动生成meta信息。
AutoCommon
这个是Google对Java Apt的一个扩展,一般的在自己写Apt的时候,都需要继承AbstractProcessor,但是google对它进行了扩展,BasicAnnotationProcessor,如果你想自己写个工具,那么就可以使用这个了。
给大家举个栗子,Dagger当初是Square公司受到Guice的启发,然后自己开发出一套依赖注入框架,当时Dagger使用的是Java反射,大家知道Java反射的效率其实并不高。
再后来都到了AutoValue的启发,在Dagger的分支上切个新分支,开发出Dagger2,然后这个Dagger2是由Google维护的,我们可以在Dagger2的Github上面找到证据。

Auto相关使用
IntentBuilder
有时候几个Activity之间相互跳转的时候需要传递一些参数,这些参数可以是基本类型,也有可能是复杂的类型,如果是负责的类型,必须要实现Serializable 或 Parcelable接口,上面也有介绍。
下面推IntentBuilder,IntentBuilder也是利用代码生成的方法实现的。
IntentBuilder Github
Activity传参
@IntentBuilder
class DetailActivity extends Activity {
@Extra
String id;
@Extra @Nullable
String title;
@Override
public void onCreate(Bundle savedInstanceState) {
super.onCreate(savedInstanceState);
DetailActivityIntentBuilder.inject(getIntent(), this);
}
}
startActivity(
new DetailActivityIntentBuilder("12345")
.title("MyTitle")
.build(context)
)
- 1
- 2
- 3
- 4
- 5
- 6
- 7
- 8
- 9
- 10
- 11
- 12
- 13
- 14
- 15
- 16
- 17
- 18
- 19
- 20
- 21
- 22
- 23
Service传参
@IntentBuilder
class DownloadService extends IntentService {

    @Extra
    String downloadUrl;

    @Override
    protected void onHandleIntent(Intent intent) {
        MyServiceIntentBuilder.inject(intent, this);
    }

}

startService(new DownloadServiceIntentBuilder("http://google.com").build(context))
- 1
- 2
- 3
- 4
- 5
- 6
- 7
- 8
- 9
- 10
- 11
- 12
- 13
- 14
FragmentArgs
上面介绍了Activity、Service的传参,但Fragment的传参方式是不一样的,还有需要提醒一句一般通过setter方法给Fragment传参是不是正确的方式,必须通过setArgs的方式。
fragmentargs Github
相关代码示例:
@FragmentWithArgs
public class MyFragment extends Fragment {
@Arg
int id;
@Override
public void onCreate(Bundle savedInstanceState) {
super.onCreate(savedInstanceState);
FragmentArgs.inject(this);
}
}
MyFragment fragment = MyFragmentBuilder.newMyFragment(101);
- 1
- 2
- 3
- 4
- 5
- 6
- 7
- 8
- 9
- 10
- 11
- 12
- 13
- 14
其他相关
Kotlin Data Class
Kotlin 是一个基于 JVM 的新的编程语言,由 JetBrains 开发。有机会可以向大家介绍这种语言。
Kotlin 中提供一种类似于AutoValue中的功能,Data Class表示这个类似是一个数据类型。
比如下面是kotlin中对Model的写法,就是这么的简单、明了、优雅。
data class KotlinUser(val id: Int,
                      val name: String)
Kotlin与Java是可以相互调用的。下面是Java的测试用例。
public class UserTest {

    @Test
    public void testUser() {
        KotlinUser user = new KotlinUser(100, "test");

        System.out.println(user);

        Assert.assertEquals(100, user.getId());
        Assert.assertEquals("test", user.getName());
    }
}
- 1
- 2
- 3
- 4
- 5
- 6
- 7
- 8
- 9
- 10
- 11
- 12
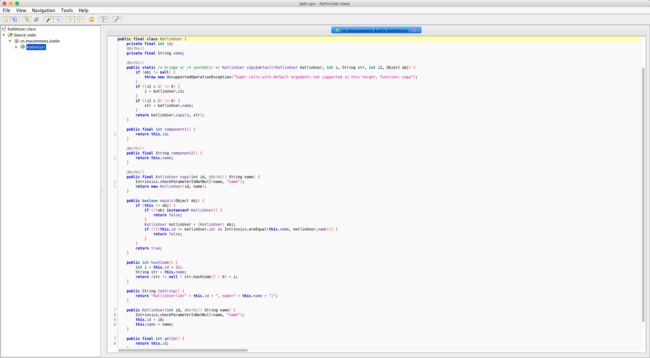
我们可以反编译Kotlin生成的class字节码,看看这个中间到底发生了什么,很明显Kotlin做了很多的语法糖,这里编译器生成的代码和上面Autovalue生成的代码很像。
Object-C
Object-C中可以过直接申明@property方式,然后就可以自动实现setter和getter方法,如果要实现Immutable type方式,需要注明readonly。
hash、equals、description如果使用APPCode,代码是可以自动生成的。
@interface OcUser : NSObject
@property(readonly) int id;
@property(retain, readonly) NSString *name;
- (instancetype)initWithId:(int)id name:(NSString *)name;
- (NSString *)description;
- (BOOL)isEqual:(id)other;
- (BOOL)isEqualToUser:(OcUser *)user;
- (NSUInteger)hash;
@end
#import "OcUser.h"
@implementation OcUser {
}
- (instancetype)initWithId:(int)id name:(NSString *)name {
self = [super init];
if (self) {
_id = id;
_name = name;
}
return self;
}
- (BOOL)isEqual:(id)other {
if (other == self)
return YES;
if (!other || ![[other class] isEqual:[self class]])
return NO;
return [self isEqualToUser:other];
}
- (BOOL)isEqualToUser:(OcUser *)user {
if (self == user)
return YES;
if (user == nil)
return NO;
if (self.id != user.id)
return NO;
return !(self.name != user.name && ![self.name isEqualToString:user.name]);
}
- (NSUInteger)hash {
NSUInteger hash = (NSUInteger) self.id;
hash = hash * 31u + [self.name hash];
return hash;
}
- (NSString *)description {
NSMutableString *description = [NSMutableString stringWithFormat:@"<%@: ", NSStringFromClass([self class])];
[description appendFormat:@"self.id=%i", self.id];
[description appendFormat:@", self.name=%@", self.name];
[description appendString:@">"];
return description;
}
@end
- 1
- 2
- 3
- 4
- 5
- 6
- 7
- 8
- 9
- 10
- 11
- 12
- 13
- 14
- 15
- 16
- 17
- 18
- 19
- 20
- 21
- 22
- 23
- 24
- 25
- 26
- 27
- 28
- 29
- 30
- 31
- 32
- 33
- 34
- 35
- 36
- 37
- 38
- 39
- 40
- 41
- 42
- 43
- 44
- 45
- 46
- 47
- 48
- 49
- 50
- 51
- 52
- 53
- 54
- 55
- 56
- 57
- 58
- 59
- 60
- 61
- 62
- 63
- 64
- 65
- 66
- 67
测试用例
#import
#import "OcUser.h"
int main(int argc, const char *argv[]) {
@autoreleasepool {
OcUser *user = [[OcUser alloc] initWithId:100 name:@"test"];
NSLog(@"user = %@", user);
}
return 0;
}
- 1
- 2
- 3
- 4
- 5
- 6
- 7
- 8
- 9
- 10
- 11
- 12
- 13
- 14
- 15
总结
本文主要介绍了Autovalue的主要用法,以及AutoValu周边只是,可能说的比较多,比较杂,而且有的地方也不够深入,但是个人觉的这是一种思路,一种解决方案,后面如果自己需要造轮子的时候,我们是可以借鉴的。
本示例代码地址 AutoValueDemo
参考连接
AutoValueDemo
完美Model之AutoValue使用
完美的安卓 model 层架构(上)
完美的安卓 model 层架构(下)
AutoValue Github
Java Immutable 介绍
Auto value gson Github
Auto value parcel Github
RoboPOJOGenerator Github
Auto value plugin Github
IntentBuilder Github
Fragmentargs Github


