django-simple-sso, django-auth-ldap, python-ldap 单点登录(二)
二、django-auth-ldap的使用
-
openLdap在windows7-64bit下的安装,简单,一键安装。之后建议学下django-auth-ldap配置和ldap基础条目知识
安装教程:https://blog.csdn.net/heyitian/article/details/53508663
下载链接:https://pan.baidu.com/s/110fb7RG942lqmxqrbeYMMg
提取码:8izi -
安装成功,添加测试数据,查看,大概长这样:
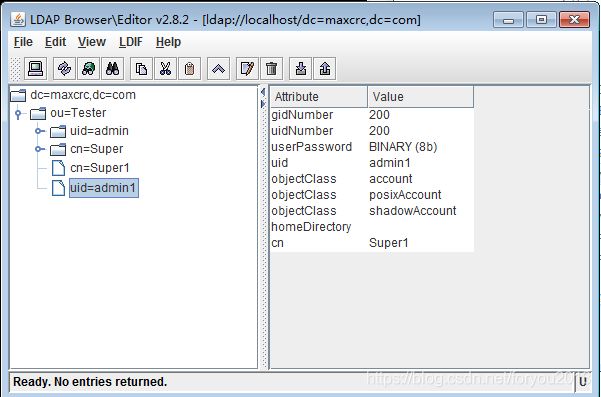
-
python环境中安装好django-auth-ldap和python-ldap
-
在前一帖子中SSO1的settings.py文件中配置LDAP
服务器地址、条目的配置按实际的来,配置好其实就能用了,没有其他什么操作
# ldap config
import ldap
from django_auth_ldap.config import \
    LDAPSearch,GroupOfNamesType,OrganizationalRoleGroupType,PosixGroupType,LDAPGroupType,LDAPGroupQuery
AUTHENTICATION_BACKENDS = [
    'django_auth_ldap.backend.LDAPBackend',
    'django.contrib.auth.backends.ModelBackend',
]
AUTH_LDAP_SERVER_URI = "ldap://localhost:389"
AUTH_LDAP_BIND_DN = "cn=Manager,dc=maxcrc,dc=com"
AUTH_LDAP_BIND_PASSWORD = "secret"
AUTH_LDAP_USER_SEARCH = LDAPSearch("cn=Super,ou=Tester,dc=maxcrc,dc=com",
                                   ldap.SCOPE_SUBTREE,
                                   "(uid=%(user)s)")
AUTH_LDAP_USER_ATTR_MAP={
    "username": "uid",
    "last_name": "sn", #sure name
    "first_name": "cn",#common name
}
AUTH_LDAP_ALWAYS_UPDATE_USER = True

AUTH_LDAP_GROUP_SEARCH = LDAPSearch("ou=Tester,dc=maxcrc,dc=com",
                                   ldap.SCOPE_SUBTREE,
                                   "(objectClass=posixGroup)")
AUTH_LDAP_GROUP_TYPE = PosixGroupType(name_attr="cn")
AUTH_LDAP_USER_FLAGS_BY_GROUP = {
    "is_staff": LDAPGroupQuery("cn=Super,ou=Tester,dc=maxcrc,dc=com"),
    "is_superuser": "cn=Super,ou=Tester,dc=maxcrc,dc=com",
    "is_active": "cn=Super,ou=Tester,dc=maxcrc,dc=com",
}

#AUTH_LDAP_REQUIRE_GROUP = "cn=Super,ou=Tester,dc=maxcrc,dc=com"

#AUTH_LDAP_MIRROR_GROUPS = True
AUTH_LDAP_FIND_GROUP_PERMS = True
AUTH_LDAP_CACHE_GROUPS = True
AUTH_LDAP_CACHE_TIMEOUT = 600

AUTH_LDAP_CONNECTION_OPTIONS = {
    ldap.OPT_DEBUG_LEVEL: 1,
    ldap.OPT_REFERRALS:0,
}

# ldap config END
- 这样配置后,django就可以使用ldap中的用户登录了
- 让项目的后台登录也使用LDAP中的用户
# ldap config
import ldap
from django_auth_ldap.config import \
    LDAPSearch,GroupOfNamesType,OrganizationalRoleGroupType,PosixGroupType,LDAPGroupType
AUTHENTICATION_BACKENDS = [
    'django_auth_ldap.backend.LDAPBackend',
    'django.contrib.auth.backends.ModelBackend',
]
AUTH_LDAP_SERVER_URI = "ldap://localhost:389"
AUTH_LDAP_BIND_DN = "cn=Manager,dc=maxcrc,dc=com"
AUTH_LDAP_BIND_PASSWORD = "secret"
AUTH_LDAP_USER_SEARCH = LDAPSearch("cn=Super,ou=Tester,dc=maxcrc,dc=com",
                                   ldap.SCOPE_SUBTREE,
                                   "(uid=%(user)s)")
AUTH_LDAP_USER_ATTR_MAP={
    "username":"uid",
    "last_name":"sn", #sure name
    "first_name":"cn",#common name
}
AUTH_LDAP_ALWAYS_UPDATE_USER = True

AUTH_LDAP_GROUP_SEARCH = LDAPSearch("ou=Tester,dc=maxcrc,dc=com",
                                   ldap.SCOPE_SUBTREE,
                                   "(objectClass=posixGroup)")
AUTH_LDAP_GROUP_TYPE = PosixGroupType(name_attr="cn")
AUTH_LDAP_USER_FLAGS_BY_GROUP = {
    "is_staff": "cn=Super,ou=Tester,dc=maxcrc,dc=com",
    "is_superuser": "cn=Super,ou=Tester,dc=maxcrc,dc=com",
    "is_active": "cn=Super,ou=Tester,dc=maxcrc,dc=com",
}
# AUTH_LDAP_REQUIRE_GROUP = "cn=Super,ou=Tester,dc=maxcrc,dc=com"

#AUTH_LDAP_MIRROR_GROUPS = False
AUTH_LDAP_FIND_GROUP_PERMS = True
AUTH_LDAP_CACHE_GROUPS = True
AUTH_LDAP_CACHE_TIMEOUT = 600

AUTH_LDAP_CONNECTION_OPTIONS = {
    ldap.OPT_DEBUG_LEVEL: 1,
    ldap.OPT_REFERRALS:0,
}

# ldap config END
8.LDAP的 用户增删查改,用python-ldap
网上例子很多,找一个看下就理解了。