mysql主从搭建-Linux版(配置环境)
一 前言
前面已经在主服务器和从服务器上成功安装了mysql(具体步骤可以查看http://blog.csdn.net/sgmcumt/article/details/79129535)。下面开始配置主从服务器的环境。
二 配置master服务器
2.1 修改my.cnf文件
打开master服务器的my.cnf文件
[root@mysqlmaster mysql]# vim /etc/my.cnf
在[mysqld]下面插入以下内容:
server-id=1 #MySQL服务器的唯一标识,默认值为 1,一般采用所属 IP 的末端值
log-bin=master-bin-log # 二进制日志文件名字,MySQL 主服务器必须启用此配置,slave会基于此log-bin来做replication
read-only=0  #主机读写都可以
2.2 重启mysql服务
[root@mysqlmaster mysql]# service mysqld restart
Redirecting to /bin/systemctl restart mysqld.service
[root@mysqlmaster mysql]#
2.3 创建用户
登录mysql数据库
[root@mysqlmaster mysql]# mysql -uroot -p
Enter password:
Welcome to the MySQL monitor.  Commands end with ; or \g.
创建同步帐号
语法:
grant [权限] on [数据库名].[表名] to ['用户名']@['web服务器的ip地址'] identified by ['密码'];
mysql> GRANT REPLICATION SLAVE ON *.* to 'testsyn'@'%' identified by '123456';
或者指定IP地址
GRANT REPLICATION SLAVE ON *.* to 'testsyn'@'192.168.239.141' identified by '123456';
192.168.239.141:是运行使用该用户的ip地址,从数据库IP
testsyn:是新创建的用户名
123456:是新创建的用户名的密码
查看master状态
mysql>show master status;

记录下file和position(master-bin-log.0000002,154)
三 配置slave服务器
3.1 修改my.cnf文件
打开slave服务器的my.cnf文件
[root@mysqlslave mysql]# vim /etc/my.cnf
在[mysqld]下面插入以下内容:
server-id=2 #MySQL服务器的唯一标识
3.2 重启mysql服务
[root@phoenixslave1 mysql]# service mysqld restart
3.3 配置同步
登录mysql数据库
[root@mysqlslave ~]# mysql -uroot -p
Enter password:
Welcome to the MySQL monitor.  Commands end with ; or \g.
通过mysql命令配置同步日志
mysql> change master to master_host='192.168.239.140',master_port=3306,master_user='testsyn',master_password='123456',master_log_file='master-bin-log.000002',master_log_pos=154;
Query OK, 0 rows affected, 2 warnings (0.03 sec)
注释:
master_host 主服务器的IP地址
master_port 主服务器的PORT端口
master_log_file 和主服务器show master status中的File字段值相同
master_log_pos 和主服务器show master status中的Position字段值相同
3.4 查看slave状态
mysql> start slave;
Query OK, 0 rows affected (0.00 sec)
mysql> show slave status\G;
注释:
G必须是大写。
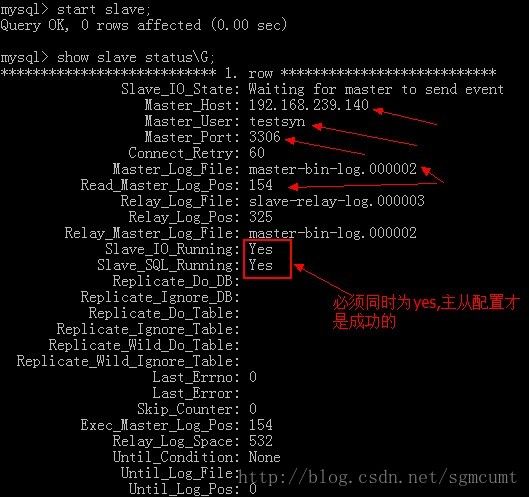
如图 Slave_IO_Running和Slave_SQL_Running同时为yes,代表主从搭建成功。

四 验证
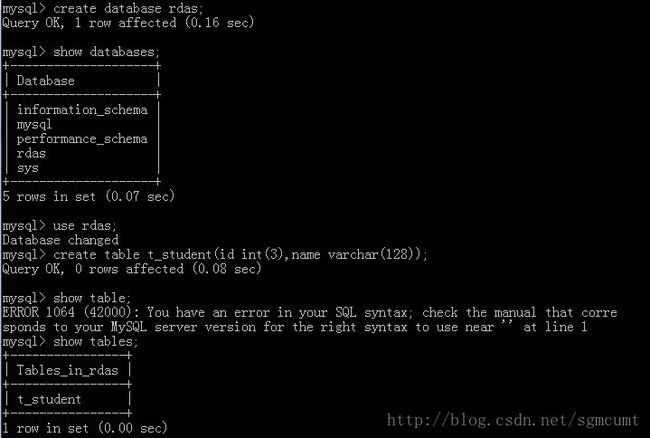
在主库上创建rdas数据库,和t_student表,如图

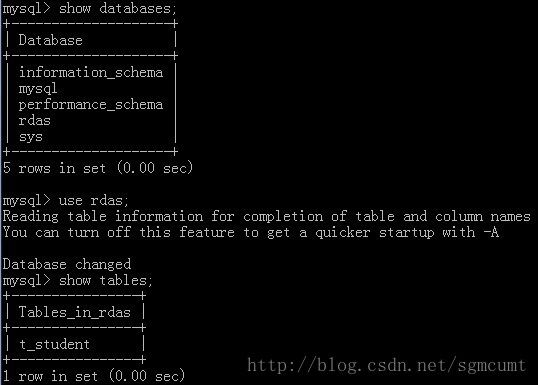
在从库上查看

主库上创建的数据库和表同步到从库中,环境搭建成功!