MPICH 3.2.1 & Boost 1.68.0编译安装
!!!参考了好多博客自己尝试了好多天程序终于跑通了特此总结,其他版本编译安装步骤应该一样,仅供参考
0 准备工作
安装前输入下面代码确认是否安装gcc,g++,gfotran,python 2.x(python 2.2 以上的版本都可以)
$ sudo apt-get install gcc
$ sudo apt-get install g++
$ sudo apt-get install gfortran
$ sudo apt-get install python
1 编译安装MPICH
# 下载安装包
$ wget http://www.mpich.org/static/downloads/3.2.1/mpich-3.2.1.tar.gz
# 解压
$ tar zxvf mpich-3.2.1.tar.gz
# 进入文件夹
$ cd mpich-3.2.1
# 编译 安装
$ mkdir /home/liu/mpich
$ ./configure --prefix=/home/liu/mpich( = 后面是文件安装路径)
$ make
$ make install
# 环境变量配置
$ sudo gedit ~/.bashrc
# 在文件末尾补上下面这句话
export PATH=/home/liu/mpich/bin:$PATH
# 保存退出后,再更新配置文件使其生效
$ source ~/.bashrc
# 检验是否安装成功
$ cd /home/liu/mpich-3.2.1/examples
$ mpirun -np 2 ./cpi

参考博客:
https://blog.csdn.net/sinat_30967935/article/details/82988659
http://blog.chinaunix.net/uid-29530577-id-4141020.html
2 编译 安装 Boost
卸载之前的安装
$ sudo apt --purge remove libboost-dev
$ sudo apt --purge remove libboost-all-dev
$ sudo apt --purge autoremove libboost-all-dev
$ sudo rm -rf /usr/lib/libboost_*
$ sudo rm -rf /usr/include/boost
下载安装依赖文件
$ apt-get install mpi-default-dev  #安装mpi库
$ apt-get install libicu-dev     #支持正则表达式的UNICODE字符集
$ apt-get install python-dev     #需要python的话
$ apt-get install libbz2-dev
# 下载
$ wget https://dl.bintray.com/boostorg/release/1.68.0/source/boost_1_68_0.tar.gz
# 解压
$ tar -xzvf boost_1_68_0.tar.gz
$ cd boost_1_68_0
$ ./bootstrap.sh
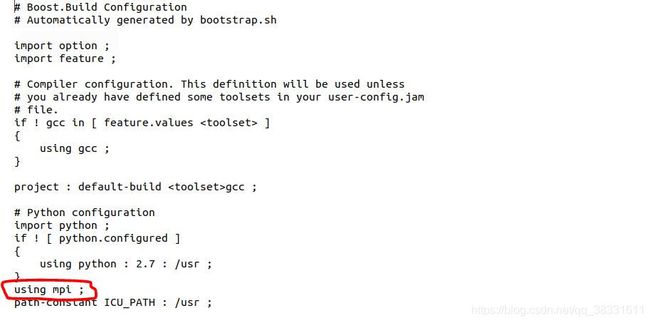
# 重点!!!!修改 project-config.jam 文件,在第22行后添加一句: using mpi ; 如下图所示,注意添加位置,以及 mpi 和 ; 之间需要一个空格。
$ sudo gedit project-config.jam
# 执行
$  ./b2
$  sudo ./b2  install
# 添加boost lib路径到默认搜索路径
$  sudo /bin/bash -c 'echo "/usr/local/lib" > /etc/ld.so.conf.d/boost.conf'
# 更新搜索路径
$ sudo ldconfig
测试
// test.cpp
#include
#include
#include

using namespace std;
int main(){
  boost::array arr = {
    {1,2,3,4}};
  cout << "hi" << arr[0] << endl;
  cout << "BOOST VERSION: " << BOOST_LIB_VERSION << endl;
  return 0;
}
$ g++ test.cpp -o test
$ ./test
再在自己的程序上测试就可以啦
我的项目测试
$ cd /home/liu/MPIK-Means/test
$ mpic++ -o mpitest mpitest.cpp -L/usr/local/lib -lboost_mpi -lboost_serialization
$ mpirun -np 3 ./mpitest
若结果如下,有三个Process则证明安装成功!
Process 1: a msg from master

Process 2: a msg from master

Process 2:
Process 1:
Process 0: zero one two
Process 0: zero one two
Process 1: zero one two
Process 2: zero one two
参考博客:
https://blog.csdn.net/huigougou/article/details/84351578
https://blog.csdn.net/hzrandd/article/details/22989187
