飞桨:Python小白逆袭大神
飞桨:Python小白逆袭大神
-
Day1-Python基础练习
-
Day2-《青春有你2》选手信息爬取
-
Day3-《青春有你2》选手数据分析
-
Day4-《青春有你2》选手识别
-
Day5-综合大作业
Day1-Python基础练习
作业一:输出 9*9 乘法口诀表(注意格式)
注意:提交作业时要有代码执行输出结果。
def table():
    #在这里写下您的乘法口诀表代码吧!
    for i in range(1, 10):
        for j in range(1, i+1):
            print('{}*{}={}'.format(j, i, i * j), end='\t')
        print()

if __name__ == '__main__':
    table()
1*1=1 1*2=2 2*2=4 1*3=3 2*3=6 3*3=9 1*4=4 2*4=8 3*4=12 4*4=16 1*5=5 2*5=10 3*5=15 4*5=20 5*5=25 1*6=6 2*6=12 3*6=18 4*6=24 5*6=30 6*6=36 1*7=7 2*7=14 3*7=21 4*7=28 5*7=35 6*7=42 7*7=49 1*8=8 2*8=16 3*8=24 4*8=32 5*8=40 6*8=48 7*8=56 8*8=64 1*9=9 2*9=18 3*9=27 4*9=36 5*9=45 6*9=54 7*9=63 8*9=72 9*9=81
作业二:查找特定名称文件
遍历”Day1-homework”目录下文件;
找到文件名包含“2020”的文件;
将文件名保存到数组result中;
按照序号、文件名分行打印输出。
注意:提交作业时要有代码执行输出结果。
#导入OS模块
import os
#待搜索的目录路径
path = "Day1-homework"
#待搜索的名称
filename = "2020"
#定义保存结果的数组
result = []

def findfiles():
    #在这里写下您的查找文件代码吧!
    count = 0
    for root,dirs,files in os.walk(path):
        for f in files:
            if filename in f:
                count = count + 1
                result.append([count,'{}'.format(os.path.join(root,f))])
    for i in range(len(result)):
        print(result[i])

if __name__ == '__main__':
    findfiles()
[1, 'Day1-homework/4/22/04:22:2020.txt'] [2, 'Day1-homework/18/182020.doc'] [3, 'Day1-homework/26/26/new2020.txt']
Day2-《青春有你2》选手信息爬取
上网的全过程:
普通用户:

打开浏览器 --> 往目标站点发送请求 --> 接收响应数据 --> 渲染到页面上。

爬虫程序:

模拟浏览器 --> 往目标站点发送请求 --> 接收响应数据 --> 提取有用的数据 --> 保存到本地/数据库。
爬虫的过程:
1.发送请求(requests模块)

2.获取响应数据(服务器返回)

3.解析并提取数据(BeautifulSoup查找或者re正则)

4.保存数据
本实践中将会使用以下两个模块,首先对这两个模块简单了解以下:
request模块:
requests是python实现的简单易用的HTTP库,官网地址:http://cn.python-requests.org/zh_CN/latest/

requests.get(url)可以发送一个http get请求,返回服务器响应内容。
BeautifulSoup库:
BeautifulSoup 是一个可以从HTML或XML文件中提取数据的Python库。网址:https://beautifulsoup.readthedocs.io/zh_CN/v4.4.0/

BeautifulSoup支持Python标准库中的HTML解析器,还支持一些第三方的解析器,其中一个是 lxml。

BeautifulSoup(markup, "html.parser")或者BeautifulSoup(markup, "lxml"),推荐使用lxml作为解析器,因为效率更高。
一、爬取百度百科中《青春有你2》中所有参赛选手信息,返回页面数据
import json
import re
import requests
import datetime
from bs4 import BeautifulSoup
import os
#获取当天的日期,并进行格式化,用于后面文件命名,格式:20200420
today = datetime.date.today().strftime('%Y%m%d')
def crawl_wiki_data():
"""
爬取百度百科中《青春有你2》中参赛选手信息,返回html
"""
headers = {
'User-Agent': 'Mozilla/5.0 (Windows NT 10.0; WOW64) AppleWebKit/537.36 (KHTML, like Gecko) Chrome/67.0.3396.99 Safari/537.36'
}
url='https://baike.baidu.com/item/青春有你第二季'
try:
response = requests.get(url,headers=headers)
print(response.status_code)
#将一段文档传入BeautifulSoup的构造方法,就能得到一个文档的对象, 可以传入一段字符串
soup = BeautifulSoup(response.text,'lxml')
#返回的是class为table-view log-set-param的所有标签
tables = soup.find_all('table',{'class':'table-view log-set-param'})
crawl_table_title = "参赛学员"
for table in tables:
#对当前节点前面的标签和字符串进行查找
table_titles = table.find_previous('div').find_all('h3')
for title in table_titles:
if(crawl_table_title in title):
return table
except Exception as e:
print(e)
二、对爬取的页面数据进行解析,并保存为JSON文件
def parse_wiki_data(table_html):
'''
从百度百科返回的html中解析得到选手信息,以当前日期作为文件名,存JSON文件,保存到work目录下
'''
bs = BeautifulSoup(str(table_html),'lxml')
all_trs = bs.find_all('tr')
error_list = ['\'','\"']
stars = []
for tr in all_trs[1:]:
all_tds = tr.find_all('td')
star = {}
#姓名
star["name"]=all_tds[0].text
#个人百度百科链接
star["link"]= 'https://baike.baidu.com' + all_tds[0].find('a').get('href')
#籍贯
star["zone"]=all_tds[1].text
#星座
star["constellation"]=all_tds[2].text
#身高
star["height"]=all_tds[3].text
#体重
star["weight"]= all_tds[4].text
#花语,去除掉花语中的单引号或双引号
flower_word = all_tds[5].text
for c in flower_word:
if c in error_list:
flower_word=flower_word.replace(c,'')
star["flower_word"]=flower_word
#公司
if not all_tds[6].find('a') is None:
star["company"]= all_tds[6].find('a').text
else:
star["company"]= all_tds[6].text
stars.append(star)
json_data = json.loads(str(stars).replace("\'","\""))
with open('work/' + today + '.json', 'w', encoding='UTF-8') as f:
json.dump(json_data, f, ensure_ascii=False)
三、爬取每个选手的百度百科图片,并进行保存
def crawl_pic_urls():
'''
爬取每个选手的百度百科图片,并保存
'''
with open('work/'+ today + '.json', 'r', encoding='UTF-8') as file:
json_array = json.loads(file.read())
headers = {
'User-Agent': 'Mozilla/5.0 (Windows NT 10.0; WOW64) AppleWebKit/537.36 (KHTML, like Gecko) Chrome/67.0.3396.99 Safari/537.36'
}
for star in json_array:
name = star['name']
link = star['link']
#!!!请在以下完成对每个选手图片的爬取,将所有图片url存储在一个列表pic_urls中!!!
r = requests.get(link, headers= headers)#获取每个页面的信息
soup = BeautifulSoup(r.text, 'lxml')#解析页面
migs = soup.find_all('div', class_='summary-pic')
migs = migs[0].a.get('href')
if 'http' not in migs:
url = f'http://baike.baidu.com{migs}'
photo_r = requests.get(url, headers= headers)
img_content = BeautifulSoup(photo_r.text, 'lxml')
imgs = img_content.select('.pic-list img ')
pic_urls = []
for img in imgs:
pic = img.get('src')
pic_urls.append(pic)
# #!!!根据图片链接列表pic_urls, 下载所有图片,保存在以name命名的文件夹中!!!
down_pic(name,pic_urls)
def down_pic(name,pic_urls):
'''
根据图片链接列表pic_urls, 下载所有图片,保存在以name命名的文件夹中,
'''
path = 'work/'+'pics/'+name+'/'
if not os.path.exists(path):
os.makedirs(path)
for i, pic_url in enumerate(pic_urls):
try:
pic = requests.get(pic_url, timeout=15)
string = str(i + 1) + '.jpg'
with open(path+string, 'wb') as f:
f.write(pic.content)
print('成功下载第%s张图片: %s' % (str(i + 1), str(pic_url)))
except Exception as e:
print('下载第%s张图片时失败: %s' % (str(i + 1), str(pic_url)))
print(e)
continue
四、打印爬取的所有图片的路径
def show_pic_path(path):
'''
遍历所爬取的每张图片,并打印所有图片的绝对路径
'''
pic_num = 0
for (dirpath,dirnames,filenames) in os.walk(path):
for filename in filenames:
pic_num += 1
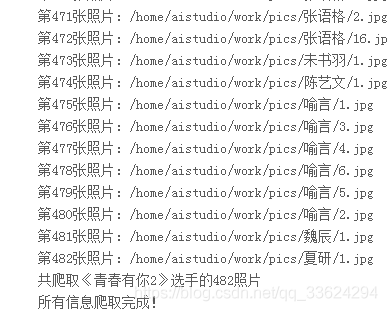
print("第%d张照片:%s" % (pic_num,os.path.join(dirpath,filename)))
print("共爬取《青春有你2》选手的%d照片" % pic_num)
if __name__ == '__main__':
#爬取百度百科中《青春有你2》中参赛选手信息,返回html
html = crawl_wiki_data()
#解析html,得到选手信息,保存为json文件
parse_wiki_data(html)
#从每个选手的百度百科页面上爬取图片,并保存
crawl_pic_urls()
# #打印所爬取的选手图片路径
show_pic_path('/home/aistudio/work/pics/')
print("所有信息爬取完成!")
Day3-《青春有你2》选手数据分析
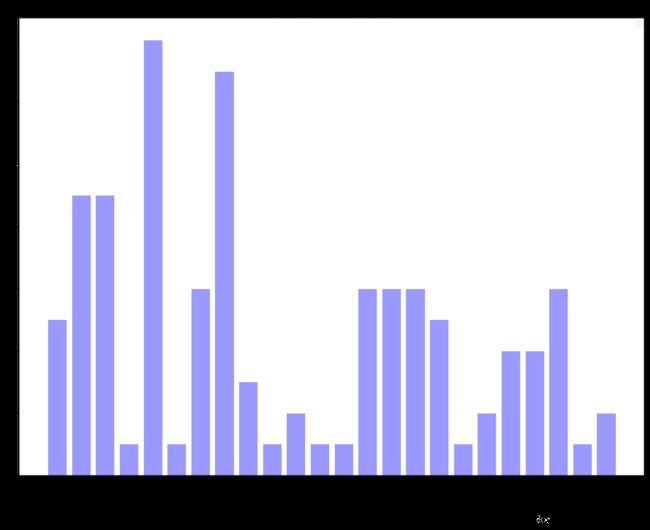
绘制选手区域分布柱状图
import matplotlib.pyplot as plt
import numpy as np
import json
import matplotlib.font_manager as font_manager
#显示matplotlib生成的图形
%matplotlib inline
with open('data/data31557/20200422.json', 'r', encoding='UTF-8') as file:
json_array = json.loads(file.read())
#绘制小姐姐区域分布柱状图,x轴为地区,y轴为该区域的小姐姐数量
zones = []
for star in json_array:
zone = star['zone']
zones.append(zone)
print(len(zones))
print(zones)
zone_list = []
count_list = []
for zone in zones:
if zone not in zone_list:
count = zones.count(zone)
zone_list.append(zone)
count_list.append(count)
print(zone_list)
print(count_list)
# 设置显示中文
plt.rcParams['font.sans-serif'] = ['SimHei'] # 指定默认字体
plt.figure(figsize=(20,15))
plt.bar(range(len(count_list)), count_list,color='r',tick_label=zone_list,facecolor='#9999ff',edgecolor='white')
# 这里是调节横坐标的倾斜度,rotation是度数,以及设置刻度字体大小
plt.xticks(rotation=45,fontsize=20)
plt.yticks(fontsize=20)
plt.legend()
plt.title('''《青春有你2》参赛选手''',fontsize = 24)
plt.savefig('/home/aistudio/work/result/bar_result.jpg')
plt.show()
109
['中国湖北', '中国四川', '中国山东', '中国浙江', '中国山东', '中国台湾', '中国陕西', '中国广东', '中国黑龙江', '中国上海', '中国四川', '中国山东', '中国安徽', '中国安徽', '中国安徽', '中国北京', '中国贵州', '中国吉林', '中国四川', '中国四川', '中国江苏', '中国山东', '中国山东', '中国山东', '中国山东', '中国江苏', '中国四川', '中国山东', '中国山东', '中国广东', '中国浙江', '中国河南', '中国安徽', '中国河南', '中国北京', '中国北京', '马来西亚', '中国湖北', '中国四川', '中国天津', '中国黑龙江', '中国四川', '中国陕西', '中国辽宁', '中国湖南', '中国上海', '中国贵州', '中国山东', '中国湖北', '中国黑龙江', '中国黑龙江', '中国上海', '中国浙江', '中国湖南', '中国台湾', '中国台湾', '中国台湾', '中国台湾', '中国山东', '中国北京', '中国北京', '中国浙江', '中国河南', '中国河南', '中国福建', '中国河南', '中国北京', '中国山东', '中国四川', '中国安徽', '中国河南', '中国四川', '中国湖北', '中国四川', '中国陕西', '中国湖南', '中国四川', '中国台湾', '中国湖北', '中国广西', '中国江西', '中国湖南', '中国湖北', '中国北京', '中国陕西', '中国上海', '中国四川', '中国山东', '中国辽宁', '中国辽宁', '中国台湾', '中国浙江', '中国北京', '中国黑龙江', '中国北京', '中国安徽', '中国河北', '马来西亚', '中国四川', '中国湖南', '中国台湾', '中国广东', '中国上海', '中国四川', '日本', '中国辽宁', '中国黑龙江', '中国浙江', '中国台湾']
['中国湖北', '中国四川', '中国山东', '中国浙江', '中国台湾', '中国陕西', '中国广东', '中国黑龙江', '中国上海', '中国安徽', '中国北京', '中国贵州', '中国吉林', '中国江苏', '中国河南', '马来西亚', '中国天津', '中国辽宁', '中国湖南', '中国福建', '中国广西', '中国江西', '中国河北', '日本']
[6, 14, 13, 6, 9, 4, 3, 6, 5, 6, 9, 2, 1, 2, 6, 2, 1, 4, 5, 1, 1, 1, 1, 1]
import matplotlib.pyplot as plt
import numpy as np
import json
import matplotlib.font_manager as font_manager
import pandas as pd
#显示matplotlib生成的图形
%matplotlib inline
df = pd.read_json('data/data31557/20200422.json')
#print(df)
grouped=df['name'].groupby(df['zone'])
s = grouped.count()
zone_list = s.index
count_list = s.values
# 设置显示中文
plt.rcParams['font.sans-serif'] = ['SimHei'] # 指定默认字体
plt.figure(figsize=(20,15))
plt.bar(range(len(count_list)), count_list,color='r',tick_label=zone_list,facecolor='#9999ff',edgecolor='white')
# 这里是调节横坐标的倾斜度,rotation是度数,以及设置刻度字体大小
plt.xticks(rotation=45,fontsize=20)
plt.yticks(fontsize=20)
plt.legend()
plt.title('''《青春有你2》参赛选手''',fontsize = 24)
plt.savefig('/home/aistudio/work/result/bar_result02.jpg')
plt.show()
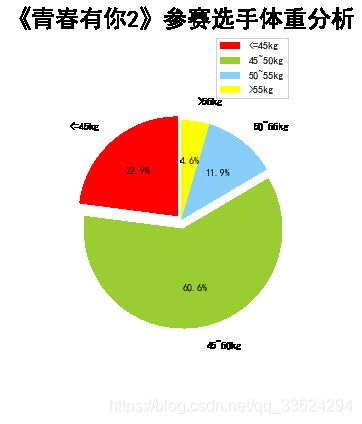
对选手体重分布进行可视化,绘制饼状图
import matplotlib.pyplot as plt
import numpy as np
import json
import matplotlib.font_manager as font_manager
#显示matplotlib生成的图形
%matplotlib inline
with open('data/data31557/20200422.json', 'r', encoding='UTF-8') as file:
json_array = json.loads(file.read())
#绘制小姐姐区域分布柱状图,x轴为地区,y轴为该区域的小姐姐数量
w = []
for star in json_array:
star_w = star['weight']
w.append(star_w)
w_list = []
count_list = np.zeros(4)
count_weight = np.zeros(4)
for weight in w:
if weight not in w_list:
weight = float(weight[:-2])
if weight <= 45:
count_list[0]+= 1
if weight > 45 and weight <= 50:
count_list[1]+= 1
if weight > 50 and weight <= 55:
count_list[2]+= 1
if weight > 55:
count_list[3]+= 1
for i in range(len(count_list)):
count_weight[i] = count_list[i] / sum(count_list)
# 设置显示中文
plt.rcParams['font.sans-serif'] = ['SimHei'] # 指定默认字体
plt.figure(figsize=(4,7))
label_weight = ['<=45kg','45~50kg','50~55kg','>55kg']
sizes = count_weight
colors = ['red','yellowgreen','lightskyblue','yellow'] #每块颜色定义
explode = (0.05,0.1,0,0) #将某一块分割出来,值越大分割出的间隙越大
plt.pie(sizes,
explode=explode,
labels=label_weight,
colors=colors,
labeldistance = 1.2,#图例距圆心半径倍距离
autopct = '%2.1f%%', #数值保留固定小数位
shadow = False, #无阴影设置
startangle =90, #逆时针起始角度设置
pctdistance = 0.6) #数值距圆心半径倍数距离
plt.axis('equal')
plt.title('''《青春有你2》参赛选手体重分析''',fontsize = 24)
plt.legend()
plt.savefig('/home/aistudio/work/result/pie_weight_result.jpg')
plt.show()
Day4-《青春有你2》选手识别
train_list.txt
anqi/3.jpg 0
anqi/43.jpg 0
anqi/11.png 0
anqi/0.jpg 0
anqi/10.png 0
anqi/9.jpg 0
anqi/8.jpg 0
wangchengxuan/39.jpg 1
wangchengxuan/38.jpg 1
wangchengxuan/41.jpg 1
wangchengxuan/40.jpg 1
wangchengxuan/17.jpg 1
wangchengxuan/16.jpg 1
wangchengxuan/18.jpg 1
wangchengxuan/42.jpg 1
wangchengxuan/50.jpg 1
wangchengxuan/51.jpg 1
wangchengxuan/52.jpg 1
xujiaqi/29.jpg 2
xujiaqi/27.jpg 2
xujiaqi/19.jpg 2
xujiaqi/28.jpg 2
xujiaqi/25.jpg 2
xujiaqi/22.jpg 2
xujiaqi/20.png 2
xujiaqi/26.jpg 2
xujiaqi/21.jpg 2
xujiaqi/24.jpg 2
xujiaqi/23.jpg 2
yushuxin/34.jpg 3
yushuxin/35.jpg 3
yushuxin/49.jpg 3
yushuxin/32.jpg 3
yushuxin/37.jpg 3
yushuxin/31.jpg 3
yushuxin/44.jpg 3
yushuxin/30.jpg 3
yushuxin/46.jpg 3
yushuxin/36.jpg 3
yushuxin/48.jpg 3
yushuxin/33.jpg 3
zhaoxiaotang/15.jpg 4
zhaoxiaotang/14.jpg 4
zhaoxiaotang/13.jpg 4
zhaoxiaotang/12.jpg 4
验证集、测试集类似
Step1、基础工作
import paddlehub as hub
Step2、加载预训练模型
接下来我们要在PaddleHub中选择合适的预训练模型来Finetune,由于是图像分类任务,因此我们使用经典的ResNet-50作为预训练模型。PaddleHub提供了丰富的图像分类预训练模型,包括了最新的神经网络架构搜索类的PNASNet,我们推荐您尝试不同的预训练模型来获得更好的性能。
module = hub.Module(name="resnet_v2_50_imagenet")
Step3、数据准备
接着需要加载图片数据集。我们使用自定义的数据进行体验,请查看适配自定义数据
from paddlehub.dataset.base_cv_dataset import BaseCVDataset
class DemoDataset(BaseCVDataset):
def __init__(self):
# 数据集存放位置
self.dataset_dir = "dataset"
super(DemoDataset, self).__init__(
base_path=self.dataset_dir,
train_list_file="train_list.txt",
validate_list_file="validate_list.txt",
test_list_file="test_list.txt",
label_list_file="label_list.txt",
)
dataset = DemoDataset()
Step4、生成数据读取器
接着生成一个图像分类的reader,reader负责将dataset的数据进行预处理,接着以特定格式组织并输入给模型进行训练。
当我们生成一个图像分类的reader时,需要指定输入图片的大小
data_reader = hub.reader.ImageClassificationReader(
image_width=module.get_expected_image_width(),
image_height=module.get_expected_image_height(),
images_mean=module.get_pretrained_images_mean(),
images_std=module.get_pretrained_images_std(),
dataset=dataset)
Step5、配置策略
在进行Finetune前,我们可以设置一些运行时的配置,例如如下代码中的配置,表示:
-
use_cuda:设置为False表示使用CPU进行训练。如果您本机支持GPU,且安装的是GPU版本的PaddlePaddle,我们建议您将这个选项设置为True;
-
epoch:迭代轮数;
-
batch_size:每次训练的时候,给模型输入的每批数据大小为32,模型训练时能够并行处理批数据,因此batch_size越大,训练的效率越高,但是同时带来了内存的负荷,过大的batch_size可能导致内存不足而无法训练,因此选择一个合适的batch_size是很重要的一步;
-
log_interval:每隔10 step打印一次训练日志;
-
eval_interval:每隔50 step在验证集上进行一次性能评估;
-
checkpoint_dir:将训练的参数和数据保存到cv_finetune_turtorial_demo目录中;
-
strategy:使用DefaultFinetuneStrategy策略进行finetune;
更多运行配置,请查看RunConfig
同时PaddleHub提供了许多优化策略,如AdamWeightDecayStrategy、ULMFiTStrategy、DefaultFinetuneStrategy等,详细信息参见策略
config = hub.RunConfig(
use_cuda=True, #是否使用GPU训练,默认为False;
num_epoch=3, #Fine-tune的轮数;
checkpoint_dir="cv_finetune_turtorial_demo",#模型checkpoint保存路径, 若用户没有指定,程序会自动生成;
batch_size=3, #训练的批大小,如果使用GPU,请根据实际情况调整batch_size;
eval_interval=10, #模型评估的间隔,默认每100个step评估一次验证集;
strategy=hub.finetune.strategy.DefaultFinetuneStrategy()) #Fine-tune优化策略;
Step6、组建Finetune Task
有了合适的预训练模型和准备要迁移的数据集后,我们开始组建一个Task。
由于该数据设置是一个二分类的任务,而我们下载的分类module是在ImageNet数据集上训练的千分类模型,所以我们需要对模型进行简单的微调,把模型改造为一个二分类模型:
- 获取module的上下文环境,包括输入和输出的变量,以及Paddle Program;
- 从输出变量中找到特征图提取层feature_map;
- 在feature_map后面接入一个全连接层,生成Task;
input_dict, output_dict, program = module.context(trainable=True)
img = input_dict["image"]
feature_map = output_dict["feature_map"]
feed_list = [img.name]
task = hub.ImageClassifierTask(
data_reader=data_reader,
feed_list=feed_list,
feature=feature_map,
num_classes=dataset.num_labels,
config=config)
Step5、开始Finetune
我们选择finetune_and_eval接口来进行模型训练,这个接口在finetune的过程中,会周期性的进行模型效果的评估,以便我们了解整个训练过程的性能变化。
run_states = task.finetune_and_eval()
Step6、预测
当Finetune完成后,我们使用模型来进行预测,先通过以下命令来获取测试的图片
import numpy as np
import matplotlib.pyplot as plt
import matplotlib.image as mpimg
with open("dataset/test_label.txt","r") as f:
filepath = f.readlines()
data = [filepath[0].split(" ")[0],filepath[1].split(" ")[0],filepath[2].split(" ")[0],filepath[3].split(" ")[0],filepath[4].split(" ")[0]]
label_map = dataset.label_dict()
index = 0
run_states = task.predict(data=data)
results = [run_state.run_results for run_state in run_states]
for batch_result in results:
print(batch_result)
batch_result = np.argmax(batch_result, axis=2)[0]
print(batch_result)
for result in batch_result:
index += 1
result = label_map[result]
print("input %i is %s, and the predict result is %s" %
(index, data[index - 1], result))
[array([[0.38369784, 0.45807096, 0.08483004, 0.03142847, 0.04197272],
[0.14275138, 0.18165883, 0.04114851, 0.51584697, 0.11859439],
[0.67317384, 0.14270192, 0.11121312, 0.05118334, 0.02172767]],
dtype=float32)]
[1 3 0]
input 1 is dataset/test/wangchengxuan.jpg, and the predict result is wangchengxuan
input 2 is dataset/test/yushuxin.jpg, and the predict result is yushuxin
input 3 is dataset/test/anqi.jpg, and the predict result is anqi
[array([[0.18219838, 0.0780868 , 0.03501804, 0.10859579, 0.5961009 ],
[0.03936729, 0.02413504, 0.91945326, 0.00691202, 0.01013238]],
dtype=float32)]
[4 2]
input 4 is dataset/test/zhaoxiaotang.jpg, and the predict result is zhaoxiaotang
input 5 is dataset/test/xujiaqi.jpg, and the predict result is xujiaqi
Day5-综合大作业
第一步:爱奇艺《青春有你2》评论数据爬取(参考链接:https://www.iqiyi.com/v_19ryfkiv8w.html#curid=15068699100_9f9bab7e0d1e30c494622af777f4ba39)
- 爬取任意一期正片视频下评论
- 评论条数不少于1000条
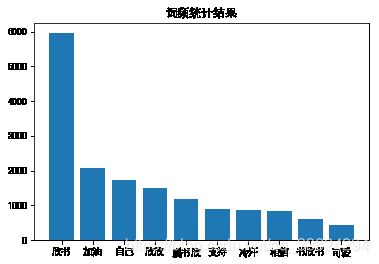
第二步:词频统计并可视化展示
- 数据预处理:清理清洗评论中特殊字符(如:@#¥%、emoji表情符),清洗后结果存储为txt文档
- 中文分词:添加新增词(如:青你、奥利给、冲鸭),去除停用词(如:哦、因此、不然、也好、但是)
- 统计top10高频词
- 可视化展示高频词
第三步:绘制词云
- 根据词频生成词云
- 可选项-添加背景图片,根据背景图片轮廓生成词云
第四步:结合PaddleHub,对评论进行内容审核
需要的配置和准备
- 中文分词需要jieba
- 词云绘制需要wordcloud
- 可视化展示中需要的中文字体
- 网上公开资源中找一个中文停用词表
- 根据分词结果自己制作新增词表
- 准备一张词云背景图(附加项,不做要求,可用hub抠图实现)
- paddlehub配置
!pip install jieba
!pip install wordcloud
#安装模型
!hub install porn_detection_lstm==1.1.0
!pip install --upgrade paddlehub
from __future__ import print_function
import requests
import json
import re #正则匹配
import time #时间处理模块
import jieba #中文分词
import numpy as np
import matplotlib
import matplotlib.pyplot as plt
import matplotlib.font_manager as font_manager
from PIL import Image
from wordcloud import WordCloud #绘制词云模块
import paddlehub as hub
#请求爱奇艺评论接口,返回response信息
def getMovieinfo(url):
'''
请求爱奇艺评论接口,返回response信息
参数 url: 评论的url
:return: response信息
'''
session = requests.session()
headers = {
"User-Agent":"Mozilla/5.0",
"Accept": "application/json",
"Referer": "http://m.iqiyi.com/v_19rqriflzg.html",
"Origin": "http://m.iqiyi.com",
"Host": "sns-comment.iqiyi.com",
"Connection": "keep-alive",
"Accept-Language":"en-US,en;q=0.9,zh-CN;q=0.8,zh;q=0.7,zh-TW;q=0.6",
"Aecept-Encoding": "gzip, deflate"
}
response = session.get(url, headers=headers )
if response.status_code == 200:
return response.text
return None
#解析json数据,获取评论
def saveMovieInfoToFile(lastId,arr):
'''
解析json数据,获取评论
参数 lastId:最后一条评论ID arr:存放文本的list
:return: 新的lastId
'''
url = " https://sns-comment.iqiyi.com/v3/comment/get_comments.action?agent_type=118&\
agent_version=9.11.5&business_type=17&content_id=15068699100&page=&page_size=10&types=time&lastId="
url += str(lastId)
responseTxt = getMovieinfo(url)
responseJson = json.loads(responseTxt)
comments = responseJson['data']['comments']
for val in comments:
if'content' in val.keys():
# print(val['content'])
arr.append(val['content'])
lastId = str(val['id'])
return lastId
#去除文本中特殊字符
def clear_special_char(content):
'''
正则处理特殊字符
参数 content:原文本
return: 清除后的文本
'''
s = re.sub(r"| |\t|\r", "",content)
s = re.sub(r"\n","", s)
s = re.sub(r"\*", "\\*", s)
s = re.sub('[^\u4e00-\u9fa5^a-z^A-Z^0-9]','',s)
s = re.sub('[\001\002\003\004\005\006\007\x08\x09\x0a\x0b\x0c\x0d\x0e\x0f\x10\x11\x12\x13\x14\x15\x16\x17\x18\x19]','',s)
s = re.sub('[a-zA-Z]','',s)
s = re.sub('^\d+(\.\d+)?$','',s)
return s
def fenci(text):
'''
利用jieba进行分词
参数 text:需要分词的句子或文本
return:分词结果
'''
jieba.load_userdict('add_words.txt')#
seg = jieba.lcut(text, cut_all=False)
return seg
def stopwordslist(file_path):
'''
创建停用词表
参数 file_path:停用词文本路径
return:停用词list
'''
stopwords = [line.strip() for line in open(file_path, encoding='UTF-8').readlines()]
return stopwords
def movestopwords(sentence,stpwords,counts):
'''
去除停用词,统计词频
参数 file_path:停用词文本路径 stopwords:停用词list counts: 词频统计结果
return:None
'''
out = []
for word in sentence:
if word not in stopwords:
if len(word) != 1:
counts[word] = counts.get(word,0) + 1
return None
def drawcounts(counts,num):
'''
绘制词频统计表
参数 counts: 词频统计结果 num:绘制topN
return:none
'''
x_aixs =[]
y_aixs =[]
c_order = sorted(counts.items(), key=lambda x:x[1], reverse=True)
for c in c_order[ :num]:
x_aixs.append(c[0])
y_aixs.append(c[1])
matplotlib.rcParams['font.sans-serif']=['SimHei'] #指定默认字体
matplotlib.rcParams['axes.unicode_minus'] = False
plt.bar(x_aixs, y_aixs)
plt.title('词频统计结果')
plt.show()
def drawcloud(word_f):
'''
根据词频绘制词云图
参数 word_f:统计出的词频结果
return:none
'''
cloud_mask = np.array(Image.open('colud.jpg'))
st = set(["东西","这是","一直见到","只有","为什么","所有人","这个实力","以为","这个"])
wc = WordCloud(background_color='white',
mask=cloud_mask,
max_words=150,
font_path= 'SimHei.ttf',
min_font_size=10,
max_font_size=100,
width=400,
relative_scaling=0.3,
stopwords=st)
wc.fit_words(word_f)
wc.to_file('pic.png')
def text_detection(text,file_path):
'''
使用hub对评论进行内容分析
return:分析结果
'''
porn_detection_lstm = hub.Module(name="porn_detection_lstm" )
f = open('aqy.txt', 'r' ,encoding='utf-8')
for line in f:
if len(line.strip()) == 1: #判断评论长度是否为1
continue
else:
test_text.append(line)
f.close( )
# print(test_text)
input_dict = {"text": test_text}
results = porn_detection_lstm.detection(data=input_dict,use_gpu=True, batch_size=1)
# print(results)
for index, item in enumerate(results):
if item[ 'porn_detection_key'] == 'porn':
print(item['text'],':',item['porn_probs'])
#评论是多分页的,得多次请求爱奇艺的评论接口才能获取多页评论,有些评论含有表情、特殊字符之类的
#num 是页数,一页10条评论,假如爬取1000条评论,设置num=100
if __name__ == "__main__":
num = 100
lastId = '0'
arr = []
with open('aqy.txt', 'a', encoding='utf-8') as f:
for i in range(num):
lastId = saveMovieInfoToFile(lastId,arr)
# print(lastId)
time.sleep(0.5)#频繁访问爱奇艺接口,偶尔出现接口连接报错情况,睡路0.5秒,增加每次访问间隔时间
for item in arr:
Item = clear_special_char(item)
if Item.strip()!='':
try:
f.write(Item+'\n')
except Exception as e:
print("含有特殊字符" )
print('共爬取评论: ',len(arr))
f= open('aqy.txt','r' ,encoding = 'utf-8')
counts = {}
for line in f:
words= fenci(line)
stopwords = stopwordslist('en_stopwords.txt')
movestopwords(words,stopwords,counts )
drawcounts(counts,10)
drawcloud(counts)
f.close()
file_path = 'aqy.txt'
test_text = []
text_detection(test_text,file_path)
共爬取评论: 1000
[2020-04-27 06:45:43,348] [ INFO] - Installing porn_detection_lstm module
[2020-04-27 06:45:43,350] [ INFO] - Module porn_detection_lstm already installed in /home/aistudio/.paddlehub/modules/porn_detection_lstm
欣欣好可爱我爱死你了色色色
: 0.9904
display(Image.open('pic.png')) #显示生成的词云图像
你可能感兴趣的:(飞桨_Python小白逆袭大神,数据分析,深度学习)
