Hibernate入门之数据库连接的增删改查
Hibernate快速入门
这里不再重复介绍Hibernate的理论和优势,具体的可以向度娘了解
之前学过Hibernate,但是对于其原理和操作还是很模糊,用这篇博客记录一个增删改查的小实验,来更好地理解Hibernate
首先下载Hibernate
可去官网下载Hibernate,我下载的是
![]()
官网下载比较慢,并且还有可能中间网速过低时下载的文件解压出错,附上一个下载链接
https://download.csdn.net/download/linmengmeng_1314/10367114
下载解压缩之后,可以看到如下目录结构:

- documentation:存放Hibernate相关的文件和API
- lib:存放Hibernate编译和运行所依赖的包,其中子目录require下的jar是Hibernate运行项目所必需的包
project:存放Hibernate相关的源代码和资源,其中project下的stc目录及其重要,里面包含了Hibernate的配置信息
首先导入Hibernate框架相关依赖jar包
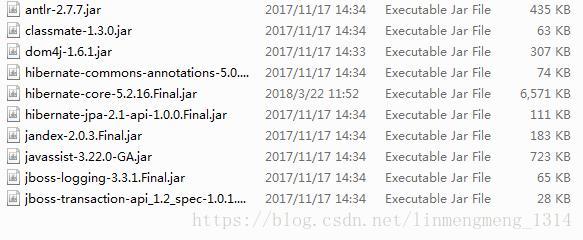
将下面的包全部复制到hibernate_demo1项目的webContent下面的WEB-INF下面的lib文件里,或者添加一个名为Hibernate的UserLibrary,将包都导入,然后右键项目buildPath导入Hibernate库
首先导入lib/required目录下所有的jar包:
再导入mysql数据库的驱动jar包:
![]()
最后导入日志相关的jar包,其中这里使用的日至相关的包是指slf4j的包,我用的是slf4j-1.7.25
MySQL驱动包和slf4j下载链接:
链接: https://pan.baidu.com/s/1gGtN0fo86vRyh7KvZlrPtA 密码: 7rhy
导入完日志相关的jar包之后,我们还须将project/etc/log4j.properties文件导入到工程hibernate_demo1的src目录下,这样工程的整个结构就为:

其中的JUnit库也是需要引入的,因为后面要用到单元测试
引入方法:右键项目,buildPath,addLIbrary,选择Junit,然后选择JUnit4或者Junit5都可以
创建数据库与表
正如前面所说,Hibernate是一个轻量级的JDBC封装,也就是说,我们可以使用Hibernate来完成原来我们使用JDBC完成的操作,也就是与数据库的交互操作。所以我们首先要创建数据库与表,这里我使用的数据库是mysql。
create database hibernateTest;
use hibernateTest;
create table t_customer(
    id int primary key auto_increment,
    name varchar(20),
    address varchar(50)
);
创建实体类
首先在Eclipse上创建一个Dynamic Web Project,比如我创建的是hibernate_demo1,然后再切到Java透视图。这儿我们在com.lmm.customer包中创建一个实体类——Customer.java。
package com.lmm.customer;

public class Customer {
    private int id;
    private String name;
    private String address;
    public int getId() {
        return id;
    }
    public void setId(int id) {
        this.id = id;
    }
    public String getName() {
        return name;
    }
    public void setName(String name) {
        this.name = name;
    }
    public String getAddress() {
        return address;
    }
    public void setAddress(String adress) {
        this.address = adress;
    }
    @Override
    public String toString() {
        return "Customer: [id = " + id + ", name = " + name + ", address = " + address + "]\n";
    }
}
Hibernate的相关配置文件
准备好以上工作之后,我们终于要踏入Hibernate的学习中了。首先我们要编写Hibernate的相关配置文件,Hibernate的相关配置文件分为两种:
- xxx.hbm.xml:它主要是用于描述类与数据库中的表的映射关系。
- hibernate.cfg.xml:它是Hibernate框架的核心配置文件。
有关这两个配置文件的详细介绍,我们后面会给大家讲解,如果就在这里弄的话,违背了我的初衷了,本文只是怎样快速入门Hibernate。
映射配置文件
首先我们要学会如何编写映射配置文件,大家要知道编写完的映射配置文件应与实体类在同一个包下,并且名称应是类名.hbm.xml,所以我们要在com.lmm.customer包下创建一个Customer.hbm.xml文件,但是它的约束应该怎么写呢?可以在Hibernate的核心jar包——hibernate-core-5.2.16.Final.jar的org.hibernate包下查找到hibernate-mapping-3.0.dtd文件,打开该文件,找到如下内容:
然后复制黏贴到Customer.hbm.xml文件中。
这里我先给出Customer.hbm.xml文件的内容,但内容不做过多介绍:
<hibernate-mapping package="com.lmm.customer">

     <class name="Customer" table="t_customer" catalog="hibernateTest">


        <id name="id" column="id">

            <generator class="native">generator>
        id>

        <property name="name" column="name" length="20">property>
        <property name="address" column="address" length="50">property>
     class>
hibernate-mapping>
核心配置文件
核心配置文件主要是Hibernate框架所使用的,它主要包含了连接数据库的相关信息和Hibernate的相关配置等。
现在我们要学会如何编写Hibernate核心配置文件,大家也要知道编写完的核心配置文件应在src目录下,并且名称应是hibernate.cfg.xml,所以我们要在src目录下创建一个hibernate.cfg.xml文件,但是它的约束应该怎么写呢?可以在Hibernate的核心jar包——hibernate-core-5.2.16.Final.jar的org.hibernate包下查找到hibernate-configuration-3.0.dtd文件,打开该文件,找到如下内容:
然后复制黏贴到hibernate.cfg.xml文件中。
在这个文件中到底如何配置昵?我们可以参考hibernate-release-5.2.16.Final\project\etc\hibernate.properties文件。这里我先给出hibernate.cfg.xml文件的内容,但内容不做过多介绍:
<hibernate-configuration>
    <session-factory>

        <property name="hibernate.connection.driver_class">com.mysql.jdbc.Driverproperty>
        <property name="hibernate.connection.url">jdbc:mysql:///hibernateTestproperty>
        <property name="hibernate.connection.username">rootproperty>
        <property name="hibernate.connection.password">linmengproperty>

        <property name="hibernate.show_sql">trueproperty>

        <property name="hibernate.format_sql">trueproperty>

        <property name="hibernate.dialect">org.hibernate.dialect.MySQLDialectproperty>

        <mapping resource="com/lmm/customer/Customer.hbm.xml"/>
    session-factory>
hibernate-configuration>
Hibernate快速入门开发测试
在com.lmm.test包下创建一个单元测试类——HibernateTest1.java。
package com.lmm.test;

import static org.junit.jupiter.api.Assertions.*;

import java.util.List;

import org.hibernate.Query;
import org.hibernate.Session;
import org.hibernate.SessionFactory;
import org.hibernate.cfg.Configuration;
import org.hibernate.query.spi.QueryParameterBindingTypeResolver;
import org.junit.jupiter.api.Test;

import com.lmm.customer.Customer;

class HibernateTest1 {

    //保存一个Customer
    //@Test
    public void saveCustomerTest() {
        Customer customer = new Customer();
        customer.setName("小明");
        customer.setAddress("航院");

        //使用Hibernate的API来完成将Customer信息保存到mysql数据库中的操作
        Configuration configuration = new Configuration().configure(); //Hibernate框架加载hibernate
        SessionFactory sessionFactory = configuration.buildSessionFactory();
        Session session = sessionFactory.openSession(); //相当于得到一个Connection
        //开启事务
        session.beginTransaction();
        //操作
        //session.save(customer);
        //事务提交
        session.getTransaction().commit();
        session.close();
        sessionFactory.close();
    }

    //@Test
    public void findCustomerByIdTest(){
        Configuration configuration = new Configuration().configure(); //Hibernate框架加载hibernate
        SessionFactory sessionFactory = configuration.buildSessionFactory();
        Session session = sessionFactory.openSession(); //相当于得到一个Connection
        //开启事务
        session.beginTransaction();

        //根据业务来编写代码
        Customer customer = session.load(Customer.class, 1);

        System.out.println(customer.getName());


        //事务提交
        session.getTransaction().commit();
        session.close();
        sessionFactory.close();
    }

    //修改操作
    //@Test
    public void updateCustomerTest() {
        //Hibernate框架直接加载hibernate.cfg.xml,没有hibernate.properties测试也可以通过
        //如果new Configuration后面不加.configure的话,默认加载hibernate.properties,没有的话会报错,无法运行
        Configuration configuration = new Configuration().configure();
        SessionFactory sessionFactory = configuration.buildSessionFactory();
        Session session = sessionFactory.openSession(); //相当于得到一个Connection
        //开启事务
        session.beginTransaction();

        //根据业务来编写代码
        Customer customer = session.get(Customer.class, 1);
        customer.setName("郑敏");
        customer.setAddress("武汉");
        session.update(customer);

        //事务提交
        session.getTransaction().commit();
        session.close();
        sessionFactory.close();
    }

    //删除操作
        @Test
        public void deletCustomerTest() {
            Configuration configuration = new Configuration().configure(); //Hibernate框架加载hibernate
            SessionFactory sessionFactory = configuration.buildSessionFactory();
            Session session = sessionFactory.openSession(); //相当于得到一个Connection
            //开启事务
            session.beginTransaction();

            //根据业务来编写代码
            Customer customer = session.get(Customer.class, 2);
            session.delete(customer);

            //事务提交
            session.getTransaction().commit();
            session.close();
            sessionFactory.close();
        }

        //查询所有的customer
                @Test
                public void deletCustomerTest() {
                    Configuration configuration = new Configuration().configure(); //Hibernate框架加载hibernate
                    SessionFactory sessionFactory = configuration.buildSessionFactory();
                    Session session = sessionFactory.openSession(); //相当于得到一个Connection
                    //开启事务
                    session.beginTransaction();

                    //根据业务来编写代码
                    Query query = session.createQuery("from Customer");
                    List list = query.list();
                    System.out.println(list);
                    //事务提交
                    session.getTransaction().commit();
                    session.close();
                    sessionFactory.close();
                }
}
可以单独测试一个小方法,右键CustomerTest.java代码,RunAs选择JUnit即可,测试完毕之后,如下图证明测试成功,这里我测试的是delete方法

测试通过之后记得查看数据库里面的数据,这样会更加有兴趣接着实验
全部测试如若都无任何问题,则我们就算入门Hibernate了。
Hibernate执行原理总结
可从度娘上摘抄到如下文字:
通过Configuration().configure();读取并解析hibernate.cfg.xml配置文件。
由hibernate.cfg.xml中的读取解析映射信息。
通过config.buildSessionFactory();得到sessionFactory。
sessionFactory.openSession();得到session。
session.beginTransaction();开启事务
persistent operate; 执行你自己的操作。
session.getTransaction().commit();提交事务。
关闭session
关闭sessionFactory。
