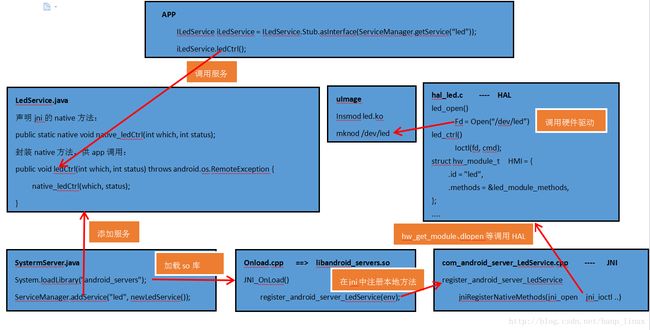
Android系统中硬件访问服务框架(JNI HAL)及实例
在学习了硬件访问服务框架之后,以led为例,总结了Android app通过服务访问硬件的框架

实现:
1. JNI和HAL
//用来注册JNI本地方法(jniRegisterNativeMethods)
实现com_android_server_LedService.cpp
//实现HAL本地方法调用c函数:open、close、ioctl 具体实现参考文章最后
hal_led.c
hal_led.h
2. 修改onload.cpp
register_android_server_LedService(env); 调用各个硬件JNI中的注册本地方法的接口函数 进行本地方法的注册
最终编译生成libandroid_servers.so
3. 修改SystemServer.java 创建一个LedService对象并add这个service
System.loadLibrary(“android_servers”); //加载库,执行jniOnLoad方法
LedService led = new LedService();
ServiceManager.addService(“led”, led);
4. 创建LedService.java 去调用JNI提供的native方法
这个LedService类要继承ILedService接口,实现接口中的方法。至此,一个LedService服务就创建成功了,但是最终要通过步骤3将这个服务添加到系统中通过service_manager这个进程来进行管理所有的服务。
5. 创建ILedService.java接口,供app使用
这个接口通过编写一个对应的ILedService.aidl文件然后mmm编译在out目录下生成对应的ILedService.java接口, 参考IVibratorService.aidl文件。
编写HAL代码:
JNI 向上提供本地函数,向下加载HAL文件并调用 HAL的函数
HAL 负责访问驱动程序执行硬件操作
JNI加载HAL的实质是JNI如何使用dlopen来加载HAL的动态库
1. JNI如何使用HAL
a. 使用hw_get_module获得hw_module_t结构体
b. 调用module->methods->open(module, name, &device); // name – 设备的名字,一个so可能包含多个device
调用moudle的open函数获取一个hw_device_t结构体(设备结构体)。
(light_device_t*)device; //并且将设备结构体转换为自定义的结构体
2. HAL怎么写
a. 要实现一个名字为HMI的hw_module_t结构体
b. 要实现一个open函数,根据传入的name返回一个设备自定义结构体,这个结构体的第一成员是hw_device_t结构体。
对修改或者新加的文件处理:
led_hal.c
hardware/libhardware/modules/led
mk文件可以cp ../vibratory/Android.mk进行修改
led_hal.h
hardware/libhardware/include/hardware
com_android_service.led.cpp
frameworks/base/services/core/jni
ILedLService.aidl
frameworks/base/core/java/android/os/ILedService.aidl
frameworks/base$ vi Android.mk进行修改
生成.java需在当前目录下执行mmm命令
SystemServer.java
frameworks/base/services/java/com/android/server
LedService.java
frameworks/base/services/core/java/com/android/server
修改frameworks/base/services/core/Android.mk
onload.cpp
frameworks/base/services/core/jni
修改frameworks/base/services/core/jni/Android.mk
mmm frameworks/base/services
mmm hardware/libhardware/modules/led
make snod
./gen-img.sh
从新烧写system.img
最后app如何使用:
1. as工程要包含什么?
out/target/common/obj/JAVA_LIBRARIES/framework_intermediates/classes.jar
2. 怎么包含
a. Creating a module library and adding it to module dependencies
file->project structure->+ ->import .jar ->classer.jar
file->project structure->app->dependencies ->+ module depends -> classer
b. 编译报错:java.lang.OutOfMemoryError: GC overhead limit exceeded
修改build.gradle,添加
dexOptions {
    javaMaxHeapSize "4g"
}
c. 编译报错: Too many field references Building Apps with Over 65K Methods
修改build.gradle
android {
    defaultConfig {
        multiDexEnabled true

dependencies {
    compile 'com.android.support:multidex:1.0.1'
修改AndroidManifest
<application
    android:name="android.support.multidex.MultiDexApplication"
关于他们之间的关系:
最后附上相关代码:
LedService.java
/*************************************************************************
    > File Name: LedService.java
    > Author: hanp
    > Mail: [email protected]
    > Created Time: 2017年07月26日 星期三 16时23分18秒
 ************************************************************************/
package com.android.server;

import android.os.ILedService;
import android.util.Slog;


/* 调用本地native方法,操作硬件 */
public class LedService extends ILedService.Stub
{
    private static final String TAG = "LedService";

    public LedService()
    {
        Slog.i(TAG, "public LedService()");
        native_ledOpen();
    }

    public void ledCtrl(int which, int status) throws android.os.RemoteException
    {
        Slog.i(TAG, "ledCtrl(int which = "+which+", int status = "+status+")");
        native_ledCtrl(which, status);
    }

    public static native void native_ledOpen();
    public static native void native_ledCtrl(int which, int status);
    public static native void native_ledClose();

}
SystemService.java
/* 向servicemanger添加一个service */
Slog.i(TAG, "Led Service");
LedService led = new LedService();
ServiceManager.addService("led", led);
com_android_service_LedService
/*************************************************************************
> File Name: com_android_server_LedService.cpp
> Author: hanp
> Mail: [email protected]
> Created Time: 2017年07月26日 星期三 16时53分51秒
************************************************************************/
#includehal_led.c
/*************************************************************************
> File Name: led_hal.c
> Author: hanp
> Mail: [email protected]
> Created Time: 2017年07月31日 星期一 15时00分30秒
************************************************************************/
#include