Elasticsearch(三) 集群搭建
目录
1、环境信息
2、安装步骤
1.修改主机名
2.修改hosts
3.修改linux 文件描述符限制
4.修改最大线程数限制
5.修改内存限制
6.重启
7.安装 jdk
8.创建用户,给Elasticsearch用户增加sudo权限
9.安装 Elasticsearch
10.设置 Elasticsearch
11.启动 Elasticsearch
1、环境信息
操作系统:centos7
jdk:1.8
Elasticsearch:6.7.2
机器:
| IP | hostname | 备注 |
|---|---|---|
| 10.24.54.241 | node1 | 节点1 |
| 10.24.54.242 | node2 | 节点2 |
2、安装步骤
1.修改主机名
打开文件 /etc/hostname ,将内容改为node1(241机器)或node2(242机器)
2.修改hosts
打开文件 /etc/hosts 增加两行
10.24.54.241 node1
10.24.54.242 node2
3.修改linux 文件描述符限制
执行命令 ulimit -Hn,查看硬限制为:4096
执行命令 ulimit -Sn,查看软限制为:1024
上述限制会导致 Elasticsearch启动失败,如下修改:打开 /etc/security/limits.conf,增加两行设置
*               soft    nofile           65536
*               hard    nofile           65536
4.修改最大线程数限制
打开文件 /etc/security/limits.conf ,增加以下两行:
* soft  nproc 4096
* hard  nproc 4096
5.修改内存限制
修改文件 /etc/sysctl.conf ,增加以下配置
vm.max_map_count=2621446.重启
7.安装 jdk
安装方式:https://blog.csdn.net/ruanhao1203/article/details/89883273
8.创建用户,给Elasticsearch用户增加sudo权限
因为 Elasticsearch 不能用root用户启动,所以要创建新用户,如下:
https://blog.csdn.net/ruanhao1203/article/details/89883526
9.安装 Elasticsearch
(1)下载安装包,到 Elasticsearch官网下载:https://www.elastic.co/cn/downloads/past-releases/elasticsearch-6-7-2
(2)解压 elasticsearch-6.7.2.tar.gz
tar -zxvf elasticsearch-6.7.2.tar.gz -C /usr/local/ ;
mv /usr/local/elasticsearch-6.7.2.tar.gz /usr/local/elasticsearch
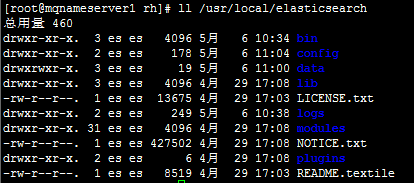
(3)更改 /usr/local/elasticsearch 用户及用户组为 es
chown -R es:es /usr/local/elasticsearch(4)验证是否更改成功
ll /usr/local/elasticsearch
10.设置 Elasticsearch
编辑 Elasticsearch 包下 conf 目录下,elasticsearch.yml 文件,添加如下内容:
cluster.name: my-application
node.name: node1
network.host: 10.24.54.241
http.port: 9200
discovery.zen.ping.unicast.hosts: ["node1", "node2"]
discovery.zen.minimum_master_nodes: 1
http.cors.enabled: true
http.cors.allow-origin: "*"
两个机器配置几乎一样,除了node.name 、 network.host 配置成各自机器的
11.启动 Elasticsearch
启动节点1 的 Elasticsearch,直接运行 ./usr/local/elasticsearch/bin/elasticsearch,启动成功后。
启动节点2 的 Elasticsearch,直接运行 ./usr/local/elasticsearch/bin/elasticsearch,启动成功后.。
可以看到节点1 界面打印如下记录,记录显示已加入节点2 访问 http://10.24.54.241:9200/_cluster/health/?pretty 查看集群状态如下:
至此集群搭建完成
