Android基础——框架模式MVVM之DataBinding的实践
Android基础——框架模式MVVM之DataBinding的实践
本篇文章包含以下内容:
- MVVM的介绍
- MVVM的实践
- DataBinding之layout标签的使用
- DataBinding之data与variable标签的使用
- DataBinding之绑定点击事件的使用
MVVM的介绍
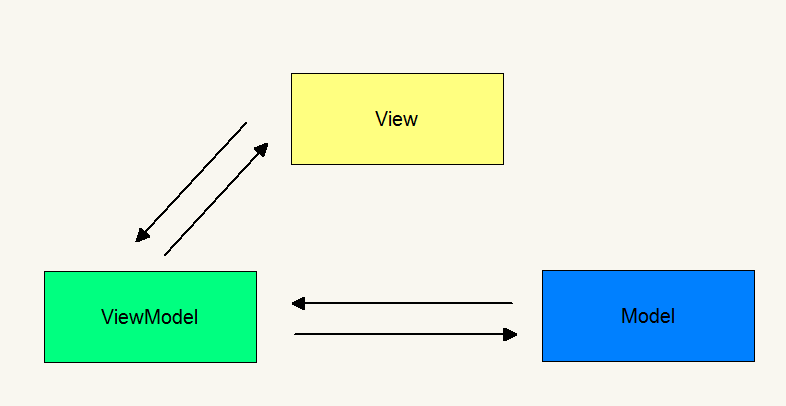
MVVM是Model-View-ViewModel的简写,这个模式提供对View和View Model的双向数据绑定,使得View Model的状态改变可以自动传递给View
- Model:数据层,负责处理数据的加载或者存储
- View:视图层,负责界面数据的展示,与用户进行交互
- ViewModel:负责完成View于Model间的交互,负责业务逻辑
MVVM的模型关系图:
MVVM优点:
- 低耦合。视图(View)可以独立于Model变化和修改,一个ViewModel可以绑定到不同的”View”上,当View变化的时候Model可以不变,当Model变化的时候View也可以不变。
- 可重用性。你可以把一些视图逻辑放在一个ViewModel里面,让很多view重用这段视图逻辑。
- 独立开发。开发人员可以专注于业务逻辑和数据的开发(ViewModel),设计人员可以专注于页面设计,使用Expression Blend可以很容易设计界面并生成xml代码。
- 可测试。界面素来是比较难于测试的,而现在测试可以针对ViewModel来写。
MVVM的实践
在安卓采用DataBinding来支持MVVM框架模式,下面我们以DataBinding来实践
实践工具:Android Studio 2.1
准备工作:开启安卓中的DataBinding,需要在Module下的build.gradle中声明
android {
     …………
     dataBinding{
        enabled = true
     }
     …………
}
DataBinding之layout标签的使用
- layout标签作用:作为DataBinding的标志,省去findViewById()方法
第一步:我们以学生管理信息为例子,我们在布局文件的外层嵌套一层layout标签,并附上命名空间,在EditText和TextView中添加对应的ID
<layout xmlns:android="http://schemas.android.com/apk/res/android"
    xmlns:tools="http://schemas.android.com/tools">

    <LinearLayout
        android:layout_width="match_parent"
        android:layout_height="match_parent"
        android:orientation="vertical">

        <EditText
            android:id="@+id/et_name"
            android:layout_width="match_parent"
            android:layout_height="wrap_content" />

        <EditText
            android:id="@+id/et_nickName"
            android:layout_width="match_parent"
            android:layout_height="match_parent" />

        <TextView
            android:id="@+id/tv_name"
            android:layout_width="match_parent"
            android:layout_height="wrap_content" />

        <TextView
            android:id="@+id/tv_nickName"
            android:layout_width="match_parent"
            android:layout_height="wrap_content" />
    LinearLayout>
layout>
第二步:在我们的主Activity中,需要通过DataBindingUtil来绑定我们的xml布局
public class LoginActivity extends AppCompatActivity {

    @Override
    protected void onCreate(Bundle savedInstanceState) {
        super.onCreate(savedInstanceState);
        ActivityLoginBinding binding = DataBindingUtil.setContentView(this, R.layout.activity_login);
    }
}
DataBindingUtil.setContentView()方法返回一个数据绑定对象,其命名规则由系统自动生成,由于我们的布局名字是activity_login.xml,所以生成规则:将下划线去掉,提取xml命名(字母首大写)+Binding
第三步:如果我们需要操作xml的View,则不需要findViewById(),直接调用binding对象里面的View即可,其控件的命名规则:将下划线去掉,提取xml命名(字母首大写)
public class LoginActivity extends AppCompatActivity {

    Student student = new Student("Hensen", "handsome");

    @Override
    protected void onCreate(Bundle savedInstanceState) {
        super.onCreate(savedInstanceState);
        ActivityLoginBinding binding = DataBindingUtil.setContentView(this, R.layout.activity_login);
        binding.tvName.setText(student.getName());
        binding.tvNickName.setText(student.getNickName());
    }
}
DataBinding之data与variable标签的使用
- data与variable标签的作用:将对象传进布局xml文件
第一步:由于layout标签还需要在binding对象中使用View,还没有完全体现MVVM的真正效果,下面在布局文件声明data与variable标签
<layout xmlns:android="http://schemas.android.com/apk/res/android"
    xmlns:tools="http://schemas.android.com/tools">

    <data>
        <variable
            name="student"
            type="com.handsome.designmode.MVVM.Bean.Student" />
    data>

    <LinearLayout
        android:layout_width="match_parent"
        android:layout_height="match_parent"
        android:orientation="vertical">

        <EditText
            android:id="@+id/et_name"
            android:layout_width="match_parent"
            android:layout_height="wrap_content" />

        <EditText
            android:id="@+id/et_nickName"
            android:layout_width="match_parent"
            android:layout_height="wrap_content" />

        <TextView
            android:id="@+id/tv_name"
            android:layout_width="match_parent"
            android:layout_height="wrap_content"
            android:text="@{student.name}" />

        <TextView
            android:id="@+id/tv_nickName"
            android:layout_width="match_parent"
            android:layout_height="wrap_content"
            android:text="@{student.nickName}" />
    LinearLayout>
layout>
在variable中,我们取个name,并将它的type指向一个Bean对象,即绑定了该对象,在使用时,通过@{ }的格式,将对象的属性绑定到控件中
第二步:在主Activity中,只要设置这个对象即可
ActivityLoginBinding binding = DataBindingUtil.setContentView(this, R.layout.activity_login);
        binding.setStudent(student);
DataBinding之绑定点击事件的使用
- 绑定onTextChanged事件:我们通过EditText的修改来更新TextView
- 绑定onClick事件:点击TextView弹出Toast
第一步:我们在主Activity中创建一个Controller类,注意这个onTextChange方法的名字和参数必须和EditText原生的onTextChange一致,还有onClick方法也是
public class Controller {
    public void onTextChanged(CharSequence s, int start, int before, int count) {
        student.setName(s.toString());
        binding.setStudent(student);
    }
    public void onClick(View view){
        Toast.makeText(LoginActivity.this,"clickMe",Toast.LENGTH_SHORT).show();
    }
}
第二步:在布局文件中,声明这个类,并给EditText加上onTextChanged事件,给TextView加上onClick事件
<layout xmlns:android="http://schemas.android.com/apk/res/android"
    xmlns:tools="http://schemas.android.com/tools">

    <data>
        <variable
            name="student"
            type="com.handsome.designmode.MVVM.Bean.Student" />
        <variable
            name="controller"
            type="com.handsome.designmode.MVVM.View.LoginActivity.Controller"/>
    data>

    <LinearLayout
        android:layout_width="match_parent"
        android:layout_height="match_parent"
        android:orientation="vertical">

        <EditText
            android:onTextChanged="@{controller.onTextChanged}"
            android:id="@+id/et_name"
            android:layout_width="match_parent"
            android:layout_height="wrap_content" />

        <EditText
            android:id="@+id/et_nickName"
            android:layout_width="match_parent"
            android:layout_height="wrap_content" />

        <TextView
            android:onClick="@{controller.onClick}"
            android:id="@+id/tv_name"
            android:layout_width="match_parent"
            android:layout_height="wrap_content"
            android:text="@{student.name}" />

        <TextView
            android:id="@+id/tv_nickName"
            android:layout_width="match_parent"
            android:layout_height="wrap_content"
            android:text="@{student.nickName}" />
    LinearLayout>
layout>
注意controller.onTextChanged和controller.onClick必须对应Controller里面的名字,Controller里面的方法名可以随便取,但是参数必须和原生的方法参数一致,否则编译报错
第三步:在主Activity中设置这个Controller
binding.setController(new Controller());
- 绑定onClickListener事件:将xml的对象传递给Activity,这也是MVVM双向数据绑定的体现
第一步:我们继续在主Activity中Controller类,创建该方法
public void onClickListener(Student student) {
    Toast.makeText(LoginActivity.this, student.getNickName(), Toast.LENGTH_SHORT).show();
}
第二步:我们在TextView中使用该方法,并将student对象传递到Activity中
"@+id/tv_nickName"
    android:layout_width="match_parent"
    android:layout_height="wrap_content"
    android:onClick="@{()->controller.onClickListenerBinding(student)}"
    android:text="@{student.nickName}" />
这里用到的我们Lambda表达式,理解起来比较困难,大家知道就好了
源码
github:https://github.com/AndroidHensen/Design-Mode


