HDFS_学习笔记
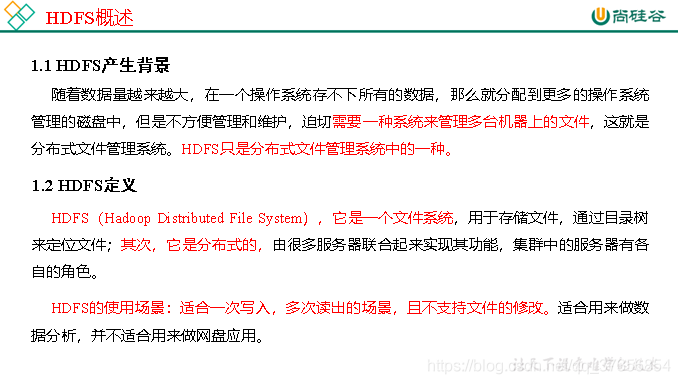
1.HDFS产生的背景及定义
-
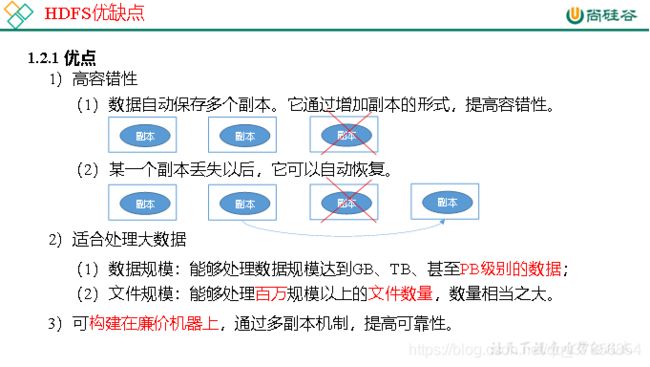
高容错性
-
适合处理大数据
-
不适合低时延数据访问
-
无法高效的对大量小文件进行存储
-
NameNode
-
DataNode
-
Client
2.HDFS的Shell操作(开发重点)
1.基本语法bin/hadoop fs 具体命令 OR bin/hdfs dfs
具体命令dfs是fs的实现类。
(0)启动Hadoop集群(方便后续的测试)
[atguigu@hadoop102 hadoop-2.7.2]$ sbin/start-dfs.sh
[atguigu@hadoop103 hadoop-2.7.2]$ sbin/start-yarn.sh
(1)-help:输出这个命令参数
[atguigu@hadoop102 hadoop-2.7.2]$ hadoop fs -help rm
(2)-ls: 显示目录信息
[atguigu@hadoop102 hadoop-2.7.2]$ hadoop fs -ls /
(3)-mkdir:在HDFS上创建目录
[atguigu@hadoop102 hadoop-2.7.2]$ hadoop fs -mkdir -p /sanguo/shuguo
(4)-moveFromLocal:从本地剪切粘贴到HDFS
[atguigu@hadoop102 hadoop-2.7.2]$ touch kongming.txt
[atguigu@hadoop102 hadoop-2.7.2]$ hadoop fs -moveFromLocal ./kongming.txt /sanguo/shuguo
(5)-appendToFile:追加一个文件到已经存在的文件末尾
[atguigu@hadoop102 hadoop-2.7.2]$ touch liubei.txt[atguigu@hadoop102 hadoop-2.7.2]$ vi liubei.txt输入san gu mao lu
[atguigu@hadoop102 hadoop-2.7.2]$ hadoop fs -appendToFile liubei.txt /sanguo/shuguo/kongming.txt
(6)-cat:显示文件内容
[atguigu@hadoop102 hadoop-2.7.2]$ hadoop fs -cat /sanguo/shuguo/kongming.txt
(7)-chgrp 、-chmod、-chown:Linux文件系统中的用法一样,修改文件所属权限
[atguigu@hadoop102 hadoop-2.7.2]$ hadoop fs -chmod 666 /sanguo/shuguo/kongming.txt
[atguigu@hadoop102 hadoop-2.7.2]$ hadoop fs -chown atguigu:atguigu /sanguo/shuguo/kongming.txt
(8)-copyFromLocal:从本地文件系统中拷贝文件到HDFS路径去
[atguigu@hadoop102 hadoop-2.7.2]$ hadoop fs -copyFromLocal README.txt /
(9)-copyToLocal:从HDFS拷贝到本地
[atguigu@hadoop102 hadoop-2.7.2]$ hadoop fs -copyToLocal /sanguo/shuguo/kongming.txt ./.
(10)-cp :从HDFS的一个路径拷贝到HDFS的另一个路径
[atguigu@hadoop102 hadoop-2.7.2]$ hadoop fs -cp /sanguo/shuguo/kongming.txt /zhuge.txt
(11)-mv:在HDFS目录中移动文件
[atguigu@hadoop102 hadoop-2.7.2]$ hadoop fs -mv /zhuge.txt /sanguo/shuguo/
(12)-get:等同于copyToLocal,就是从HDFS下载文件到本地
[atguigu@hadoop102 hadoop-2.7.2]$ hadoop fs -get /sanguo/shuguo/kongming.txt ./
(13)-getmerge:合并下载多个文件,比如HDFS的目录 /user/atguigu/test下有多个文件:log.1, log.2,log.3,…
[atguigu@hadoop102 hadoop-2.7.2]$ hadoop fs -getmerge /user/atguigu/test/* ./zaiyiqi.txt
(14)-put:等同于copyFromLocal
[atguigu@hadoop102 hadoop-2.7.2]$ hadoop fs -put ./zaiyiqi.txt /user/atguigu/test/
(15)-tail:显示一个文件的末尾
[atguigu@hadoop102 hadoop-2.7.2]$ hadoop fs -tail /sanguo/shuguo/kongming.txt
(16)-rm:删除文件或文件夹
[atguigu@hadoop102 hadoop-2.7.2]$ hadoop fs -rm /user/atguigu/test/jinlian2.txt
(17)-rmdir:删除空目录
[atguigu@hadoop102 hadoop-2.7.2]$ hadoop fs -mkdir /test
[atguigu@hadoop102 hadoop-2.7.2]$ hadoop fs -rmdir /test
(18)-du统计文件夹的大小信息
[atguigu@hadoop102 hadoop-2.7.2]$ hadoop fs -du -s -h /user/atguigu/test
2.7 K /user/atguigu/test
[atguigu@hadoop102 hadoop-2.7.2]$ hadoop fs -du -h /user/atguigu/test
1.3 K /user/atguigu/test/README.txt
15 /user/atguigu/test/jinlian.txt
1.4 K /user/atguigu/test/zaiyiqi.txt
(19)-setrep:设置HDFS中文件的副本数量
[atguigu@hadoop102 hadoop-2.7.2]$ hadoop fs -setrep 10 /sanguo/shuguo/kongming.txt
3.HDFS客户端操作
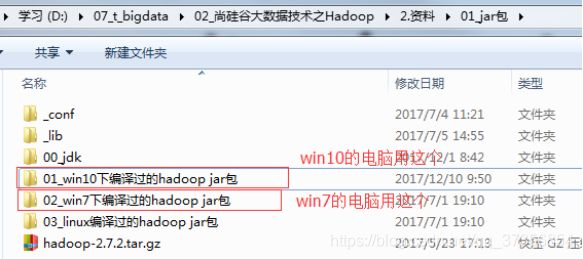
1.根据自己电脑的操作系统拷贝对应的编译后的hadoop jar包到非中文路径(例如:D:\Develop\hadoop-2.7.2),如图3-4所示。
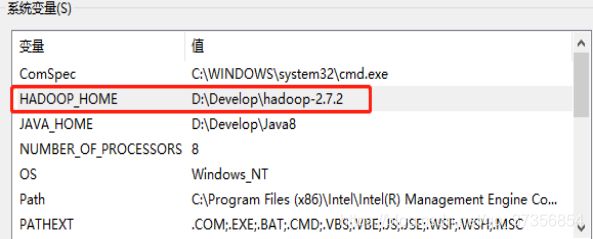
2. 配置HADOOP_HOME环境变量,如图3-5所示。
3. 配置Path环境变量。
4. 创建一个Maven工程HdfsClientDemo
5.导入相应的依赖坐标+日志添加
6.创建包名:com.atguigu.hdfs
7.创建HdfsClient类
8.执行程序
3.1HDFS文件上传(测试参数优先级)
1.编写源代码
@Testpublic void testCopyFromLocalFile() throws IOException, InterruptedException, URISyntaxException {

	// 1 获取文件系统
	Configuration configuration = new Configuration();
	configuration.set("dfs.replication", "2");
	FileSystem fs = FileSystem.get(new URI("hdfs://hadoop102:9000"), configuration, "atguigu");
	// 2 上传文件
	fs.copyFromLocalFile(new Path("e:/banzhang.txt"), new Path("/banzhang.txt"));
	// 3 关闭资源
	fs.close();
	System.out.println("over");
	}
略
3.2HDFS文件下载
@Testpublic void testCopyToLocalFile() throws IOException, InterruptedException, URISyntaxException{

// 1 获取文件系统
	Configuration configuration = new Configuration();
	FileSystem fs = FileSystem.get(new URI("hdfs://hadoop102:9000"), configuration, "atguigu");
	// 2 执行下载操作
	// boolean delSrc 指是否将原文件删除
	// Path src 指要下载的文件路径
	// Path dst 指将文件下载到的路径
	// boolean useRawLocalFileSystem 是否开启文件校验
	fs.copyToLocalFile(false, new Path("/banzhang.txt"), new Path("e:/banhua.txt"), true);
	// 3 关闭资源
	fs.close();
	}
3.3HDFS文件夹删除
@Testpublic void testDelete() throws IOException, InterruptedException, URISyntaxException{

	// 1 获取文件系统
	Configuration configuration = new Configuration();
	FileSystem fs = FileSystem.get(new URI("hdfs://hadoop102:9000"), configuration, "atguigu");
	// 2 执行删除
	fs.delete(new Path("/0508/"), true);
	// 3 关闭资源
	fs.close();}
3.4HDFS文件名更改
public void testRename() throws IOException, InterruptedException, URISyntaxException{

	// 1 获取文件系统
	Configuration configuration = new Configuration();
	FileSystem fs = FileSystem.get(new URI("hdfs://hadoop102:9000"), configuration, "atguigu");
	// 2 修改文件名称
	fs.rename(new Path("/banzhang.txt"), new Path("/banhua.txt"));
	// 3 关闭资源
	fs.close();}
3.5HDFS文件详情查看
查看文件名称、权限、长度、块信息
@Testpublic void testListFiles() throws IOException, InterruptedException, URISyntaxException{

// 1获取文件系统
	Configuration configuration = new Configuration();
	FileSystem fs = FileSystem.get(new URI("hdfs://hadoop102:9000"), configuration, "atguigu");
	// 2 获取文件详情
	RemoteIterator<LocatedFileStatus> listFiles = fs.listFiles(new Path("/"), true);
	while(listFiles.hasNext()){

		LocatedFileStatus status = listFiles.next();
		// 输出详情
		// 文件名
		System.out.println(status.getPath().getName());
		// 长度
		System.out.println(status.getLen());
		// 权限
		System.out.println(status.getPermission());
		// 分组
		System.out.println(status.getGroup());
		// 获取存储的块信息
		BlockLocation[] blockLocations = status.getBlockLocations();
		for (BlockLocation blockLocation : blockLocations)
		{

		// 获取块存储的主机节点
		String[] hosts = blockLocation.getHosts();
		for (String host : hosts) {

		System.out.println(host);			}		}
		System.out.println("-----------班长的分割线----------");	} // 3 关闭资源
		fs.close();
		}
3.6HDFS文件和文件夹判断
@Testpublic void testListStatus() throws IOException, InterruptedException, URISyntaxException{

	// 1 获取文件配置信息
	Configuration configuration = new Configuration();
	FileSystem fs = FileSystem.get(new URI("hdfs://hadoop102:9000"), configuration, "atguigu");
	// 2 判断是文件还是文件夹
	FileStatus[] listStatus = fs.listStatus(new Path("/"));
	for (FileStatus fileStatus : listStatus) {

	// 如果是文件
	if (fileStatus.isFile()) {

	System.out.println("f:"+fileStatus.getPath().getName());
	}
	else {

	System.out.println("d:"+fileStatus.getPath().getName());
        //3 关闭资源
	fs.close();}
3.7HDFS的I/O流操作
上面我们学的API操作HDFS系统都是框架封装好的。那么如果我们想自己实现上述API的操作该怎么实现呢?我们可以采用IO流的方式实现数据的上传和下载。
3.7.1HDFS文件上传
需求:把本地e盘上的banhua.txt文件上传到HDFS根目录
编写代码
@Testpublic void putFileToHDFS() throws IOException,InterruptedException, URISyntaxException {

	// 1 获取文件系统
	Configuration configuration = new Configuration();
	FileSystem fs = FileSystem.get(new URI("hdfs://hadoop102:9000"), configuration, "atguigu");
	// 2 创建输入流
	FileInputStream fis = new FileInputStream(new File("e:/banhua.txt"));
	// 3 获取输出流
	FSDataOutputStream fos = fs.create(new Path("/banhua.txt"));
	// 4 流对拷
	IOUtils.copyBytes(fis, fos, configuration);
	// 5 关闭资源
	IOUtils.closeStream(fos);
	IOUtils.closeStream(fis);
	fs.close();
	}
3.7.2 HDFS文件下载
从HDFS上下载banhua.txt文件到本地e盘上
编写代码
// 文件下载
@Testpublic void getFileFromHDFS() throws IOException, InterruptedException, URISyntaxException{

	// 1 获取文件系统
	Configuration configuration = new Configuration();
	FileSystem fs = FileSystem.get(new URI("hdfs://hadoop102:9000"), configuration, "atguigu");
	// 2 获取输入流
	FSDataInputStream fis = fs.open(new Path("/banhua.txt"));
	// 3 获取输出流
	FileOutputStream fos = new FileOutputStream(new File("e:/banhua.txt"));
	// 4 流的对拷
	IOUtils.copyBytes(fis, fos, configuration);
	// 5 关闭资源
	IOUtils.closeStream(fos);
	IOUtils.closeStream(fis);
	fs.close();}
3.7.3定位文件读取
需求:分块读取HDFS上的大文件,比如根目录下的/hadoop-2.7.2.tar.gz2.
编写代码
(1)下载第一块
@Testpublic void readFileSeek1() throws IOException, InterruptedException, URISyntaxException{

// 1 获取文件系统
	Configuration configuration = new Configuration();
	FileSystem fs = FileSystem.get(new URI("hdfs://hadoop102:9000"), configuration, "atguigu");
	// 2 获取输入流
	FSDataInputStream fis = fs.open(new Path("/hadoop-2.7.2.tar.gz"));
	// 3 创建输出流
	FileOutputStream fos = new FileOutputStream(new File("e:/hadoop-2.7.2.tar.gz.part1"));
	// 4 流的拷贝
	byte[] buf = new byte[1024];
	for(int i =0 ; i < 1024 * 128; i++){

	fis.read(buf);
	fos.write(buf);	}
	// 5关闭资源
	IOUtils.closeStream(fis);
	IOUtils.closeStream(fos);
	fs.close();}
(2)下载第二块
@Testpublic void readFileSeek2() throws IOException, InterruptedException, URISyntaxException{

	// 1 获取文件系统
	Configuration configuration = new Configuration();
	FileSystem fs = FileSystem.get(new URI("hdfs://hadoop102:9000"), configuration, "atguigu");
	// 2 打开输入流
	FSDataInputStream fis = fs.open(new Path("/hadoop-2.7.2.tar.gz"));
	// 3 定位输入数据位置
	fis.seek(1024*1024*128);
	// 4 创建输出流
	FileOutputStream fos = new FileOutputStream(new File("e:/hadoop-2.7.2.tar.gz.part2"));
	// 5 流的对拷
	IOUtils.copyBytes(fis, fos, configuration);
	// 6 关闭资源
	IOUtils.closeStream(fis);
	IOUtils.closeStream(fos);
	}
(3)合并文件
在Window命令窗口中进入到目录E:\,然后执行如下命令,对数据进行合并
type hadoop-2.7.2.tar.gz.part2 >> hadoop-2.7.2.tar.gz.part1合并完成后,将hadoop-2.7.2.tar.gz.part1重新命名为hadoop-2.7.2.tar.gz。解压发现该tar包非常完整。
4.HDFS的数据流
4.1HDFS写数据的流程
- 客户端通过Distributed FileSystem模块向NameNode请求上传文件,NameNode检查目录文件是否存在,父目录是否存在。
- NameNode返回是否可以上传
- 客户端请求上传第一个Block上传到哪几个datanode服务器上。
- NameNode返回3个datanode节点,分别为dn1,dn2,dn3
5)客户端通过FSDataOutputStream模块请求dn1上传数据,dn1收到请求会继续调用dn2,然后dn2调用dn3,将这个通信管道建立完成。
6)dn1、dn2、dn3逐级应答客户端。
7)客户端开始往dn1上传第一个Block(先从磁盘读取数据放到一个本地内存缓存),以Packet为单位,dn1收到一个Packet就会传给dn2,dn2传给dn3;dn1每传一个packet会放入一个应答队列等待应答。
8)当一个Block传输完成之后,客户端再次请求NameNode上传第二个Block的服务器。(重复执行3-7步)。
网络拓扑-节点距离计算
在HDFS写距离的过程中,namenode会选择距离待上传数据最近距离的datanode接收数据。那么这个最近距离怎么算呢?
节点距离:两个节点达到最近的共同祖先的距离总和。

4.2HDFS读数据的流程

1)客户端通过Distributed FileSystem向NameNode请求下载文件,NameNode通过查询元数据,找到文件块所在的DataNode地址。
2)挑选一台DataNode(就近原则,然后随机)服务器,请求读取数据。
3)DataNode开始传输数据给客户端(从磁盘里面读取数据输入流,以Packet为单位来做校验)。
4)客户端以Packet为单位接收,先在本地缓存,然后写入目标文件。
5.NameNode和SecondaryNameNode
首先,我们做个假设,如果存储在NameNode节点的磁盘中,因为经常需要进行随机访问,还有响应客户请求,必然是效率过低。因此,元数据需要存放在内存中。但如果只存在内存中,一旦断电,元数据丢失,整个集群就无法工作了。因此产生在磁盘中备份元数据的FsImage。这样又会带来新的问题,当在内存中的元数据更新时,如果同时更新FsImage,就会导致效率过低,但如果不更新,就会发生一致性问题,一旦NameNode节点断电,就会产生数据丢失。因此,引入Edits文件(只进行追加操作,效率很高)。
每当元数据有更新或者添加元数据时,修改内存中的元数据并追加到Edits中。这样,一旦NameNode节点断电,可以通过FsImage和Edits的合并,合成元数据。但是,如果长时间添加数据到Edits中,会导致该文件数据过大,效率降低,而且一旦断电,恢复元数据需要的时间过长。因此,需要定期进行FsImage和Edits的合并,如果这个操作由NameNode节点完成,又会效率过低。因此,引入一个新的节点SecondaryNamenode,专门用于FsImage和Edits的合并。
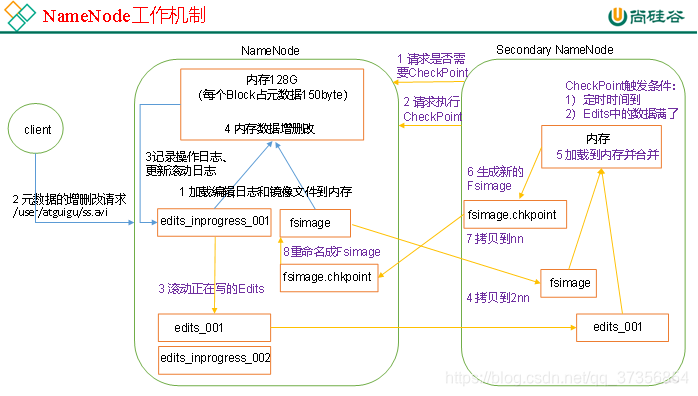
5.2 Fsimage和Edits解析
-
oiv查看Fsimage文件
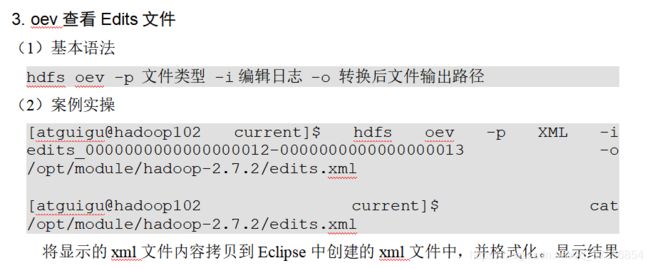
(1)查看oiv和oev命令
[atguigu@hadoop102 current]$ hdfs
oiv apply the offline fsimage viewer to an fsimage
oev apply the offline edits viewer to an edits file

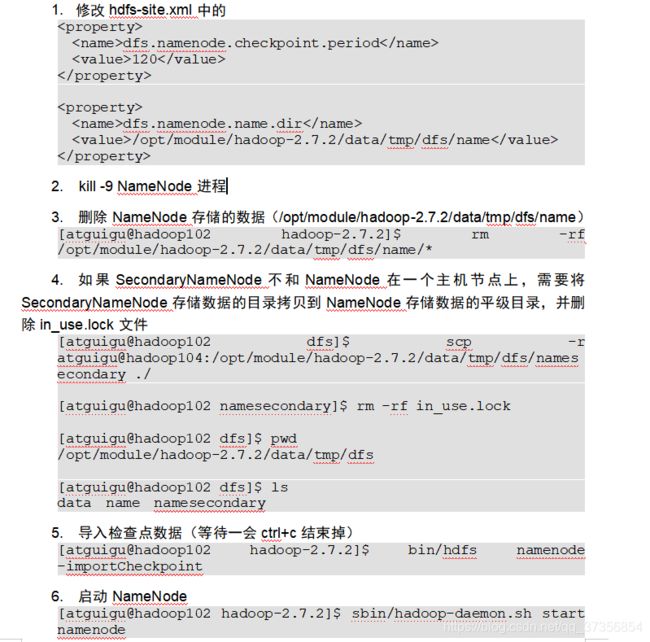
5.4 NameNode故障处理
NameNode故障后,可以采用如下两种方法恢复数据。
方法一:将secondaryNameNode中的数据拷贝到NameNode存储数据的目录中
- kill -9 NameNode进程
- 删除NameNode存储的数据(/opt/module/hadoop-2.7.2/data/tmp/dfs/name)
[atguigu@hadoop102 hadoop-2.7.2]$ rm -rf /opt/module/hadoop-2.7.2/data/tmp/dfs/name/*- 拷贝SecondaryNameNode中数据到原NameNode存储数据目录
[atguigu@hadoop102 dfs]$ scp -r atguigu@hadoop104:/opt/module/hadoop-2.7.2/data/tmp/dfs/namesecondary/* ./name/- 重新启动NameNode
[atguigu@hadoop102 hadoop-2.7.2]$ sbin/hadoop-daemon.sh start namenode方法二:使用-importCheckpoint选项启动NameNode守护进程,从而将SecondaryNameNode中数据拷贝到NameNode目录中。
5.5 集群安全模式
 基本语法集群处于安全模式,不能执行重要操作(写操作)。集群启动完成后,自动退出安全模式。
(1)bin/hdfs dfsadmin -safemode get (功能描述:查看安全模式状态)
(2)bin/hdfs dfsadmin -safemode enter (功能描述:进入安全模式状态)
(3)bin/hdfs dfsadmin -safemode leave (功能描述:离开安全模式状态)
(4)bin/hdfs dfsadmin -safemode wait (功能描述:等待安全模式状态)
- 查看当前模式
[atguigu@hadoop102 hadoop-2.7.2]$ hdfs dfsadmin -safemode getSafe mode is OFF- 先进入安全模式
[atguigu@hadoop102 hadoop-2.7.2]$ bin/hdfs dfsadmin -safemode enter- 创建并执行下列脚本
在/opt/module/hadoop-2.7.2路径上,编辑一个脚本safemode.sh
[atguigu@hadoop102 hadoop-2.7.2]$ touch safemode.sh
[atguigu@hadoop102 hadoop-2.7.2]$ vim safemode.sh 、
#!/bin/bash
hdfs dfsadmin -safemode wait
hdfs dfs -put /opt/module/hadoop-2.7.2/README.txt /
[atguigu@hadoop102 hadoop-2.7.2]$ chmod 777 safemode.sh
[atguigu@hadoop102 hadoop-2.7.2]$ ./safemode.sh - 再打开一个窗口执行
[atguigu@hadoop102 hadoop-2.7.2]$ bin/hdfs dfsadmin -safemode leave5.6 NameNode多目录配置
- NameNode的本地目录可以配置成多个,且每个目录存放内容相同,增加了可靠性
- 具体配置如下

1)一个数据块在DataNode上以文件形式存储在磁盘上,包括两个文件,一个是数据本身,一个是元数据包括数据块的长度,块数据的校验和,以及时间戳。
2)DataNode启动后向NameNode注册,通过后,周期性(1小时)的向NameNode上报所有的块信息。
3)心跳是每3秒一次,心跳返回结果带有NameNode给该DataNode的命令如复制块数据到另一台机器,或删除某个数据块。如果超过10分钟没有收到某个DataNode的心跳,则认为该节点不可用。
4)集群运行中可以安全加入和退出一些机器。
如下是DataNode节点保证数据完整性的方法。
1)当DataNode读取Block的时候,它会计算CheckSum。
2)如果计算后的CheckSum,与Block创建时值不一样,说明Block已经损坏。
3)Client读取其他DataNode上的Block。
4)DataNode在其文件创建后周期验证CheckSum


服役新数据节点 略
退役旧数据节点 略
黑名单退役 略
Datanode多目录配置 略
