初试PyOpenGL二 (Python+OpenGL)基本地形生成与高度检测
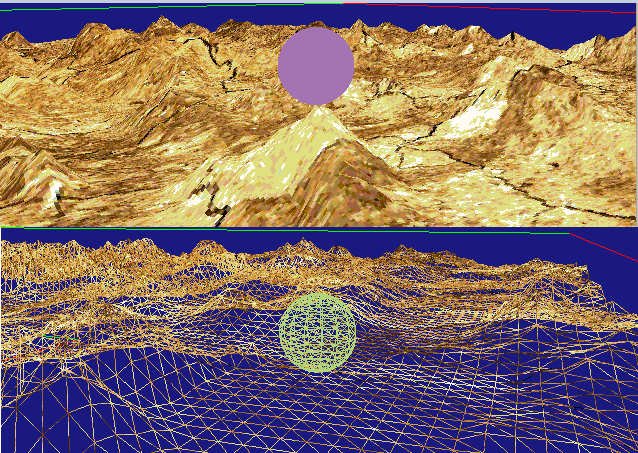
在上文中,讲述了PyOpenGL的基本配置,以及网格,球形的生成,以及基本的漫游。现在利用上一篇的内容,来利用高程图实现一个基本的地形,并且,利用上文中的第三人称漫游,以小球为视角,来在地形上前后左右漫游,能实时检测高度。下面先看下效果图:

二张图,球分别在不同的地方,不同的显示模型,一个是全填充的,一个是线连,可以从中看到一些基本的思路。大致过程分别如下,首先拿到一张高度图,检索其中的高度对应的通道的值,然后用来改变网格的高度。这个过程只需要在初始化时生成就行了,所以我们可以简单的用CPU来完成这个。然后是球体的漫游,这部分在上文中已经讲了第一与第三人称漫游,用的就是其中的第三人称作漫游,在这里,我们主要是要检索球下面的地形的高度,因为需要实时计算,这部分用GPU来完成。
我们先看下,根据高度图来改变网格高度的相关代码(请对照前文中的网格类Plane来看,下面的setHeight为其中的一个方法):

 1     def setHeight(this,image):

 2         ix = image.size[0]

 3         iy = image.size[1]

 4         this.heightImage = image

 5         print ix,iy

 6         #print "xr,yr",this.xr,this.yr

 7         lerp = lambda a,b,d:a * d + b * (1.0 - d)

 8         fade = lambda t : t*t*(3.0-2.0*t)  #t*t*t*(t*(t*6.0-15.0)+10.0)

 9         for y in range(this.yr):

10             for x in range(this.xr):

11                 index = 5 * (this.xr * y + x) + 3

12                 #print index

13                 fx = float(x) / float(this.xr - 1) * float(ix - 1)

14                 fy = float(y) / float(this.yr - 1) * float(iy - 1)

15                 #print float(x) / float(this.xr - 1),fx,float(y) / float(this.yr - 1),fy

16                 xl,xr,yu,yd = int(math.floor(fx)),int(math.ceil(fx)),int(math.floor(fy)),int(math.ceil(fy))

17                 dx,dy = fade(fx - xl),fade(fy - yu)

18                 #print "loc:",xl,xr,yu,yd,dx,dy

19                 #left up,right up,left down,right down

20                 lu,ru,ld,rd = image.im[ix * yu + xl],image.im[ix * yu + xr],image.im[ix * yd + xl],image.im[ix * yd + xr]

21                 #print ix * yu + xl,lu,ru,ld,rd

22                 hight = lerp(lerp(lu,ru,dx),lerp(ld,rd,dx),dy)

23                 this.data[index] = hight / 255.0

24                 #print "setHeight:",hight / 255.0
当初完成这段代码后,我有时后悔在前面学习noise时,没有自己先完成一个根据高度图生成地形,不然理解柏林噪声函数会是一件非常简单的事,这段代码很简单,得到image的信息,然后把原来的地形网格他们二个做一个映射关系,就好像二个大小不同的矩阵,根据其中一个在本矩阵里的位置,找出在另一个矩阵中对应的位置。首先index得到的是当初位置网络数据里的高度索引,第前面文章中,这个值是0,然后根据线性关系,就如上面后说,找到当前位置对应在image的位置,fx,fy.为什么我说很后悔先看了noise,大家可以看下,这里的代码的逻辑和noise里的就是一样,但是这里我可以自己推出来,而看noise里的过程花费太多不必要的时间。在这里,我们可以想象的到,fx,fy是整数的机会不大,那么无论取floor(fx)或ceil(fx),都有较大的偏差,正确的方法应该是根据fx的小数位来做floor(fx)或ceil(fx)权重进行计算。简单来说,就是根据fx,fy来取在它周围的四个像素点,然后根据他们的小数位来对四个小数点进行混合计算。其中小数部分需要的fade可以用lerp,也可以用二阶平滑来至三阶平滑的映射关系,而像素值根据简单线性关系求就可以了。理解这里的以后,再去看柏林噪声实践(一) 海波等就容易理解多了。
这个是初始化地形的高度值,下面就是重点,如果根据球所在的位置,来得到当前位置里的高度,然后用来设定球的高度(简化问题,只求球心下的高度,二片卡住球的问题就没考虑)。有了前面的基础,在CPU中进行得到高度值也很容易,但是现在是漫游过程中,当前位置每时都在计算,CPU应该用来进行更复杂的逻辑运算,这部分交给GPU了,先给出相关着色器代码:

 1 update_v = """

 2         //#version 330 compatibility

 3         #version 130

 4         uniform sampler2D tex0;

 5         uniform float xw;

 6         uniform float yw;

 7         uniform float height;

 8         //the location of center of the sphere

 9         uniform vec2 xz;

10         uniform float sphereRadius;

11         uniform mat4 mMatrix;

12         uniform mat4 vMatrix;

13         uniform mat4 pMatrix;

14         out vec4 o_color;

15         void main() {

16             vec4 pos = vec4(gl_Vertex);

17             vec2 uv = vec2(xz/vec2(xw,yw) + vec2(0.5,0.5));

18             uv.y = 1.0 - uv.y;

19             vec3 rgb =  texture2D(tex0, uv).rgb;

20             pos.y = pos.y + sphereRadius + rgb.r;//height;//

21             o_color = vec4(uv.x, uv.y, rgb.r, 1);

22             gl_Position = pMatrix * vMatrix * mMatrix * pos;

23

24             //vec4 v = vec4(gl_Vertex);

25             //vec2 uv = vec2(xz/vec2(xw,yw) + vec2(0.5,0.5)).xy;

26             //uv.y = 1.0 - uv.y;

27             //v.x = v.x + xz.x;

28             //v.z = v.z + xz.y;

29             //v.y = v.y + texture2D(tex0, uv).r+ sphereRadius;

30             //o_color = vec4(uv.x,uv.y, 0, 1 );

31             //gl_Position = gl_ModelViewProjectionMatrix * v;

32         }"""

33

34 update_f = """

35         //#version 330 compatibility

36         #version 130

37         in vec4 o_color;

38         void main() {

39             //vec4 color = texture2D(tex1, gl_TexCoord[0].st);

40             gl_FragColor = o_color;// vec4( 0, 1, 0, 1 );

41         }"""
这段代码大致思想和前面一样,不过纹理坐标需要映射到0-1之前,不过,也少了混合周围定点的计算,因为我们在设定纹理时(glTexParameterf),已经告诉着色器,自动线性混合了。在这里,需要说明的是,因为130后,已经废弃了固定管线的相关功能与API,虽然还能用,但是毕竟要向前看,所以主体的部分有二部分,一部分是用的是着色器版本120固定管线提供的gl_ModelViewProjectionMatrix,以及120后的,自己提供MVP,也顺便练习下如何在PyOpenGL里进行矩阵的基本操作。其中height是CPU计算的高度,这个就放附件里,不拿出来说了,至于为什么还拿出一个CPU版,前面不是说了不交给CPU吗,主要是我发现,有些旧的显卡对于这段逻辑处理还是有些问题(有一问题浪费大量时间才发现是旧显卡的问题),代码就不放了,大家有兴趣可以去附件里看。
嗯,还有必要说下绘制部分,地形网络用到一个颜色纹理,而球需要用到高度纹理,在glsl中,多纹理,多着色器如何设定以及完成。

 1 class allshader:

 2     def __init__(this):

 3         this.planeProgram = shaders.compileProgram(shaders.compileShader(plane_v, GL_VERTEX_SHADER),

 4             shaders.compileShader(plane_f, GL_FRAGMENT_SHADER))

 5         #the parameter tex0 must be use in shaders,otherwise the

 6         #glGetUniformLocation get -1

 7         this.planeProgram.tex0 = glGetUniformLocation(this.planeProgram,"tex0")

 8         this.planeProgram.tex1 = glGetUniformLocation(this.planeProgram,"tex1")

 9         print this.planeProgram.tex0,this.planeProgram.tex1

10

11         this.updateProgram = shaders.compileProgram(shaders.compileShader(update_v, GL_VERTEX_SHADER),

12             shaders.compileShader(update_f, GL_FRAGMENT_SHADER))

13         this.updateProgram.xl = glGetUniformLocation(this.updateProgram,"xw")

14         this.updateProgram.yl = glGetUniformLocation(this.updateProgram,"yw")

15         this.updateProgram.height = glGetUniformLocation(this.updateProgram,"height")

16         this.updateProgram.sphereRadius = glGetUniformLocation(this.updateProgram,"sphereRadius")

17         this.updateProgram.tex0 = glGetUniformLocation(this.updateProgram,"tex0")

18         this.updateProgram.xz = glGetUniformLocation(this.updateProgram,"xz")

19         this.updateProgram.hight = glGetUniformLocation(this.updateProgram,"hight")

20         this.updateProgram.mMatrix = glGetUniformLocation(this.updateProgram,"mMatrix")

21         this.updateProgram.vMatrix = glGetUniformLocation(this.updateProgram,"vMatrix")

22         this.updateProgram.pMatrix = glGetUniformLocation(this.updateProgram,"pMatrix")

23

24

25 def DrawGLScene():

26     glClear(GL_COLOR_BUFFER_BIT | GL_DEPTH_BUFFER_BIT)

27     glMatrixMode(GL_MODELVIEW)

28     camera.setLookat()

29     #texture set

30     glActiveTexture(GL_TEXTURE0)

31     glBindTexture(GL_TEXTURE_2D, colorMap)

32     glActiveTexture(GL_TEXTURE1)

33     glBindTexture(GL_TEXTURE_2D, hightMap)

34     #plane

35     glUseProgram(shaderall.planeProgram)

36     glUniform1i(shaderall.planeProgram.tex0, 0)

37     plane.draw()

38     glUseProgram(0)

39     #sphare

40     eyeLoc = camera.origin

41     uv = eyeLoc[0] / plane.xl + 0.5,eyeLoc[2] / plane.yl + 0.5

42     glUseProgram(shaderall.updateProgram)

43     glUniform1f(shaderall.updateProgram.xl, plane.xl)

44     glUniform1f(shaderall.updateProgram.yl, plane.yl)

45     #CPU compute height

46     #glUniform1f(shaderall.updateProgram.height, plane.getHeight(eyeLoc[0],eyeLoc[2]))

47     glUniform1f(shaderall.updateProgram.sphereRadius, sph.radius)

48     glUniform1i(shaderall.updateProgram.tex0, 1)

49     #print uv

50     glUniform2f(shaderall.updateProgram.xz,eyeLoc[0],eyeLoc[2])

51     #print "eye:",eyeLoc,eyeLoc[0],eyeLoc[2]

52     getMVP(eyeLoc)

53     sph.draw()

54     glUseProgram(0)

55     glActiveTexture(GL_TEXTURE0)

56     glBindTexture(GL_TEXTURE_2D, 0)

57     glDisable(GL_TEXTURE_2D)

58     glActiveTexture(GL_TEXTURE1)

59     glBindTexture(GL_TEXTURE_2D, 0)

60     glDisable(GL_TEXTURE_2D)

61

62     glBegin(GL_LINES)

63     glColor(1.0,0.0,0.0)

64     glVertex3f(-plane.xl / 2.0, 1.0, -plane.yl / 2.0)

65     glVertex3f(100.0, 1.0, -plane.yl / 2.0)

66     glColor(0.0,1.0,0.0)

67     glVertex3f(-plane.xl / 2.0, 1.0, -plane.yl / 2.0)

68     glVertex3f(-plane.xl / 2.0, 1.0, 100.0)

69

70     glColor(1.0,0.0,0.0)

71     glVertex3f(0.0, 0.0,0.0)

72     glVertex3f(100.0, 0.0, 0.0)

73     glColor(0.0,1.0,0.0)

74     glVertex3f(0.0, 0.0, 0.0)

75     glVertex3f(0.0, 1.0, 100.0)

76     glEnd()

77

78     glutSwapBuffers()
嗯,python好像对中文注解支持不友好,故采用我的鬼哭神嚎的英语,大家就不要笑了。说一下,后面给出二个坐标系,用来确定当家位置的,一个是左下角,一个是中心,分别向X,Z正轴发射出去。
下面这段是设定球MVP的代码:

1 def getMVP(eye):

2     v = ny.array(glGetFloatv(GL_MODELVIEW_MATRIX), ny.float32)

3     p = ny.array(glGetFloatv(GL_PROJECTION_MATRIX), ny.float32)

4     m = ny.array([[1, 0, 0, 0],[0, 1, 0, 0], [0, 0, 1, 0],[eye[0],0,eye[2],1]],ny.float32)

5     #print m

6     glUniformMatrix4fv(shaderall.updateProgram.pMatrix,1,GL_FALSE,p)

7     glUniformMatrix4fv(shaderall.updateProgram.vMatrix,1,GL_FALSE,v)

8     glUniformMatrix4fv(shaderall.updateProgram.mMatrix,1,GL_FALSE,m)

9     #glgeffloat
附件:Python地形.zip 和上方的漫游模式一样,其中EDSF前后左右移动,WR分别向上与向下,鼠标右键加移动鼠标控制方向,V切换第一人称与第三人称。UP与DOWN切换前面操作的移动幅度。在第三人称下,因为球中着色器限定了Y轴,故那时模式看起来如2.5D的那种游戏视角,能左右转动视角,不能看到天,不知2.5D游戏里的那种是不是也是这样被限制住了。
