在caffe框架中添加添加一个简单的新层
没错,我又来水经验了。在深度学习网络框架caffe中添加一个简单的新层,用来实现原框架中所没有的功能:输出一句话,以及一个看起来似乎并没有什么实际作用的参数,下面详细展开来说。
在添加新层的过程中,参考了网上一些博主的技术文章,感觉还是很有帮助的(好吧,其实本文就是将他们讲的东西稍微整理,结合自己的实现过程,在这里转述一下),下面贴出相关的博文地址:
https://blog.csdn.net/qq_33468806/article/details/68941195
https://blog.csdn.net/wanggao_1990/article/details/78863669?%3E
1. 首先,本文实现的Layer名称为AllPassLayer,这里不能和已有的层同名,功能为将输入到该层的数据不做任何改变直接输出到下一层(其间输出一句话和一个参数,证明数据确实经过了这个层)。AllPassLayer层的Forward和Backwark实现非常容易,直接将输入的blob数据复制到输出的blob中,因此基本可以加入到任何已有网络中,不影响训练和测试的结果。
2. 添加新的层AallPassLayer的实现,需要同其他的Layer类一样,分成声明和实现两个部分,对应放在.hpp和.cpp文件中,如果用到gpu的话,还应该有相应的.cu文件。其中.hpp头文件放在/caffe-windows/include/caffe/layers/文件夹下,而 .cpp 和 .cu 放入/caffe-windows/src/caffe/layers下。这里仅实现CPU上的代码。
all_pass_layer.hpp
#ifndef CAFFE_ALL_PASS_LAYER_HPP_
#define CAFFE_ALL_PASS_LAYER_HPP_

#include

#include "caffe/blob.hpp"
#include "caffe/layer.hpp"
#include "caffe/proto/caffe.pb.h"

#include "caffe/layers/neuron_layer.hpp"

namespace caffe {
template
class AllPassLayer : public NeuronLayer {
public:
    explicit AllPassLayer(const LayerParameter& param)
        : NeuronLayer(param) {}
    virtual inline const char* type() const { return "AllPass"; }

protected:
    virtual void Forward_cpu(const vector*>& bottom,
        const vector*>& top);
    virtual void Forward_gpu(const vector*>& bottom,
        const vector*>& top);
    virtual void Backward_cpu(const vector*>& top,
        const vector& propagate_down, const vector*>& bottom);
    virtual void Backward_gpu(const vector*>& top,
        const vector& propagate_down, const vector*>& bottom);
};

}  // namespace caffe
#endif  // CAFFE_ALL_PASS_LAYER_HPP_
正如所看到的那样,上面只是一些函数的声明,并没有具体的实现,实现的话要写在.cpp文件中。
all_pass_layer.cpp
#include
#include

#include "caffe/layers/all_pass_layer.hpp"

#include
using namespace std;
#define DEBUG_AP(str) cout<
void AllPassLayer::Forward_cpu(const vector*>& bottom,
    const vector*>& top) {
    const Dtype* bottom_data = bottom[0]->cpu_data();
    Dtype* top_data = top[0]->mutable_cpu_data();
    const int count = bottom[0]->count();

    //for (int i = 0; i < count; ++i) {
    //  top_data[i] = bottom_data[i];
    //}
    caffe_copy(count, bottom_data, top_data);

    //注意:获取参数的两个变量 "all_pass_param" 和 "key"
    DEBUG_AP("Here is All Pass Layer, forwarding.");
    DEBUG_AP(this->layer_param_.all_pass_param().key());
}

template
void AllPassLayer::Backward_cpu(const vector*>& top,
    const vector& propagate_down,
    const vector*>& bottom) {
    if (propagate_down[0]) {
        //const Dtype* bottom_data = bottom[0]->cpu_data();
        const Dtype* top_diff = top[0]->cpu_diff();
        Dtype* bottom_diff = bottom[0]->mutable_cpu_diff();
        const int count = bottom[0]->count();
        //for (int i = 0; i < count; ++i) {
        //  bottom_diff[i] = top_diff[i];
        //}
        caffe_copy(count, top_diff, bottom_diff);
    }
    //同上
    DEBUG_AP("Here is All Pass Layer, backwarding.");
    DEBUG_AP(this->layer_param_.all_pass_param().key());
}

#ifdef CPU_ONLY
STUB_GPU(AllPassLayer);
#endif

//注意:下面2行对层进行注册,必不可少;注意宏参数不能弄错
INSTANTIATE_CLASS(AllPassLayer); // 类的名称 AllPassLayer
REGISTER_LAYER_CLASS(AllPass);   // 层的名称 AllPass
}  // namespace caffe
3.修改caffe.proto文件
由于我们新添加的层是带有参数的,因此需要在caffe.proto中进行相应的注册和修改。
首先打开caffe/src/caffe/proto/caffe.proto文件,找到message LayerParameter{},在这里我们要为新添加的层注册一个类似于ID的东西。
顺便更改一下这个:
我们需要为新添加的层创造一个message函数:
message AllPassParameter {
          optional float key = 1 [default = 0];
        }
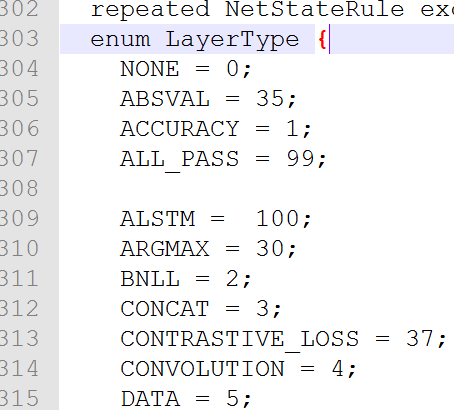
另外还要找到message V1LayerParameter里enum LayerType处加入ID,如下图:
在message V1LayerParameter的最后加入ID:
如果添加的层参数用到之前没有定义的参数变量,我们还要在message V0LayerParameter{}加入定义,我们定义的有一个参数key,因此需要在V0LayerParameter中添加如下:
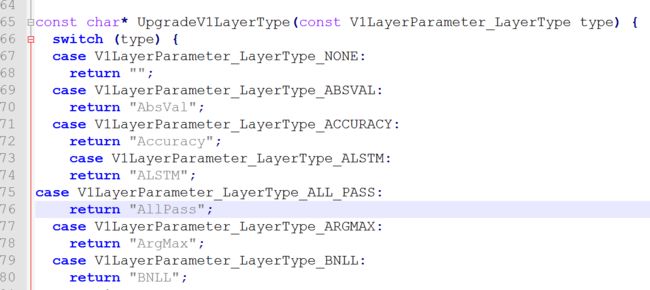
4. 另外还有一个要修改的在~\caffe-master\src\caffe\util\内upgrade_proto.cpp里const char* UpgradeV1LayerType(const V1LayerParameter_LayerType type) {
switch (type) {}里添加相关代码case...return,如下图:
这里AllPass与V1LayerParameter内的type名称要保持一致。
5. 最后一步,对于Windows下来说,也是最重要的一部,找到caffe/windows/libcaffe/下的libcaffe.vcxproj和libcaffe.vcxproj.filters进行修改,加入.hpp,.cpp,.cu(如果有的话)文件的路径:
第一步,在libcaffe.vcxproj加入
第二步:在libcaffe.vcxproj.filters加入
最后再重新编译caffe就可以了
以测试mnist为例,我将成功加入的层添加在了data层和第一层卷积层之间:
下面是用一张手写体数字进行测试的结果:
可以看到成功输出了一句话和一个参数,说明添加新层成功了。^_^


