做一个用python脚本生成bmp位图的小工具

需求

我有一些用代码生成位图的需求,例如给定一个坐标(x,y),通过一定的逻辑得到对应的颜色值。目的是以这样的方式得到一些用于调试的位图。

实现这个目的有多种方法,不过我最大的期望是—— “易用性” :我希望当我想生成一个位图时,所做的操作达到最小。这意味着:

  • 首先,这个“工具”不是一个纯C++的工程,否则我每次想生成新位图时,都需要打开我的工程,修改代码后,重新编译。换句话说,生成图片的逻辑需要在动态的脚本里,而不是需要编译的静态语言里。
  • Python脚本看起来是个可行的方案。不过这个“工具”也不应是个纯Python脚本,因为我觉得运行脚本也需要一定的操作量。
  • 我觉得,一个拥有图形界面的exe是最方便的“工具”。我可以在界面上写逻辑,随后点击一个按钮,就可以生成位图了。

另外,我还希望我的“工具”能够较为 “独立” ,这意味它的依赖尽可能少,这样我更方便在其他的环境中使用,或者分享出去。

我的方案

首先,生成图片的逻辑我想用Python脚本。不过生成BMP图片的代码我还是选择用C++,理由是我对python不够熟悉,我担心需要依赖其他的python模块,使得工具不太“独立”。
而图形界面我选择用C# Windows窗体,界面上可以指定位图的长宽信息以及生成图片的逻辑的python语句,当点击【生成】按钮后,会将这些作为参数传递给C++程序。
做一个用python脚本生成bmp位图的小工具_第1张图片

步骤1. 在C++中生成BMP图片

BMP文件格式

关于BMP文件的格式,以及如何生成一个BMP图片,网上已有很多资料可以参考,我主要参考了:
C语言集锦(一) C代码生成图片:BMP、PNG和JPEG - 星云的彼岸 - 博客园
c++创建BMP文件并写入数据_kupePoem的专栏-CSDN博客
BMP图像数据格式详解 - 屌丝迷途 - 博客园

总的来说,BMP文件的格式比较简单:

  • 开头是BMP文件头:BITMAPFILEHEADER
  • 紧接着是BMP信息头:BITMAPINFOHEADER
  • 随后是图像数据
C++工程

做一个用python脚本生成bmp位图的小工具_第2张图片

#include 

#pragma pack(2)//影响了“对齐”。可以实验前后 sizeof(BITMAPFILEHEADER) 的差别

typedef unsigned char  BYTE;
typedef unsigned short WORD;
typedef unsigned long  DWORD;
typedef long    LONG;

//BMP文件头:
struct BITMAPFILEHEADER 
{
     
	WORD  bfType;		//文件类型标识,必须为ASCII码“BM”
	DWORD bfSize;		//文件的尺寸,以byte为单位
	WORD  bfReserved1;	//保留字,必须为0
	WORD  bfReserved2;	//保留字,必须为0
	DWORD bfOffBits;	//一个以byte为单位的偏移,从BITMAPFILEHEADER结构体开始到位图数据
};

//BMP信息头:
struct BITMAPINFOHEADER 
{
     
	DWORD biSize;			//这个结构体的尺寸
	LONG  biWidth;			//位图的宽度
	LONG  biHeight;			//位图的长度
	WORD  biPlanes;			//The number of planes for the target device. This value must be set to 1.
	WORD  biBitCount;		//一个像素有几位
	DWORD biCompression;    //0:不压缩,1:RLE8,2:RLE4
	DWORD biSizeImage;      //4字节对齐的图像数据大小
	LONG  biXPelsPerMeter;  //用象素/米表示的水平分辨率
	LONG  biYPelsPerMeter;  //用象素/米表示的垂直分辨率
	DWORD biClrUsed;        //实际使用的调色板索引数,0:使用所有的调色板索引
	DWORD biClrImportant;	//重要的调色板索引数,0:所有的调色板索引都重要
};

//一个像素的颜色信息
struct RGBColor
{
     
	char B;		//蓝
	char G;		//绿
	char R;		//红
};

//将颜色数据写到一个BMP文件中
//FileName:文件名
//ColorBuffer:颜色数据
//ImageWidth:图像宽度
//ImageHeight:图像长度
void WriteBMP(const char* FileName, RGBColor* ColorBuffer, int ImageWidth, int ImageHeight)
{
     
	//颜色数据总尺寸:
	const int ColorBufferSize = ImageHeight * ImageWidth * sizeof(RGBColor);

	//文件头
	BITMAPFILEHEADER fileHeader;
	fileHeader.bfType = 0x4D42;	//0x42是'B';0x4D是'M'
	fileHeader.bfReserved1 = 0;
	fileHeader.bfReserved2 = 0;
	fileHeader.bfSize = sizeof(BITMAPFILEHEADER) + sizeof(BITMAPINFOHEADER) + ColorBufferSize;
	fileHeader.bfOffBits = sizeof(BITMAPFILEHEADER) + sizeof(BITMAPINFOHEADER);
	
	//信息头
	BITMAPINFOHEADER bitmapHeader = {
      0 };
	bitmapHeader.biSize = sizeof(BITMAPINFOHEADER);
	bitmapHeader.biHeight = ImageHeight;
	bitmapHeader.biWidth = ImageWidth;
	bitmapHeader.biPlanes = 1;
	bitmapHeader.biBitCount = 24;
	bitmapHeader.biSizeImage = ColorBufferSize;
	bitmapHeader.biCompression = 0; //BI_RGB


	FILE *fp;//文件指针

	//打开文件(没有则创建)
	fopen_s(&fp, FileName, "wb");

	//写入文件头和信息头
	fwrite(&fileHeader, sizeof(BITMAPFILEHEADER), 1, fp);
	fwrite(&bitmapHeader, sizeof(BITMAPINFOHEADER), 1, fp);
	//写入颜色数据
	fwrite(ColorBuffer, ColorBufferSize, 1, fp);
	
	fclose(fp);
}

int main()
{
     
	int ImageWidth = 256;	//图片宽度
	int ImageHeight = 256;	//图片长度
	const char* FileName = "test.bmp";//输出图片名字

	//颜色数据
	RGBColor* ColorBuffer = new RGBColor[ImageWidth*ImageWidth];

	//--------------------图片中颜色数据--------------------
	//暂时用C++代码写,之后期望被替换为python脚本的逻辑
	for (int y = 0; y < ImageHeight; y++)
		for (int x = 0; x < ImageWidth; x++)
		{
     
			int index = x + y * ImageWidth;
			ColorBuffer[index].R = x;
			ColorBuffer[index].G = y;
			ColorBuffer[index].B = y;
		}
	//------------------------------------------------------

	//写入BMP文件:
	WriteBMP(FileName, ColorBuffer, ImageWidth, ImageHeight);
	
	//打开文件:
	system(FileName);
	
	return 0;
}

其中,生成图像的逻辑是:(之后期望被替换为python脚本的逻辑)

ColorBuffer[index].R = x;
ColorBuffer[index].G = y;
ColorBuffer[index].B = y;

生成的图片为:
做一个用python脚本生成bmp位图的小工具_第3张图片

步骤2. 使用python脚本作为处理图片颜色的逻辑

在上一篇博客《实践在C++中调用Python函数》中,有实践如何在C代码中与python进行交互。这里和之前的类似。

#include "Python.h"

main函数修改如下:

int main()
{
     
	int ImageWidth = 256;	//图片宽度
	int ImageHeight = 256;	//图片长度
	const char* FileName = "test.bmp";//输出图片名字

	//颜色数据
	RGBColor* ColorBuffer = new RGBColor[ImageWidth*ImageWidth];

	//准备python的环境----------------------------------------
	Py_SetProgramName(L"PictureGenerator");
	Py_Initialize();
	//定义计算颜色值的函数【ProcessPixel】,当前硬编码,之后期望作为参数传入
	PyRun_SimpleString(	
		"def ProcessPixel(x,y):\n"
		"    r = x\n"
		"    g = 128\n"
		"    b = y\n"
		"    return r,g,b\n");
	//main模块:
	PyObject* mainModule = PyImport_ImportModule("__main__");
	//找到【ProcessPixel】函数的地址
	PyObject* pFunc_ProcessPixel = PyObject_GetAttrString(mainModule, "ProcessPixel");

	//--------------------图片中颜色数据--------------------
	//将逐个像素调用【ProcessPixel】函数
	for (int y = 0; y < ImageHeight; y++)
		for (int x = 0; x < ImageWidth; x++)
		{
     
			int index = x + y * ImageWidth;

			//设置参数的值x,y
			PyObject* pArgs = PyTuple_New(2);		
			PyTuple_SetItem(pArgs, 0, PyLong_FromLong(x));
			PyTuple_SetItem(pArgs, 1, PyLong_FromLong(y));

			//调用函数
			PyObject* pReturnValue = PyObject_CallObject(pFunc_ProcessPixel, pArgs);

			//拆解返回结果		
			ColorBuffer[index].R = PyLong_AsLong(PyTuple_GetItem(pReturnValue, 0));
			ColorBuffer[index].G = PyLong_AsLong(PyTuple_GetItem(pReturnValue, 1));
			ColorBuffer[index].B = PyLong_AsLong(PyTuple_GetItem(pReturnValue, 2));
		}
	//------------------------------------------------------

	//写入BMP文件:
	WriteBMP(FileName, ColorBuffer, ImageWidth, ImageHeight);
	
	//打开文件:
	system(FileName);
	
	return 0;
}

其中,生成图像的逻辑在Python脚本中:

PyRun_SimpleString(	
	"def ProcessPixel(x,y):\n"
	"    r = x\n"
	"    g = 128\n"
	"    b = y\n"
	"    return r,g,b\n");

生成的图像:
做一个用python脚本生成bmp位图的小工具_第4张图片

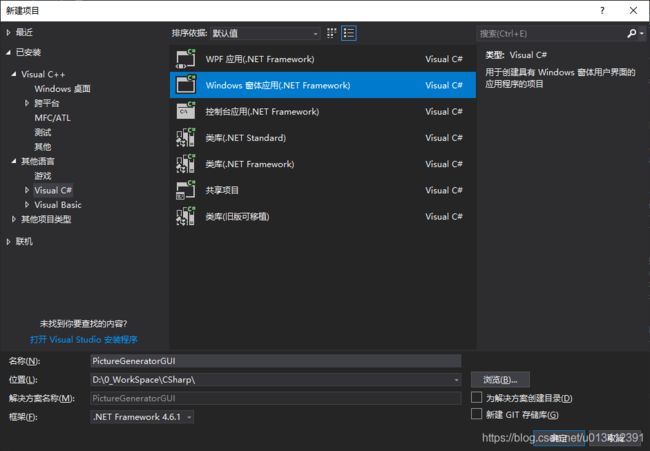
3. 使用C# Windows窗体提供用户界面

做一个用python脚本生成bmp位图的小工具_第5张图片
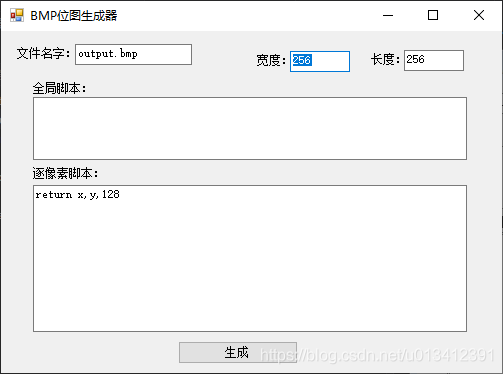
界面如下:
做一个用python脚本生成bmp位图的小工具_第6张图片
点击按钮的脚本如下:
首先是传递相关的参数:

//python函数名字:
const string FunctionName = "ProcessPixel";

string Arguments = "";//最终传入的参数
{
     
    //图片名字:
    Arguments += ImageNameText.Text + ' ';
    //图片宽度:
    Arguments += ImageWidthText.Text + ' ';
    //图片高度:
    Arguments += ImageHeightText.Text + ' ';
    //函数名字:
    Arguments += FunctionName + ' ';
   
    //定义函数:
    Arguments += "\"";          //开头双引号
    Arguments += "def ";
    Arguments += FunctionName;
    Arguments += "(x,y):\n";
    //函数体:
    for (int l = 0; l < PixelScript.Lines.Length; l++)
        Arguments += "    " + PixelScript.Lines[l] + "\n";
    Arguments += "\" ";          //结尾双引号

    //全局语句:
    for (int l = 0; l < GlobalScript.Lines.Length; l++)
    {
     
        if(GlobalScript.Lines[l].Length>0)
        {
     
            Arguments += "\"";          //开头双引号
            Arguments += GlobalScript.Lines[l] + "\n";
            Arguments += "\" ";          //结尾双引号
        }                 
    }   
}

调用exe:

//新进程
System.Diagnostics.Process process = new System.Diagnostics.Process();
//程序exe路径
process.StartInfo.FileName = "PictureGenerator.exe";   
//参数
process.StartInfo.Arguments = Arguments;
//启动进程
process.Start();

当然,C++程序为了接收对应的参数,也需要做修改:

int main(int argc, char *argv[])
{
     
	if (argc < 6)//参数不够,直接返回
		return 0;
	
	char* FileName = argv[1];			//输出图片名字
	int ImageWidth = atoi(argv[2]);		//图片宽度
	int ImageHeight = atoi(argv[3]);	//图片长度
	
	char* FunctionName = argv[4];		//函数的名字
	char* FunctionDefCode = argv[5];	//定义函数的代码
	

	//颜色数据
	RGBColor* ColorBuffer = new RGBColor[ImageWidth*ImageWidth];

	//准备python的环境----------------------------------------
	Py_SetProgramName(L"PictureGenerator");
	Py_Initialize();
	//定义计算颜色值的函数
	PyRun_SimpleString(FunctionDefCode);
	//一些全局语句:
	for (int i = 6; i < argc; i++)
		PyRun_SimpleString(argv[i]);
...

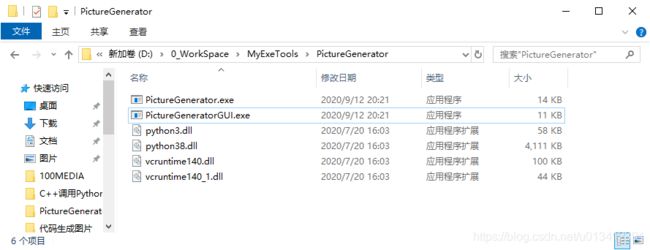
编译后,可以将C++、C#程序的exe,以及python相关的dll拷贝到同一个目录。这样“工具”就完成了:
做一个用python脚本生成bmp位图的小工具_第7张图片
最终效果:
做一个用python脚本生成bmp位图的小工具_第8张图片
(GIF压缩看起来让图片有了点“不一样”的效果,实际图片如下)
做一个用python脚本生成bmp位图的小工具_第9张图片

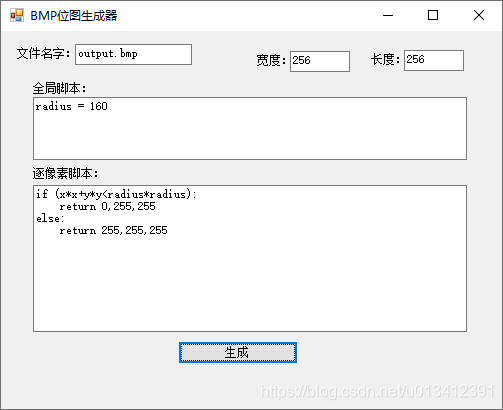
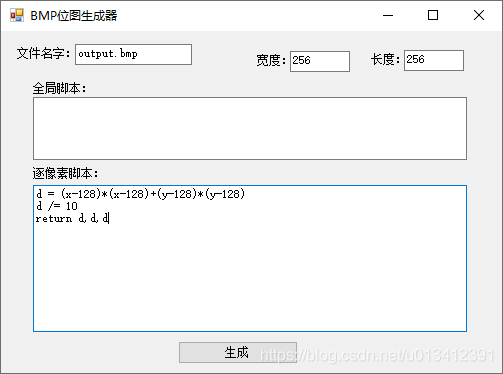
一些试用

四分之一圆

做一个用python脚本生成bmp位图的小工具_第10张图片
做一个用python脚本生成bmp位图的小工具_第11张图片

辐射图案

做一个用python脚本生成bmp位图的小工具_第12张图片
做一个用python脚本生成bmp位图的小工具_第13张图片

最终完整代码

C++
#include 

#include "Python.h"

#pragma pack(2)//影响了“对齐”。可以实验前后 sizeof(BITMAPFILEHEADER) 的差别

typedef unsigned char  BYTE;
typedef unsigned short WORD;
typedef unsigned long  DWORD;
typedef long    LONG;

//BMP文件头:
struct BITMAPFILEHEADER 
{
     
	WORD  bfType;		//文件类型标识,必须为ASCII码“BM”
	DWORD bfSize;		//文件的尺寸,以byte为单位
	WORD  bfReserved1;	//保留字,必须为0
	WORD  bfReserved2;	//保留字,必须为0
	DWORD bfOffBits;	//一个以byte为单位的偏移,从BITMAPFILEHEADER结构体开始到位图数据
};

//BMP信息头:
struct BITMAPINFOHEADER 
{
     
	DWORD biSize;			//这个结构体的尺寸
	LONG  biWidth;			//位图的宽度
	LONG  biHeight;			//位图的长度
	WORD  biPlanes;			//The number of planes for the target device. This value must be set to 1.
	WORD  biBitCount;		//一个像素有几位
	DWORD biCompression;    //0:不压缩,1:RLE8,2:RLE4
	DWORD biSizeImage;      //4字节对齐的图像数据大小
	LONG  biXPelsPerMeter;  //用象素/米表示的水平分辨率
	LONG  biYPelsPerMeter;  //用象素/米表示的垂直分辨率
	DWORD biClrUsed;        //实际使用的调色板索引数,0:使用所有的调色板索引
	DWORD biClrImportant;	//重要的调色板索引数,0:所有的调色板索引都重要
};

//一个像素的颜色信息
struct RGBColor
{
     
	char B;		//蓝
	char G;		//绿
	char R;		//红
};

//将颜色数据写到一个BMP文件中
//FileName:文件名
//ColorBuffer:颜色数据
//ImageWidth:图像宽度
//ImageHeight:图像长度
void WriteBMP(const char* FileName, RGBColor* ColorBuffer, int ImageWidth, int ImageHeight)
{
     
	//颜色数据总尺寸:
	const int ColorBufferSize = ImageHeight * ImageWidth * sizeof(RGBColor);

	//文件头
	BITMAPFILEHEADER fileHeader;
	fileHeader.bfType = 0x4D42;	//0x42是'B';0x4D是'M'
	fileHeader.bfReserved1 = 0;
	fileHeader.bfReserved2 = 0;
	fileHeader.bfSize = sizeof(BITMAPFILEHEADER) + sizeof(BITMAPINFOHEADER) + ColorBufferSize;
	fileHeader.bfOffBits = sizeof(BITMAPFILEHEADER) + sizeof(BITMAPINFOHEADER);
	
	//信息头
	BITMAPINFOHEADER bitmapHeader = {
      0 };
	bitmapHeader.biSize = sizeof(BITMAPINFOHEADER);
	bitmapHeader.biHeight = ImageHeight;
	bitmapHeader.biWidth = ImageWidth;
	bitmapHeader.biPlanes = 1;
	bitmapHeader.biBitCount = 24;
	bitmapHeader.biSizeImage = ColorBufferSize;
	bitmapHeader.biCompression = 0; //BI_RGB


	FILE *fp;//文件指针

	//打开文件(没有则创建)
	fopen_s(&fp, FileName, "wb");

	//写入文件头和信息头
	fwrite(&fileHeader, sizeof(BITMAPFILEHEADER), 1, fp);
	fwrite(&bitmapHeader, sizeof(BITMAPINFOHEADER), 1, fp);
	//写入颜色数据
	fwrite(ColorBuffer, ColorBufferSize, 1, fp);
	
	fclose(fp);
}

int main(int argc, char *argv[])
{
     
	if (argc < 6)//参数不够,直接返回
		return 0;
	
	char* FileName = argv[1];			//输出图片名字
	int ImageWidth = atoi(argv[2]);		//图片宽度
	int ImageHeight = atoi(argv[3]);	//图片长度
	
	char* FunctionName = argv[4];		//函数的名字
	char* FunctionDefCode = argv[5];	//定义函数的代码
	

	//颜色数据
	RGBColor* ColorBuffer = new RGBColor[ImageWidth*ImageWidth];

	//准备python的环境----------------------------------------
	Py_SetProgramName(L"PictureGenerator");
	Py_Initialize();
	//定义计算颜色值的函数
	PyRun_SimpleString(FunctionDefCode);
	//一些全局语句:
	for (int i = 6; i < argc; i++)
		PyRun_SimpleString(argv[i]);
	//main模块:
	PyObject* mainModule = PyImport_ImportModule("__main__");
	//找到函数的地址
	PyObject* pFunc_ProcessPixel = PyObject_GetAttrString(mainModule, FunctionName);

	//--------------------图片中颜色数据--------------------
	//将逐个像素调用【ProcessPixel】函数
	for (int y = 0; y < ImageHeight; y++)
		for (int x = 0; x < ImageWidth; x++)
		{
     
			int index = x + y * ImageWidth;

			//设置参数的值x,y
			PyObject* pArgs = PyTuple_New(2);		
			PyTuple_SetItem(pArgs, 0, PyLong_FromLong(x));
			PyTuple_SetItem(pArgs, 1, PyLong_FromLong(y));

			//调用函数
			PyObject* pReturnValue = PyObject_CallObject(pFunc_ProcessPixel, pArgs);

			//拆解返回结果		
			ColorBuffer[index].R = PyLong_AsLong(PyTuple_GetItem(pReturnValue, 0));
			ColorBuffer[index].G = PyLong_AsLong(PyTuple_GetItem(pReturnValue, 1));
			ColorBuffer[index].B = PyLong_AsLong(PyTuple_GetItem(pReturnValue, 2));
		}
	//------------------------------------------------------

	//写入BMP文件:
	WriteBMP(FileName, ColorBuffer, ImageWidth, ImageHeight);
	
	//打开文件:
	system(FileName);
	
	return 0;
}
C#
private void GenerateButton_Click(object sender, EventArgs e)
{
     
    //python函数名字:
    const string FunctionName = "ProcessPixel";

    string Arguments = "";//最终传入的参数
    {
     
        //图片名字:
        Arguments += ImageNameText.Text + ' ';
        //图片宽度:
        Arguments += ImageWidthText.Text + ' ';
        //图片高度:
        Arguments += ImageHeightText.Text + ' ';
        //函数名字:
        Arguments += FunctionName + ' ';
       
        //定义函数:
        Arguments += "\"";          //开头双引号
        Arguments += "def ";
        Arguments += FunctionName;
        Arguments += "(x,y):\n";
        //函数体:
        for (int l = 0; l < PixelScript.Lines.Length; l++)
            Arguments += "    " + PixelScript.Lines[l] + "\n";
        Arguments += "\" ";          //结尾双引号

        //全局语句:
        for (int l = 0; l < GlobalScript.Lines.Length; l++)
        {
     
            if(GlobalScript.Lines[l].Length>0)
            {
     
                Arguments += "\"";          //开头双引号
                Arguments += GlobalScript.Lines[l] + "\n";
                Arguments += "\" ";          //结尾双引号
            }                 
        }   
    }
    
    //新进程
    System.Diagnostics.Process process = new System.Diagnostics.Process();
    //程序exe路径
    process.StartInfo.FileName = "PictureGenerator.exe";   
    //参数
    process.StartInfo.Arguments = Arguments;
    //启动进程
    process.Start();
}

你可能感兴趣的:(Python,我的工具,python,c++,c#)