Unity3d插件NGUI拓展修改——简单实现反向九宫格拉伸UISprite
最近这段时间在公司负责开发新手指引功能,要实现一个铺满屏幕的黑底中只露出一个可操作的圆形的显示效果,考虑到这个圆形可能出现在屏幕的任何位置,如果想确保铺满屏幕的话需要使用的图片将会很大,为了实现这么一个显示效果使用这么大的图集资源显然是不可取的。所以我们开始使用的是一张有圆形空洞的矩形图片加上四张拉伸放大的黑色图片拼接出这个效果,但是当打包到手机平台时图片间的边缘会出现很明显的缝隙,显然不是我们想要的效果,这时我想到了NGUI的UISprite自带的九宫格切割效果,决定尝试可以修改UISprite来实现我称之为“反向九宫格”的效果。(PS:由于公司项目选用的是NGUI 2.7.0的老版本所以本次实现也是基于这个版本。但是我想思路是共通的。希望可以帮助到有需要的人。)
说干就干,首先在UISprite里的Type枚举添加一个新类型ReverseSliced,并修改OnFill函数和border,在border的get方法中添加了一个ReverseSliced的条件
public enum Type
{
    Simple,
    Sliced,
    Tiled,
    Filled,
    ReverseSliced,
}

public override void OnFill (BetterList verts, BetterList uvs, BetterList cols)
{
    switch (type)
    {
        case Type.Simple:
	SimpleFill(verts, uvs, cols);
	break;

	case Type.Sliced:
	SlicedFill(verts, uvs, cols);
	break;

	case Type.Filled:
	FilledFill(verts, uvs, cols);
	break;

	case Type.Tiled:
	TiledFill(verts, uvs, cols);
	break;

	case Type.ReverseSliced:
	ReverseSlicedFill(verts, uvs, cols);
	break;
}

///
/// Sliced sprites generally have a border.
///

public override Vector4 border
{
    get
    {
        if (type == Type.Sliced || type == Type.ReverseSliced)
        {
            UIAtlas.Sprite sp = GetAtlasSprite();
            if (sp == null) return Vector2.zero;

            Rect outer = sp.outer;
            Rect inner = sp.inner;

            Texture tex = mainTexture;

            if (atlas.coordinates == UIAtlas.Coordinates.TexCoords && tex != null)
            {
                outer = NGUIMath.ConvertToPixels(outer, tex.width, tex.height, true);
                inner = NGUIMath.ConvertToPixels(inner, tex.width, tex.height, true);
            }
            return new Vector4(inner.xMin - outer.xMin, inner.yMin - outer.yMin, outer.xMax - inner.xMax, outer.yMax - inner.yMax) * atlas.pixelSize;
        }
        return base.border;
    }
} 以下是ReverseSlicedFill函数的实现:
///
/// 反向Sliced九宫格
///
protected void ReverseSlicedFill (BetterList verts, BetterList uvs, BetterList cols)
{
    if (mOuterUV == mInnerUV)
    {
        SimpleFill(verts, uvs, cols);
        return;
    }

    Vector2[] v = new Vector2[4];
    Vector2[] uv = new Vector2[4];

    Texture tex = mainTexture;

    v[0] = Vector2.zero;
    v[1] = Vector2.zero;
    v[2] = new Vector2(1f, -1f);
    v[3] = new Vector2(1f, -1f);

    Rect middleUV = new Rect();

    if (tex != null)
    {
        float pixelSize = atlas.pixelSize;
        float borderLeft = (mInnerUV.xMin - mOuterUV.xMin) * pixelSize;
        float borderRight = (mOuterUV.xMax - mInnerUV.xMax) * pixelSize;
        float borderTop = (mInnerUV.yMax - mOuterUV.yMax) * pixelSize;
        float borderBottom = (mOuterUV.yMin - mInnerUV.yMin) * pixelSize;

        Vector3 gScale = cachedTransform.localScale;	//最后可以算出图集内图片的原尺寸
        Rect rect = NGUIMath.ConvertToPixels(outerUV, tex.width, tex.height, true);
        gScale.x = Mathf.RoundToInt(rect.width * pixelSize) * Mathf.Sign(gScale.x);
        gScale.y = Mathf.RoundToInt(rect.height * pixelSize) * Mathf.Sign(gScale.y);
        int width = Mathf.RoundToInt(Mathf.Abs(gScale.x) * (1f + mSprite.paddingLeft + mSprite.paddingRight));
        int height = Mathf.RoundToInt(Mathf.Abs(gScale.y) * (1f + mSprite.paddingTop + mSprite.paddingBottom));

        Vector3 scale = cachedTransform.localScale;
        scale.x = Mathf.Max(0f, scale.x);
        scale.y = Mathf.Max(0f, scale.y);

        Vector2 sz = new Vector2(scale.x / tex.width, scale.y / tex.height);
        Vector2 tl = new Vector2(borderLeft / sz.x, borderTop / sz.y);
        Vector2 br = new Vector2(borderRight / sz.x, borderBottom / sz.y);
        float halfInnerWidth = width / 2 - border.x;    //九宫格最中间的范围宽度的一半
        float halfNowWidth = scale.x / 2;
        float halfInnerHeight = height / 2 - border.y;  //九宫格最中间的范围高度的一半
        float halfNowHeight = scale.y / 2;

        v[1].x = 0.5f - Mathf.Abs(halfInnerWidth / halfNowWidth) / 2.0f;
        v[2].x = 1f - v[1].x;
        v[3].x = Mathf.Max(tl.x + br.x, 1f);

        v[1].y = -(0.5f - Mathf.Abs(halfInnerHeight / halfNowHeight) / 2.0f);
        v[2].y = -(1.0f - Mathf.Abs(v[1].y));
        v[3].y = Mathf.Min(tl.y + br.y, -1f);

        uv[0] = new Vector2(mOuterUV.xMin, mOuterUV.yMax);
        uv[1] = new Vector2(mInnerUV.xMin, mInnerUV.yMax);
        uv[2] = new Vector2(mInnerUV.xMax, mInnerUV.yMin);
        uv[3] = new Vector2(mOuterUV.xMax, mOuterUV.yMin);
    }
    else
    {
        // No texture -- just use zeroed out texture coordinates
        for (int i = 0; i < 4; ++i) uv[i] = Vector2.zero;
    }

    Color colF = color;
    colF.a *= mPanel.alpha;
    Color32 col = atlas.premultipliedAlpha ? NGUITools.ApplyPMA(colF) : colF;

    for (int x = 0; x < 3; ++x)
    {
        nt x2 = x + 1;

        for (int y = 0; y < 3; ++y)
        {
            if (!mFillCenter && x == 1 && y == 1) continue;

            int y2 = y + 1;
            verts.Add(new Vector3(v[x2].x, v[y].y, 0f));
            verts.Add(new Vector3(v[x2].x, v[y2].y, 0f));
            verts.Add(new Vector3(v[x].x, v[y2].y, 0f));
            verts.Add(new Vector3(v[x].x, v[y].y, 0f));

            uvs.Add(new Vector2(uv[x2].x, uv[y].y));
            uvs.Add(new Vector2(uv[x2].x, uv[y2].y));
            uvs.Add(new Vector2(uv[x].x, uv[y2].y));
            uvs.Add(new Vector2(uv[x].x, uv[y].y));

            cols.Add(col);
	    cols.Add(col);
	    cols.Add(col);
            cols.Add(col);
        }
    }
}
和对应的UISpriteInspector脚本:
///
/// Sprites's custom properties based on the type.
///

protected override void DrawExtraProperties ()
{
    NGUIEditorTools.DrawSeparator();

    if (GetType() == typeof(UISpriteInspector))
    {
        //GUILayout.BeginHorizontal();
        UISprite.Type type = (UISprite.Type)EditorGUILayout.EnumPopup("Sprite Type", mSprite.type);
        //GUILayout.Label("sprite", GUILayout.Width(58f));
        //GUILayout.EndHorizontal();

        if (mSprite.type != type)
        {
            NGUIEditorTools.RegisterUndo("Sprite Change", mSprite);
            mSprite.type = type;
            EditorUtility.SetDirty(mSprite.gameObject);
        }
    }

    if (mSprite.type == UISprite.Type.Sliced)
    {
        bool fill = EditorGUILayout.Toggle("Fill Center", mSprite.fillCenter);

        if (mSprite.fillCenter != fill)
        {
            NGUIEditorTools.RegisterUndo("Sprite Change", mSprite);
            mSprite.fillCenter = fill;
            EditorUtility.SetDirty(mSprite.gameObject);
        }
    }
    else if (mSprite.type == UISprite.Type.Filled)
    {
        if ((int)mSprite.fillDirection > (int)UISprite.FillDirection.Radial360)
        {
            mSprite.fillDirection = UISprite.FillDirection.Horizontal;
            EditorUtility.SetDirty(mSprite);
        }

        UISprite.FillDirection fillDirection = (UISprite.FillDirection)        EditorGUILayout.EnumPopup("Fill Dir", mSprite.fillDirection);
        float fillAmount = EditorGUILayout.Slider("Fill Amount", mSprite.fillAmount, 0f, 1f);
        bool invert = EditorGUILayout.Toggle("Invert Fill", mSprite.invert);

        if (mSprite.fillDirection != fillDirection || mSprite.fillAmount != fillAmount || mSprite.invert != invert)
        {
            NGUIEditorTools.RegisterUndo("Sprite Change", mSprite);
            mSprite.fillDirection = fillDirection;
            mSprite.fillAmount = fillAmount;
            mSprite.invert = invert;
            EditorUtility.SetDirty(mSprite);
        }
    }
    else if (mSprite.type == UISprite.Type.ReverseSliced)
    {
        bool fill = EditorGUILayout.Toggle("Fill Center", mSprite.fillCenter);

        if (mSprite.fillCenter != fill)
        {
            NGUIEditorTools.RegisterUndo("Sprite Change", mSprite);
            mSprite.fillCenter = fill;
            EditorUtility.SetDirty(mSprite.gameObject);
        }
    }
    GUILayout.Space(4f);
}
可以看到我只是简单的修改了一下顶点信息中的v[1],v[2]的值,使得它们不会因为缩放而改变。而且我目前还未对不同的锚点做相应的处理,也许以后有时间会补上。
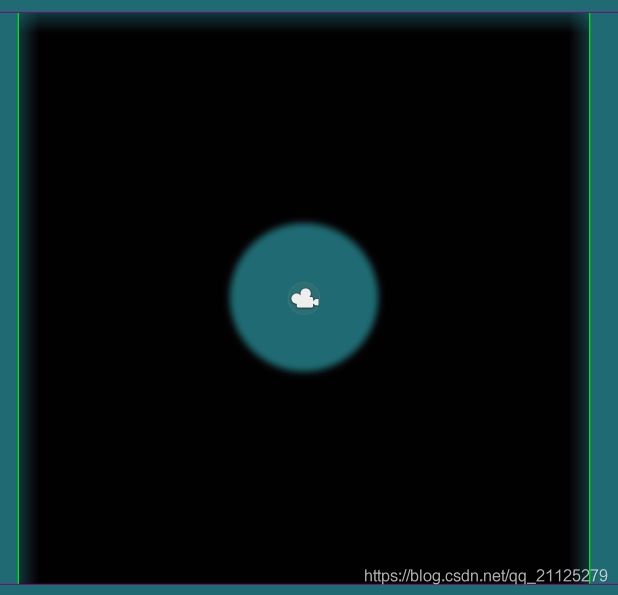
最后附上实现以后的效果截图,图内是一个500x500的Sprite对象,而次图片在图集内的大小只有156x156。希望能帮助到有同样需求的人。
