使用WIF实现单点登录Part III —— 正式实战
不好意思,最近一段时间真是太忙了,导致一直没有更新,有好几位朋友都表示让我赶紧接着往下写,偶心里真是挺感动~~
好了,经过前两篇文章,估计大家对WIF已经有比较充分的认识了,估计大家在经过了枯燥的理论以后,肯定是摩拳擦掌赶紧付诸于行动了。没办法,咱们程序员就是这个毛病。那好吧,我也不那么多废话了,直接进入正题吧。
我们接下来的demo将包括以下的工程:
- SiteA —— 基于.net framework 4.5的MVC 4程序,使用WIF 4.5的SDK,第一个RP
- SiteB —— 基于.net framework 4.5的MVC 4程序,使用WIF 3.5的SDK,第二个RP
- SiteC —— 基于.net framework 4.0的MVC 4程序,使用WIF 3.5的SDK,第三个RP
- SiteD —— 基于.net framework 4.0 的WebApplication程序,使用WIF 3.5的SDK,第四个RP
- STS —— 基于.net framework 4.5 的MVC 4程序,作为IP
一、创建第一个RP
以管理员身份打开vs2012,在起始页上点击“新建项目”,在左边的“模板”树下,展开“其它项目类型”,然后选择“Visual Studio解决方案”,“名称”输入框里输入WIFSSO,然后选择解决方案的路径后点击”确定“,如图:
在”解决方案资源管理器“中,在新建好的解决方案上点右键,选择”添加“->”新建项目“。在弹出的对话框中选择”ASP.NET MVC 4 Web应用程序“,记得.Net Framework版本选4.5,名称起名为”SiteA“,然后点确定,如图:
在弹出的“新ASP.NET MVC 4项目”对话框中直接点“确定”,第一个RP项目新建完成后,添加以下两个引用:System.IdentityModel和System.IdentityModel.Services。这次的教程不使用Identity and Access Tool,而是直接修改web.config文件,这样能使大家对WIF的配置有更深入的了解。
打开web.config文件,将configSections节里的entityFramework配置节点删掉,因为我们不需要用到Entity Framework。最好把web.config中关于Entity Framework相关的配置全都删掉,因为我们都用不上。然后加上以下这两个节点:
将authentication节的mode属性设为None,并把里面的form节点删掉,因为我们采用的是WIF的身份验证方式,而不是传统的Forms身份验证。然后增加authorization节点,不允许匿名用户访问站点:
在system.webServer节点下增加2个HttpModule的配置节点:
最后,增加WIF的配置节点:
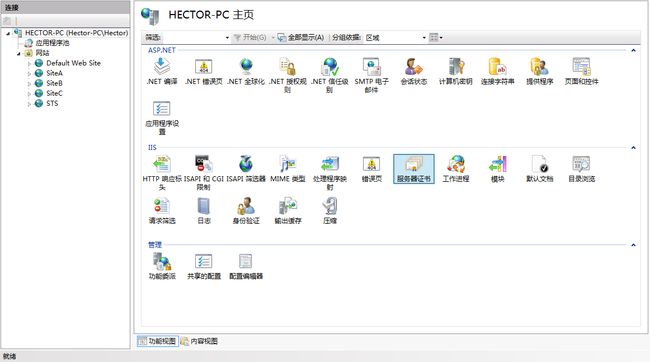
我来详细解释一下这些节点的意义。audienceUris指定了一组可以被RP接受的身份标识URI,只有这些配置中的URI范围内的令牌才可以被接受。这里,我把siteA配置在这里。trustedIssuers就是受信任的发行者,由于我们这个demo没有用到SSL,所以这里我指定的thumbprint是IIS Express的指纹,这个指纹在哪里可以获得呢?打开IIS管理器,在左侧树点击根节点,然后在“功能视图”里双击“服务器证书",如下图:
在打开的证书列表里,找到IIS Express Development Certificate,双击,在弹出的”证书“对话框中点击“详细信息”页签,找到“指纹”然后点击,把框里的指纹拷下来,全都改成大写后粘贴到thumbnail的值里去:
接下来配置federationConfiguration节点,它表示配置WSFederationAuthenticationModule (WSFAM) 和SessionAuthenticationModule (SAM) 时使用联合身份验证通过的 WS 联合身份验证协议。这里我们使用WS 联合身份验证的身份验证模块 (WSFAM),关于该节点的详细配置信息,请参考:http://msdn.microsoft.com/zh-cn/library/office/apps/hh568665.aspx
好,这样一来,SiteA的配置就已经完成了,然后我们来加点代码。
打开/Views/Home/Index.cshtml,将原有的代码删掉,改为如下代码:
@using System.Security.Claims
@{
    ViewBag.Title = "SiteA主页";
    ClaimsIdentity ci = User.Identity as ClaimsIdentity;
    if(ci!=null)
    {
        @ci.FindFirst(ClaimTypes.Name).Value
        @ci.FindFirst(ClaimTypes.Email).Value
    }
}

退出
代码很简单,只要当前用户处于已登录状态,就把用户的名称和Email显示在页面上。
至此,SiteA就已经完成了。你是不是迫不及待的想要运行了呢?别急,虽然有SiteA了,但还没有STS呢,现在启动SiteA,由于没登录,所以它会跳转到STS,但STS还不存在,所以会出错的。
二、创建STS
接下来我们来创建STS,在解决方案上新建项目,新建一个名为STS的MVC 4应用程序,.Net Framework选择4.5,项目模板选择“Internet应用程序",确定。
添加System.IdentityModel和System.IdentityModel.Services这两个引用,打开web.config,为forms节点添加两个属性:
在应用程序下新建一个名为Services的文件夹,在里面新建一个类文件,名为:CertificateUtil,用于获取证书,具体代码如下:
    public class CertificateUtil
    {
        public static X509Certificate2 GetCertificate(StoreName name, StoreLocation location, string subjectName)
        {
            X509Store store = new X509Store(name, location);
            X509Certificate2Collection certificates = null;
            store.Open(OpenFlags.ReadOnly);

            try
            {
                X509Certificate2 result = null;
                certificates = store.Certificates;

                for (int i = 0; i < certificates.Count; i++)
                {
                    X509Certificate2 cert = certificates[i];
                    if (cert.SubjectName.Name.ToLower() == subjectName.ToLower())
                    {
                        if (result != null)
                            throw new ApplicationException(string.Format("subject Name {0}存在多个证书", subjectName));
                        result = new X509Certificate2(cert);
                    }
                }

                if (result == null)
                {
                    throw new ApplicationException(string.Format("没有找到用于 subject Name {0} 的证书", subjectName));
                }

                return result;
            }
            finally
            {
                if (certificates != null)
                {
                    for (int i = 0; i < certificates.Count; i++)
                    {
                        certificates[i].Reset();
                    }
                }
                store.Close();
            }
        }

    }
创建新类,名为Common,存放几个常量:
    public class Common
    {
        public const string IssuerName = "IssuerName";
        public const string SigningCertificateName = "SigningCertificateName";
        public const string EncryptingCertificateName = "EncryptingCertificateName";

    }
创建新类,名为SingleSignOnManager,用于注册RP以及获取RP列表:
public class SingleSignOnManager
{
const string SITECOOKIENAME = "StsSiteCookie";
const string SITENAME = "StsSite";
///
/// Returns a list of sites the user is logged in via the STS
///
/// 创建新类,CustomSecurityTokenService,自定义令牌服务,继承SecurityTokenService,用于返回需要的声明令牌:
public class CustomSecurityTokenService : SecurityTokenService
{
private readonly SigningCredentials signingCreds;
private readonly EncryptingCredentials encryptingCreds;
public CustomSecurityTokenService(SecurityTokenServiceConfiguration config)
: base(config)
{
this.signingCreds = new X509SigningCredentials(
CertificateUtil.GetCertificate(StoreName.My, StoreLocation.LocalMachine, WebConfigurationManager.AppSettings[Common.SigningCertificateName]));
if (!string.IsNullOrWhiteSpace(WebConfigurationManager.AppSettings[Common.EncryptingCertificateName]))
{
this.encryptingCreds = new X509EncryptingCredentials(
CertificateUtil.GetCertificate(StoreName.My, StoreLocation.LocalMachine, WebConfigurationManager.AppSettings[Common.EncryptingCertificateName]));
}
}
///
/// 此方法返回要发布的令牌内容。内容由一组ClaimsIdentity实例来表示,每一个实例对应了一个要发布的令牌。当前Windows Identity Foundation只支持单个令牌发布,因此返回的集合必须总是只包含单个实例。
///
/// 调用方的principal
/// 进入的 RST,我们这里不用它
/// 由之前通过GetScope方法返回的范围
///
/// 此方法返回用于令牌发布请求的配置。配置由Scope类表示。在这里,我们只发布令牌到一个由encryptingCreds字段表示的RP标识 ///
///
///
/// 最后添加新类CustomSecurityTokenServiceConfiguration,继承SecurityTokenServiceConfiguration:
    public class CustomSecurityTokenServiceConfiguration : SecurityTokenServiceConfiguration
    {
        private static readonly object syncRoot = new object();
        private const string CustomSecurityTokenServiceConfigurationKey = "CustomSecurityTokenServiceConfigurationKey";

        public CustomSecurityTokenServiceConfiguration()
            : base(WebConfigurationManager.AppSettings[Common.IssuerName])
        {
            this.SecurityTokenService = typeof(CustomSecurityTokenService);
        }

        public static CustomSecurityTokenServiceConfiguration Current
        {
            get
            {
                HttpApplicationState app = HttpContext.Current.Application;
                CustomSecurityTokenServiceConfiguration config = app.Get(CustomSecurityTokenServiceConfigurationKey) as CustomSecurityTokenServiceConfiguration;
                if (config != null)
                    return config;
                lock (syncRoot)
                {
                    config = app.Get(CustomSecurityTokenServiceConfigurationKey) as CustomSecurityTokenServiceConfiguration;
                    if (config == null)
                    {
                        config = new CustomSecurityTokenServiceConfiguration();
                        app.Add(CustomSecurityTokenServiceConfigurationKey, config);
                    }

                    return config;
                }
            }
        }
    }
打开/Controllers/HomeController.cs,将Index()方法修改如下:
        public ActionResult Index()
        {
            FederatedPassiveSecurityTokenServiceOperations.ProcessRequest(
                System.Web.HttpContext.Current.Request,
                User as ClaimsPrincipal,
                CustomSecurityTokenServiceConfiguration.Current.CreateSecurityTokenService(),
                System.Web.HttpContext.Current.Response);
            return View();
        }
打开/Controllers/AccountController.cs,将Login(LoginModel model, string returnUrl)方法修改如下:
        [HttpPost]
        [AllowAnonymous]
        [ValidateAntiForgeryToken]
        public ActionResult Login(LoginModel model, string returnUrl)
        {
            var query = HttpUtility.ParseQueryString(Request.UrlReferrer.Query);
            if (model.UserName == "[email protected]" && model.Password == "123456")
            {
                FormsAuthentication.SetAuthCookie("[email protected]|1983-10-22|oujian", false);
                if (!string.IsNullOrEmpty(returnUrl))
                    return Redirect(returnUrl);
                return RedirectToAction("Index", "Home");
            }
            return View(model);
        }
LogOff方法修改如下:
        public ActionResult LogOff()
        {
            FormsAuthentication.SignOut();
            ViewData["AddressesExpected"] = SingleSignOnManager.SignOut().Distinct().ToArray();
            return View("Login");
        }
打开/Views/Account/Login.cshtml,添加以下代码:
@{
    ViewBag.Title = "登录";
    var addressesExpected = ViewData["AddressesExpected"] as string[];
    if (addressesExpected != null)
    {
        foreach (var address in addressesExpected)
        {

        }
    }

}
OK,至此STS也已经完成了。把SiteA和STS都部署到IIS上,然后打开C:\Windows\System32\Drivers\etc\hosts文件,添加几个站点:
127.0.0.1	www.sitea.com
127.0.0.1	www.siteb.com
127.0.0.1	www.sitec.com
127.0.0.1	www.sited.com
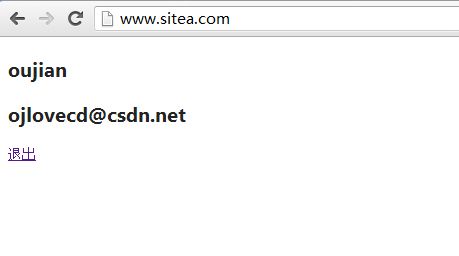
127.0.0.1 www.sts.com好了,在浏览器输入www.sitea.com,看看如何,它马上跳转到了www.sts.com的登录页面,输入[email protected],密码123456,确定,登录成功,跳回到了www.sitea.com,并显示出了用户名和Email:
点击退出,将注销当前用户,并跳转到登录页。
三、创建其它RP
OK,站点A搞定了,那其它站点如何呢?现在只是最简单的登录退出功能而已,说好的单点登录呢?别急,接下来就一一实现。
新建基于.NET Framework4.5的MVC4程序,添加Microsoft.IdentityModel引用。修改web.config,configSections里添加如下节点:
Compilation里增加Microsoft.IdentityModel的程序集:
身份验证改为None,添加authorization节点,禁止匿名用户访问:
添加三个httpModules:
system.webServer里添加以下三个modules:
最后增加microsoft.identityModel节点:
以上配置跟SIteA差不多,只是WIF3.5和4.5的区别而已,在这里就不赘述了,要获取详细信息,请参考微软官方网站。
打开/Views/Home/Index.cshtml,将代码修改如下,在SiteB里我们显示Email和生日:
@using Microsoft.IdentityModel.Claims
@{
    ViewBag.Title = "SiteB主页";
    ClaimsIdentity ci = User.Identity as ClaimsIdentity;
    if(ci!=null)
    {
        @ci.Claims.SingleOrDefault(c=>c.ClaimType == ClaimTypes.Email).Value
        @ci.Claims.SingleOrDefault(c=>c.ClaimType == ClaimTypes.DateOfBirth).Value
    }
}


退出
OK,部署到IIS上,然后运行,页面跳转到了sts的登录页面,输入用户名和密码,跳转,哎哟我去,怎么报错了:

原因是从sts返回来的数据里有<>这种标签,于是asp.net认为那是有危险的,于是抛出了异常,这个异常大家估计以前也碰到过,最简单粗暴的方法就是把验证请求的配置改为false,但这里我不建议这么干, 为此,我们专门用一个类来处理这种情况。
在SiteB目录下新建一个文件夹名为Services,然后添加一个类,名为SampleRequestValidator:
  ///
    /// This SampleRequestValidator validates the wresult parameter of the
    /// WS-Federation passive protocol by checking for a SignInResponse message
    /// in the form post. The SignInResponse message contents are verified later by
    /// the WSFederationPassiveAuthenticationModule or the WIF signin controls.
    ///


    public class SampleRequestValidator : RequestValidator
    {
        protected override bool IsValidRequestString(HttpContext context, string value, RequestValidationSource requestValidationSource, string collectionKey, out int validationFailureIndex)
        {
            validationFailureIndex = 0;


            if (requestValidationSource == RequestValidationSource.Form && collectionKey.Equals(WSFederationConstants.Parameters.Result, StringComparison.Ordinal))
            {
                    return true;
            }


            return base.IsValidRequestString(context, value, requestValidationSource, collectionKey, out validationFailureIndex);
        }


    }
然后在web.config里加入这个类的配置:
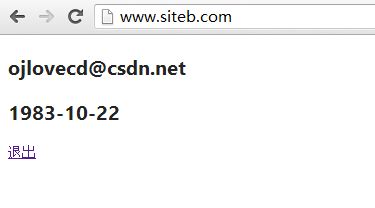
重新运行程序,非常完美:

这时候再打开SIteA,发现也已经处于了登录状态,这时候在SiteA点击退出,跳转到了登录页,再看看这时候的SiteB呢,刷新SiteB首页,发现也跳转到了登录页,证明在SiteA的退出操作对SiteB也起了作用,确实是单点登录了!
SiteC和SiteD的配置与SiteB类似,这里我就不重复了,留给大家自己练习一下,等所有的项目都配置好以后,在任意站点登录,发现其它站点也是登录状态;在任意站点退出,发现其它站点也已经退出。利用WIF,单点登录变的如此简单~~

