nodejs封装api
安装了nodeJs
执行:
安装淘宝镜像

npm install -g cnpm --registry=https://registry.npm.taobao.org

安装 yarn(我使用这个,淘宝镜像总是莫名其妙各种bug。。。)

npm install yarn -g

接着项目中执行:

yarn add express --save

yarn add body-parser --save

yarn add supervisor --save
api.js(服务)
var express = require('express');
var app = express();
var bodyParser = require('body-parser');
var supervisor = require('supervisor');
//引用bodyParser
app.use(bodyParser.json()); // for parsing application/json
app.use(bodyParser.urlencoded({ extended: true })); // for parsing application/x-www-form-urlencoded
//设置跨域请求
app.all('*', function(req, res, next) {
    res.header("Access-Control-Allow-Credentials", true);
    res.header("Access-Control-Allow-Origin", "*");
    res.header('Access-Control-Allow-Headers', 'Content-Type, Content-Length, Authorization, Accept, X-Requested-With , yourHeaderFeild');
    res.header("Access-Control-Allow-Methods", "PUT,POST,GET,DELETE,OPTIONS");
    res.header("X-Powered-By", ' 3.2.1');
    res.header("Content-Type", "application/json;charset=utf-8");
    next();
});
var questions = [{
        name: 'xiaoming',
        age: 41
    },
    {
        name: 'lihua',
        age: 99
    }
];
//写个接口
app.get('/api/user', function(req, res) {
    res.status(200),
        res.json(questions)
});
app.post('/api/delete', function(req, res) {
        res.json(req.body);
    })
    //配置服务端口
const port = 8888;
app.listen(port, () => {
    console.log('Express server listening on port ' + port);
});
进入api.js所在的目录下,执行下面的命令运行服务,一定要运行服务,不然使用api就会连接失败:
node api.js热更新: 正常运行node api.js时,如果你更新了接口信息,那么要重新运行一次node api.js,不然刷新页面也渲染不到新的数据,为了解决这个问题,可以用supervisor进行热更新:
在项目中安装了supervisor后,
再进行全局安装一次(可以外部全局装):
yarn add supervisor -g
接着,运行服务时,用 进入api.js所在的根目录下,执行 supervisor app.js,这样就可以做到热更新了
最后如何调用新建立的两个接口?
http://localhost:8888/api/userinfo?age=1
http://localhost:8888/api/delete
我使用的是axios
可以在项目中执行以下命令:
yarn add axios --save然后执行下面的代码就可以了(记得导入axios再使用):
        axios({
          method: 'GET',
          url: 'http://localhost:8888/api/user',
          params:{age:1},
          dataType: 'json'
        }).then(res => {
          console.log(res);
        }).catch(err => {

        })
        //post请求
        axios({
          method: 'post',
          url: 'http://localhost:8888/api/delete',
          data: {
            name: 'lihua',
            age: '45'
          }
        }).then(res => {
          console.log(res);

        }).catch(err => {

        });
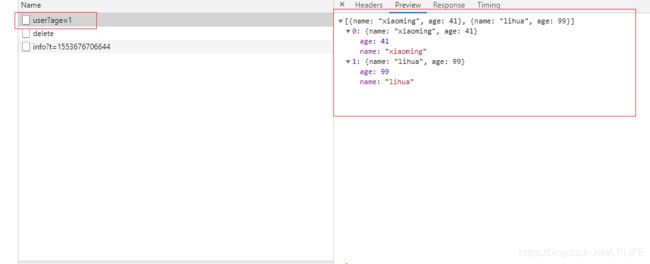
运行项目,查看浏览器,可以看到接口已经被调用,也能看到我们所写进去的数据:

