SpringBoot集成Dubbo+zookeeper
	本次搭建是分模块搭建,没下载zookeeper的先下了
	                                                                    ---------小记一下
zookeeper及dubbo-admin下载地址:https://pan.baidu.com/s/1hXkoltcpqxj9ouzTTObRTw
提取码:z0ck
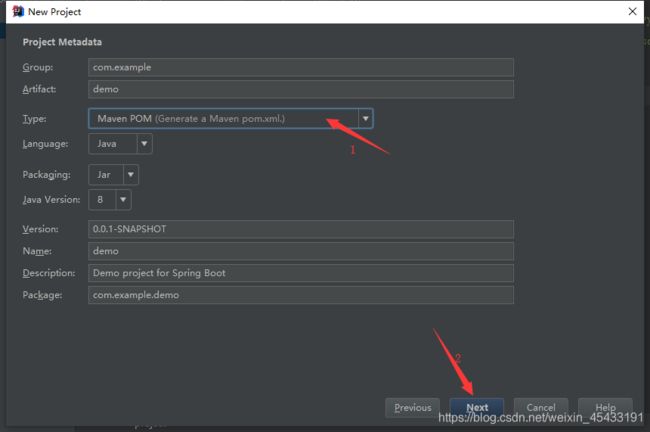
创建SpringBoot项目:
<?xml version="1.0" encoding="UTF-8"?>
<project xmlns="http://maven.apache.org/POM/4.0.0" xmlns:xsi="http://www.w3.org/2001/XMLSchema-instance"
	xsi:schemaLocation="http://maven.apache.org/POM/4.0.0 https://maven.apache.org/xsd/maven-4.0.0.xsd">
	<modelVersion>4.0.0</modelVersion>
	<parent>
		<groupId>org.springframework.boot</groupId>
		<artifactId>spring-boot-starter-parent</artifactId>
		<version>2.2.6.RELEASE</version>
		<relativePath/> <!-- lookup parent from repository -->
	</parent>
	<groupId>com.example</groupId>
	<artifactId>demo</artifactId>
	<version>0.0.1-SNAPSHOT</version>
	<name>demo</name>
	<description>Demo project for Spring Boot</description>

	<properties>
		<java.version>1.8</java.version>
	</properties>

	<dependencies>
		<dependency>
			<groupId>org.springframework.boot</groupId>
			<artifactId>spring-boot-starter</artifactId>
		</dependency>

		<dependency>
			<groupId>org.springframework.boot</groupId>
			<artifactId>spring-boot-starter-test</artifactId>
			<scope>test</scope>
			<exclusions>
				<exclusion>
					<groupId>org.junit.vintage</groupId>
					<artifactId>junit-vintage-engine</artifactId>
				</exclusion>
			</exclusions>
		</dependency>
	</dependencies>

	<build>
		<plugins>
			<plugin>
				<groupId>org.springframework.boot</groupId>
				<artifactId>spring-boot-maven-plugin</artifactId>
			</plugin>
		</plugins>
	</build>

</project>
额,虽然是这个样子,但我还是修剪了一下,并且重新添加了几个依赖,变成了这样:
<?xml version="1.0" encoding="UTF-8"?>
<project xmlns="http://maven.apache.org/POM/4.0.0" xmlns:xsi="http://www.w3.org/2001/XMLSchema-instance"
	xsi:schemaLocation="http://maven.apache.org/POM/4.0.0 https://maven.apache.org/xsd/maven-4.0.0.xsd">
	<modelVersion>4.0.0</modelVersion>

	<parent>
		<groupId>org.springframework.boot</groupId>
		<artifactId>spring-boot-starter-parent</artifactId>
		<version>2.0.3.RELEASE</version>
		<relativePath/> <!-- lookup parent from repository -->
	</parent>

	<groupId>com.boot-dubbo</groupId>
	<artifactId>bootdubbodemo</artifactId>
	<version>0.0.1-SNAPSHOT</version>
	<name>bootdubbodemo</name>
	<description>Demo project for Spring Boot</description>

	<dependencies>
		<!-- 整合dubbo -->
		<dependency>
			<groupId>io.dubbo.springboot</groupId>
			<artifactId>spring-boot-starter-dubbo</artifactId>
			<version>1.0.0</version>
		</dependency>
		<!-- zookeeper客户端 -->
		<dependency>
			<groupId>com.101tec</groupId>
			<artifactId>zkclient</artifactId>
			<version>0.7</version>
		</dependency>
		<!-- mvc -->
		<dependency>
			<groupId>org.springframework.boot</groupId>
			<artifactId>spring-boot-starter-web</artifactId>
			<version>2.1.3.RELEASE</version>
		</dependency>
	</dependencies>

</project>
好了,现在父级的pom.xml已经处理完了,我们开始创建服务提供方:
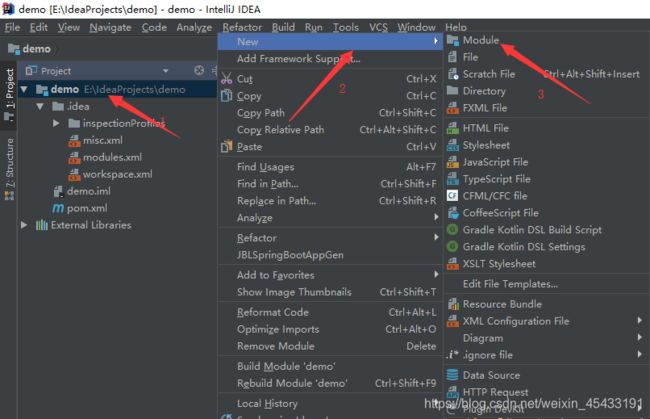
我不喜欢用骨架,这个按个人喜好来:
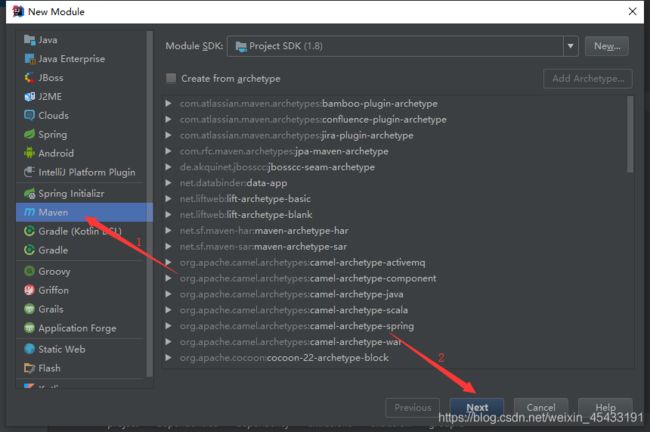
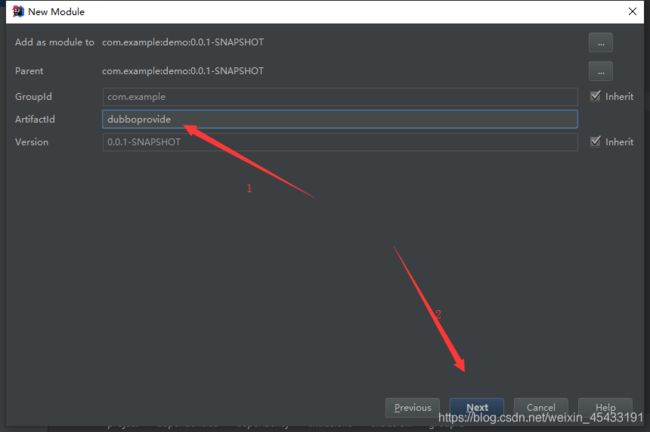
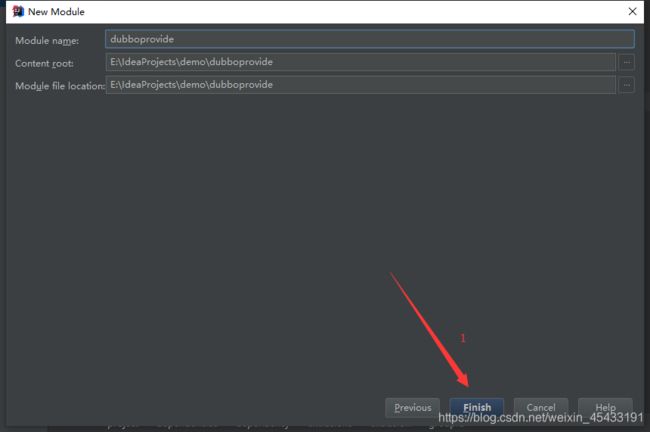
完了之后可以看到父级的pom文件里已经把刚刚创建的模块自动添加到了里面:

那接下来开始将服务提供方给他弄完整(pom.xml就不用管了,直接拿他爹的来用):
写个接口:
package com.dubbo.service;

public interface DubboService {

    String hello(String name);
}
写个实现类:
package com.dubbo.service.impl;

import com.alibaba.dubbo.config.annotation.Service;  ← ← ← ← ←
import com.dubbo.service.DubboService;					     ↑
													         ↑
@Service  //这里这个注解看清楚了,导的是alibaba的包,别整错了 ↑↑
public class DubboServiceImpl implements DubboService {

    @Override
    public String hello(String name) {

        return "hello--" + name;
    }
}
springboot的启动类:
package com;

import org.springframework.boot.SpringApplication;
import org.springframework.boot.autoconfigure.SpringBootApplication;

@SpringBootApplication
public class Application {

    public static void main(String[] args) {

        SpringApplication.run(Application.class, args);
    }
}
服务提供方目录结构如下图:
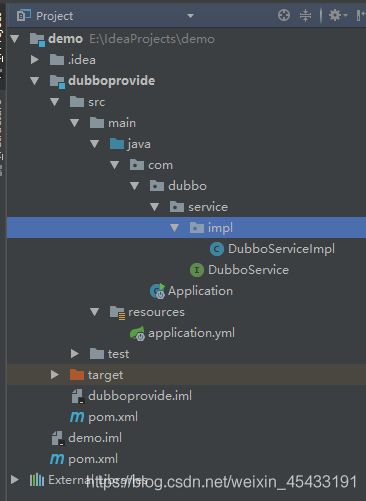
好了,这服务提供方代码就写完了,下来把resources下的application.yml给他一配就完事了:
server:
  port: 8081 #那傻猫的端口号
spring:
  dubbo:
    application:
      name: springboot-dubbo-tgz #提供方名字 不能与消费方相同
    registry:
      address: zookeeper://localhost #zookeeper的地址
      port: 2181 #注册的端口
    protocol:
      name: dubbo
      port: 20890 #dubbo服务暴露的端口
    scan: com.dubbo.service.impl   #扫描需要暴露的服务
现在直接启动服务提供方Application,打开dubbo的控制台: http://localhost:8080/dubbo-admin-2.6.0,可以看到:
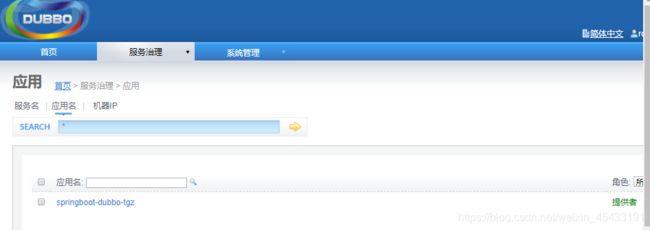
你要是没看到的话,我也不知道咋回事,自己检查吧!!!
至此,服务提供方已经搞定了,现在开始整服务消费方,消费方模块创建我就不贴图了,方法同上:
把提供方接口贴过来,包名给我整对咯!:
package com.dubbo.service;

public interface DubboService {

    String hello(String name);
}
写个controller:
package com.dubbo.controller;

import com.alibaba.dubbo.config.annotation.Reference;  ←   ←   ←
import com.dubbo.service.DubboService;							↑
import org.springframework.stereotype.Controller;				↑
import org.springframework.web.bind.annotation.RequestMapping;	↑
import org.springframework.web.bind.annotation.ResponseBody;	↑
																↑
@Controller														↑
@RequestMapping("/hello")								        ↑
public class DubboController {
     								    ↑
    @Reference //这里注意了,是alibaba的包,导包的时候看清楚了   ↑↑↑
    private DubboService dubboService;

    @RequestMapping("/visitHello")
    @ResponseBody
    public String visitHello(String name){

        return dubboService.hello(name);
    }
}
服务消费方目录结构如下:

好了,服务消费方配置文件搞一下,就完事了,这边的配置比服务提供方要少,少些啥就不赘述了:
server:
  port: 8082 #猫的端口
spring:
  dubbo:
    application:
      name: springboot-dubbo-xfz #消费方名字 不能与提供方相同
    registry:
      address: zookeeper://localhost #zookeeper的地址
      port: 2181 #注册的端口
    scan: com.dubbo.controller #包扫描
启动服务消费方Application,打开控制台查看:

好了,经过一顿操作,这俩齐活了,现在通过消费方访问提供方,看能不能调到提供方的接口:
http://localhost:8082/hello/visitHello?name=你连不连的通?

好了,连上了
至此,我这笔记就写到这里了,写完,收工
写在最后:
人若成就一道景致,则无关春夏秋冬.

