精选30+云产品,助力企业轻松上云!>>> ![]()
大家使用jstack的时候偶尔会遇到这样的异常Unable to open socket file…… 下面我们依据openjdk11的code进行分析。
从错误入手
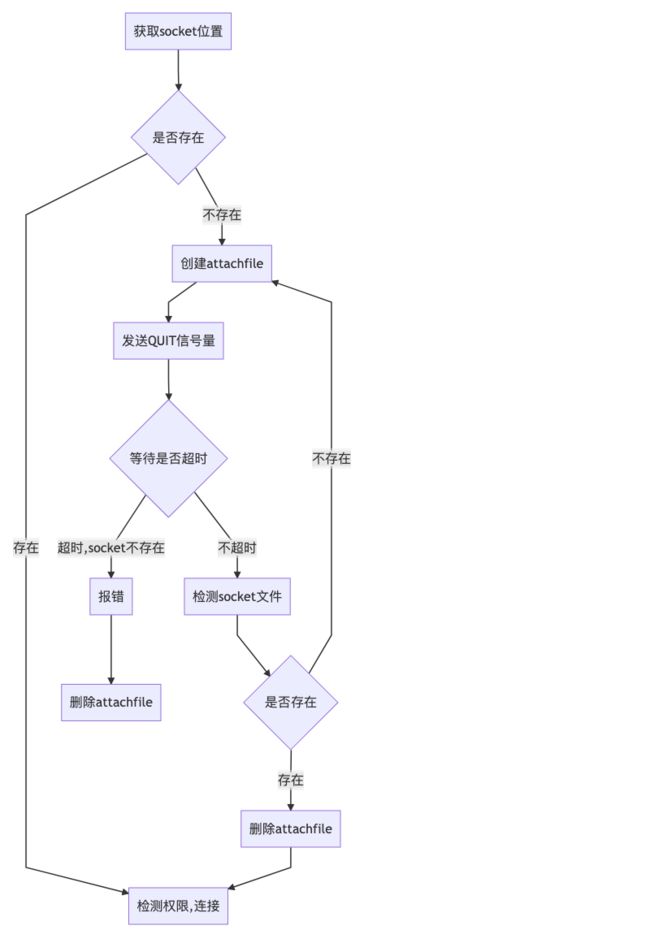
Unable to open socket file这个错误是jstack本身报的,算是一个客户端行为。什么情况下会出这个错误呢。我们直接用错误关键字进行搜索。
 File socket_file = findSocketFile(pid, ns_pid);
        socket_path = socket_file.getPath();
        if (!socket_file.exists()) {
            File f = createAttachFile(pid, ns_pid);
            try {
                sendQuitTo(pid);

                // give the target VM time to start the attach mechanism
                final int delay_step = 100;
                final long timeout = attachTimeout();
                long time_spend = 0;
                long delay = 0;
                do {
                    // Increase timeout on each attempt to reduce polling
                    delay += delay_step;
                    try {
                        Thread.sleep(delay);
                    } catch (InterruptedException x) { }

                    time_spend += delay;
                    if (time_spend > timeout/2 && !socket_file.exists()) {
                        // Send QUIT again to give target VM the last chance to react
                        sendQuitTo(pid);
                    }
                } while (time_spend <= timeout && !socket_file.exists());
                if (!socket_file.exists()) {
                    throw new AttachNotSupportedException(
                        String.format("Unable to open socket file %s: " +
                          "target process %d doesn't respond within %dms " +
                          "or HotSpot VM not loaded", socket_path, pid,
                                      time_spend));
                }
            } finally {
                f.delete();
            }
        }
    private File findSocketFile(int pid, int ns_pid) {
        // A process may not exist in the same mount namespace as the caller.
        // Instead, attach relative to the target root filesystem as exposed by
        // procfs regardless of namespaces.
        String root = "/proc/" + pid + "/root/" + tmpdir;
        return new File(root, ".java_pid" + ns_pid);
    }
socket的地址其实就是/tmp/.java_pid${ns_pid} 前面的/proc/pid/root/tmp指向的就是/tmp目录。
通过上面的流程,我们大概可以猜到流程中的quit的信号量,就是jvm做出对应操作的地方。
JNIEXPORT void JNICALL Java_sun_tools_attach_VirtualMachineImpl_sendQuitTo
  (JNIEnv *env, jclass cls, jint pid)
{
    if (kill((pid_t)pid, SIGQUIT)) {
        JNU_ThrowIOExceptionWithLastError(env, "kill");
    }
}
发送的信号量就是SIGQUIT。
从信号量入手
#define SIGBREAK SIGQUIT
jvm里有一段宏,就是把SIGQUIT都可以用SIGBREAK代替。
    switch (sig) {
      case SIGBREAK: {
        if (!DisableAttachMechanism && AttachListener::is_init_trigger()) {
          continue;
        }
        VM_PrintThreads op;
        ...
当收到的信号量是SIGQUIT的时候,先看看DisableAttachMechanism。如果设置了-XX:+DisableAttachMechanism,那这里就直接跳过处理了。初始化socket的流程在后面的AttachListener::is_init_trigger里。 当加了-XX:+DisableAttachMechanism后,jstack关注的socket文件就无法创建了,会一定报错。
bool AttachListener::is_init_trigger() {
  if (init_at_startup() || is_initialized()) {
    return false;               // initialized at startup or already initialized
  }
...
  if (ret == -1) {
    log_trace(attach)("Failed to find attach file: %s, trying alternate", fn);
    snprintf(fn, sizeof(fn), "%s/.attach_pid%d",
             os::get_temp_directory(), os::current_process_id());
    RESTARTABLE(::stat64(fn, &st), ret);
    if (ret == -1) {
      log_debug(attach)("Failed to find attach file: %s", fn);
    }
  }

  if (ret == 0) {
    // simple check to avoid starting the attach mechanism when
    // a bogus non-root user creates the file
    if (os::Posix::matches_effective_uid_or_root(st.st_uid)) {
      init();
      log_trace(attach)("Attach triggered by %s", fn);
      return true;
    } else {
      log_debug(attach)("File %s has wrong user id %d (vs %d). Attach is not triggered", fn, st.st_uid, geteuid());
    }
  }
 ...
}
is_init_trigger会先检测attach file是否存在,只有存在的情况下,才会有后面的初始化操作。 init方法中开始启动Attach Listener线程。并且最终调用到AttachListener::pd_init()方法中,然后调用到 LinuxAttachListener::init() 去初始化socket。最终通过AttachListener::set_initialized();**设置初始化成功标志。**这里很重要,回头再去看is_init_trigger方法的最开始就是检测标志,如果被设置为成功就不再执行了。也就是说信号量的操作只能初始化一次,后面就再也不会初始化了。
nt LinuxAttachListener::init() {
  char path[UNIX_PATH_MAX];          // socket file
  char initial_path[UNIX_PATH_MAX];  // socket file during setup
  int listener;                      // listener socket (file descriptor)

  // register function to cleanup
  ::atexit(listener_cleanup);

  int n = snprintf(path, UNIX_PATH_MAX, "%s/.java_pid%d",
                   os::get_temp_directory(), os::current_process_id());
  if (n < (int)UNIX_PATH_MAX) {
    n = snprintf(initial_path, UNIX_PATH_MAX, "%s.tmp", path);
  }
  if (n >= (int)UNIX_PATH_MAX) {
    return -1;
  }

  // create the listener socket
  listener = ::socket(PF_UNIX, SOCK_STREAM, 0);
  if (listener == -1) {
    return -1;
  }
  ...
这里就是socket文件的创建过程。
小结
看完上面的流程,我们大概可以梳理以下几种情况,我们是会遇到异常的。
- 开启了-XX:+DisableAttachMechanism。
- 初始化完以后,删除了/tmp下的socket文件。
- 程序的各种问题(资源,夯死等)导致无法触发jvm代码运行。
欢迎关注公众号:肥宅英短
