vue多主题管理插件,支持ElementUI、iView、Vux动态主题
文章目录
- 一、使用插件
-
- Step1 安装
- Step2 添加主题主目录
- Step3 注册插件
- Step4 创建主题
- 二、主题基本样式加载
- 三、ElementUI、iView、Vux等的动态主题
- 四、为主题定制组件
- 五、主题参数
- 六、API
- 七、下载示例
- 八、结语
本插件初于开发阶段,可能每个版本的差异较大,因此请多关注文档的更新。
一、使用插件
Step1 安装
npm install vue-multi-theme -S
Step2 添加主题主目录
在main.js所在的目录添加themes目录

Step3 注册插件
main.js
...
import VueMultiTheme from 'vue-multi-theme'
...
Vue.use(VueMultiTheme, {

  themeConfigs: require.context(
    './themes',
    true,
    /\/.*\/index\.js$/
  ),
  // themeName: 'theme1'
})
...
插件参数说明:
| 参数 | 说明 | 必填 |
|---|---|---|
| themeConfigs | 要注册的主题列表,可以是对象{theme1:import theme1/index.js,theme2:import theme2/index.js}(伪代码),或像上面那样用webpack的require.context传入(推荐) | YES |
| themeName | 设置当前要渲染的主题。若不填,则渲染默认主题;可以通过调用组件的this.$setTheme修改,修改后界面自动更新 | NO |
| themeOptions | 主题参数,若设置会覆盖默认主题参数的对应字段,所有组件可以通过this.themeOptions获取当前主题的参数;也可以在组件中调用this.$setThemeOptions修改主题参数,修改后界面自动更新 | NO |
| onThemeChanged | 切换主题完成后的回调,参数1为新主题的参数,参数2为主题管理对象 | NO |
Step4 创建主题
在themes目录中创建主题目录,内容如下:
├── main.js
└── themes
    ├── theme1
    │   └── index.js
    ├── theme2
    │   └──index.js
    └── theme3
        └── index.js
其中index.js内容如下
export default {

  components: {
     },
  options: {
     },
  styles: [],
  externalCss: []
}
| 字段 | 说明 | 是否必须 |
|---|---|---|
| components | 当前主题自定义的组件列表,只有添加到这里的组件才能被渲染组件(ThemeRender)渲染 | NO |
| options | 主题参数,参数的内容完全由你的实际需要决定,因为你能在所有组件的this.themeOptions访问到它 | NO |
| styles | 当前主题的基本样式模块列表,后详述 | NO |
| externalCss | 当前主题要加载的外部css文件列表 | NO |
二、主题基本样式加载
我们在theme1目录中添加base.css:
.theme-theme1 div {
     ...}
.theme-theme1 h1 {
     ...}
...
然后在theme1/index.js中设置:
export default {

   ...
   styles: [() => import('./base.css')],
}
这样当我们调用this.$setTheme或通过插件初始化的themeName参数设置主题时,base.css就会被加载进来。
要特别注意这里的**.theme-theme1**,base.css中的所有样式都应该与这个class有关联,这是因为当前主题会将body的className设置为“theme-主题名”,这里是通过body的这个className的不同名称来区分主题的。
你还可以使用less、stylus等预编译样式。若webpack相关loader缺失,请自行安装配置。
styles: [() => import('./base.less')]
或
styles: [() => import('./base.styl')]
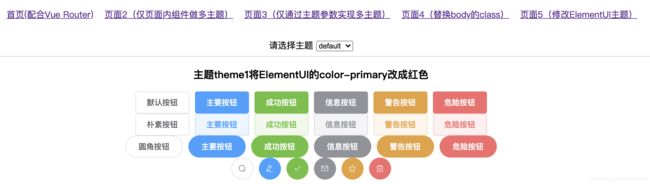
三、ElementUI、iView、Vux等的动态主题
ElementUI、iView、Vux等官方一般都提供了修改主题的方法,但并没有提供动态加载的方法。
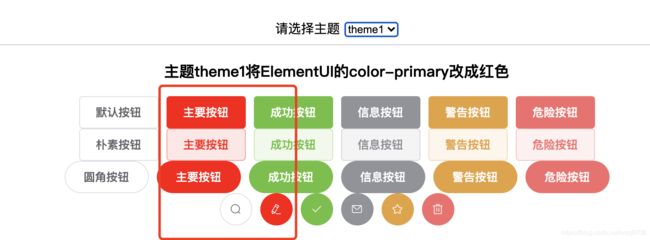
以ElementUI为例,我们打算当选择theme1时,ElementUI的color-primary变成红色。首先我们按照官方的方法生成一个red.css文件,然后把它存放在public/element-themes目录中(位置跟据自已需要):

然后在theme1/index.js中设置:
export default {

   ...
   externalCss: ['/element-themes/red.css']
}
这样当我们调用this.$setTheme或通过插件初始化的themeName参数设置主题时,red.css就可以被加载进来,而在切换到其它主题时它又会被卸载掉。效果如下:
iView、Vux同理。
这个方法也能用来设置主题的基本样式,并且没有theme-theme1这个class的限制,这正是因为它在切换主题时会被卸载掉。但这种方法不能加载less和stylus等预编译样式,如何取舍看自己了。
四、为主题定制组件
我们可以为某一个组件或页面在不同主题中定制不同的模板、样式和行为,为主题的定制提供更多的灵活性。
比如我们可以在默认的Component1.vue基础上为某一主题做Component1.vue定制:
themes/theme1/components/Component1.vue
<script>
import Component1 from '../../../components/Component1'
export default {

  extends: Component1 // 继承默认主题
}
</script>
然后修改theme1/index.js:
export default {

  components: {

    Component1: () => import('./components/Component1'),
  },
  ...
}
然后在原来用到Component1这个组件地方做如下修改:
<template>
  <div>
	...
    <Component1/>
  </div>
</template>

<script>
import Component1 from './Component1'
export default {

    components: {

        Component1
    }
}
</script>
...
将上面的代码改为:
<template>
  <div>
	...
    <ThemeRender __component="Component1" :__default="component1()"/>
  </div>
</template>

<script>
import Component1 from './Component1'
export default {

    methods: {

        component1: () => Component1
    }
}
</script>
ThemeRender组件参数说明:
| 参数 | 说明 |
|---|---|
| __component | 表示到当前主题中找到Component1组件并渲染 |
| __default | 表示如果在当前主题中找不到__component对应的组件,则渲染component1()返回的组件(即默认组件) |
这样,你就可以在不同主题里对Component1这个组件为所欲为了。当你想改变template时:
<template>
	...
</template>
<script>
import Component1 from '../../../components/Component1'
export default {

  extends: Component1 // 继承默认主题
}
</script>
当你想改变样式时:
<script>
import Component1 from '../../../components/Component1'
export default {

  extends: Component1 // 继承默认主题
}
</script>
<style scoped>
	...
</style>
当你想改变按钮事件时:
<script>
import Component1 from '../../../components/Component1'
export default {

  extends: Component1, // 继承默认主题
  methods: {

    btnClick: function() {

      ...
    }
  }
}
</script>
你可能会问:我不想继承行不行:
extends: Component1 // 不写这一行
Of course,没有任何问题,就是完全写了一另一个组件。
我们还可以在Vue Router中使用ThemeRender:
routes.js
import {
     themeRouteProps, ThemeRender} from 'vue-multi-theme'
import Home from './components/Home' // 默认Home
...

export default [
    {
     path: '/', name:'home', component: ThemeRender, props: themeRouteProps('Home', Home) },
	...
];
这样,当你在某一主题中有对Home定制,且当前主题是该主题时,就会自动渲染这个主题下的Home
themeRouteProps函数的参数:
| 参数 | 说明 |
|---|---|
| 参数1 | 对应ThemeRender的__component参数 |
| 参数2 | 对应ThemeRender的__default参数 |
| 参数3 | 其它props(如果有的话) |
由于组件在theme1/index.js中是使用import()函数引入的,因此这些组件及样式是在选择主题时才被加载进来的。
五、主题参数
theme1/index.js中的:
export default {

    options: {

        ...
    }
}
是主题的参数,这些参数可以在组件中通过this.themeOptions得到,我们可以在这里面设置一些和主题相关的信息,比如主题的中文名、logo等:
export default {

  ...
  options: {

    cnName: '仅修改默认Home的样式',
    logo: `url(${
       require('./res/logo.png')})`,
    ...
  },
  ...
}
然后就可以组件中使用它们了。
六、API
Vue.prototype.$setTheme:设置当前主题,设置完成后,界面自动更新。
| 参数 | 说明 |
|---|---|
| 参数1 | 要设置的主题的名称 |
| 参数2 | 主题在参数,会覆盖默认参数 |
示例
this.$setTheme('theme1')
Vue.prototype.$setThemeOptions:设置当前主题的参数,设置完成后,界面自动更新。
| 参数 | 说明 |
|---|---|
| 参数1 | 要设置的参数 |
| 参数2 | 是否完全替换当前参数;如果为false,则与当前参数合并;默认为false |
示例
this.$setThemeOptions({
     cnName: '新的名称'})
注意:主题的name参数是自动添加的,不可修改
this.themeOptions:获取当前主题参数
示例:
<script>
...
export default {

  ...
  methods: {

    btnClick: function() {

      alert(`当前主题${
       this.themeOptions.name}`)
    }
  }
}
</script>
七、下载示例
你可以在:https://github.com/Ajiaxi/vue-multi-theme/tree/master/examples查看示例,也可以下载运行示例:
$ git clone https://github.com/Ajiaxi/vue-multi-theme.git
$ cd vue-multi-theme
$ npm install
$ npm run serve
八、结语
新写的插件,可能会有bug和不完善的地方,需要在真正的项目中去检验,有问题可以到https://github.com/Ajiaxi/vue-multi-theme/issues反馈,我有空的话,想办法解决。