GP(Geoprocessing)服务的发布与调用
1、什么是GP服务
GP服务是Geoprocessing服务的简称,Geoprocessing包含了一系列地理数据处理的功能,像做缓冲区分析、叠加分析、以及对栅格数据制作阴影图等等。在桌面软件中可以通过ArcToolbox中的工具直接调用Geoprocessing的功能,而如果期望通过web来调用GP的功能,就必须借助于GP服务了。Esri的帮助文档中介绍了发布GP服务的两种方式:
l Publish a geoprocessing toolbox. Each tool in the toolbox becomes a task in the geoprocessing service.
l Publish an ArcMap document containing geoprocessing tool layers. Each tool layer becomes a task in the geoprocessing service.
也就是说我们既可以将某个工具单独发布为一个服务,也可以将该工具作为一个工具图层(tool layer)和地图文档一起发布,这样会同时得到同名的一个地图服务和一个GP服务。这里地图服务中的图层可以当做GP任务的数据源,也可以利用工具图层得到的结果来控制最后输出图层的符号。
2、如何发布GP服务——buffer为例
2.1 案例介绍
这里我们使用ArcTutor\Using_ArcGIS_Desktop\MexicoPopulationDensity.mxd【已经安装ArcTutor练习数据】作为地图服务,并且调用GP中的Buffer工具来进行缓冲区的创建。这里我们采用地图文档和工具一起发布的方式,GP服务的输入为通过和地图交互得到的点(即feature set),而直接使用buffer工具的话输入参数只能是要素类或图层,所以需要通过ModelBuilder制作模型来让GP服务正确读取输入参数。
2.2 准备模型
在ArcTutor\GP Service Examples\BufferPoints目录下,会看到已经制作好的示例模型。在这里截图展示:
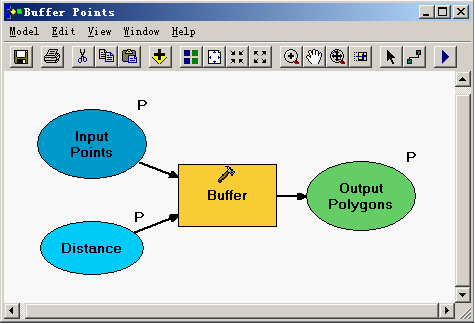
具体的操作步骤为:
(1)在该文件夹中创建自定义工具箱,右键——new——toolbox,命名为BufferService;
(2)在该工具箱中新建模型,右键——new——Model;
(3)在打开的ModelBuilder界面中,将Analysis工具箱中Buffer工具拖放进去,现在工具还没有输入参数,而根据要求输入是用户跟地图交互时产生的。这就需要我们进行下面的设置;
(4)在Buffer工具上右键菜单中设置变量——从参数——输入要素;
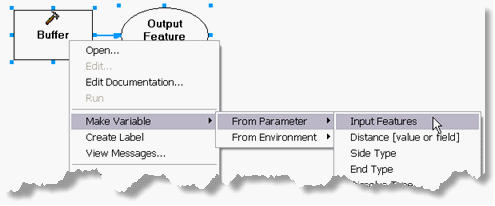

(5)现在一个完整的模型流程已经创建好了,但是还处于不可执行状态。因为我们还未指定输入数据源,这里就需要借助一个空的要素类来作为feature set的模板。这里我们新建一个geodatabase,在其中新建一个point类型的要素类;
(6)在Input Features右键属性的Data Type选项卡中,指定“select data type”的类型为Feature Set,“Import schema and symbology”为上面一步中创建的要素类;
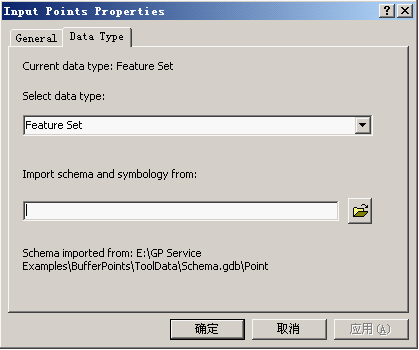
(7)现在模型就会变成彩色的,即可执行状态。为了以后便于修改缓冲区距离这个参数,我们也用第四步中的办法把距离参数提取出来,作为模型的参数。OK,到这一步我们的模型就制作完毕了,下一步我们在ArcMap中测试一下模型;
(8)将MexicoPopulationDensity.mxd打开,把制作好的模型添加进去,模型自动会被识别为工具图层。打开工具,按照提示通过与地图交互的方式获得输入的若干个点,点击OK执行,能够顺利得到点的缓冲区那么测试就通过了。现在取消刚生成结果图层的可见性,保存地图文档,下面一步要做的就是发布服务。
2.3 发布服务
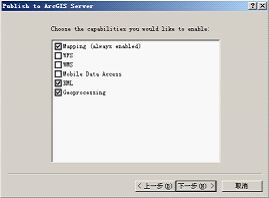
打开ArcCatalog,在该地图文档上弹右键菜单,选择Publish toArcGIS Server,指定名称后点击下一步,如图所示这里除了Mapping service之外还会出现Geoprocessing Service。
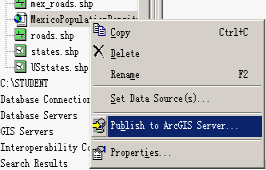
3、如何调用GP服务——Flex API
GP服务的执行有两种方式,同步(synchronous)和异步(asynchronous),同步的调用方法为execute,异步的调用方法为submitJob,区别详见帮助。下面一段就是使用Flex API调用GP服务的代码,这里GP服务的名称为BufferPoint,测试环境为Flex Builder 3+ArcGIS Server 9.3。
 代码
代码
< mx:Application xmlns:mx ="http://www.adobe.com/2006/mxml" layout ="absolute" xmlns:esri ="http://www.esri.com/2008/ags" >
< esri:Map id ="map" mapClick ="mapClick(event)" >
< esri:ArcGISDynamicMapServiceLayer url ="http://localhost/arcgis/rest/services/BufferPoint/MapServer" />
< esri:GraphicsLayer id ="graphicsLayer" />
</ esri:Map >
< esri:Geoprocessor id ="gp" url ="http://localhost/arcgis/rest/services/BufferPoint/GPServer/Buffer%20Points"
executeComplete ="gpExecuteCompleteHandler(event)"
fault ="Alert.show(event.fault.message)" />
< mx:Script >
<![CDATA[
import com.esri.ags.Graphic;
import com.esri.ags.tasks.BufferParameters;
import com.esri.ags.events.MapEvent;
import com.esri.ags.geometry.MapPoint;
import com.esri.ags.events.MapMouseEvent;
import com.esri.ags.tasks.ParameterValue;
import com.esri.ags.tasks.FeatureSet;
import com.esri.ags.events.GeoprocessorEvent;
import mx.controls.Alert;
private function gpExecuteCompleteHandler(event:GeoprocessorEvent):void
{
//绘制buffer graphicsLayer.graphicProvider=gp.executeLastResult.parameterValues[0].value.features;
}
private function mapClick(event:MapMouseEvent):void
{
graphicsLayer.clear();
var graphic:Graphic=new Graphic(event.mapPoint);
graphicsLayer.add(graphic);
gp.execute({"Input_Points": new FeatureSet([graphic]),"Distance":{"distance":100,"units":"esriKilometers"}}); }
]]>
</ mx:Script >
</ mx:Application >
