Quartz定时任务用法
1.在 build.gradle 里面添加依赖
compilegroup:'org.quartz-scheduler',name:'quartz',version:'2.3.0'
compile('org.springframework.boot:spring-boot-starter-quartz')
2.
新建一个任务类继承QuartzJobBean 编写定时任务
3.
配置Quartz
例如:
```
package com.kenny.spring.cloud.mircoweatherbasic.Config;
import com.kenny.spring.cloud.mircoweatherbasic.job.WeatherDataSyncJob;
import org.quartz.*;
import org.springframework.context.annotation.Bean;
import org.springframework.context.annotation.Configuration;
@Configuration
public class QuartzConfiguration {
//JobDetail 为哪一个类注册为Job
@Bean
public JobDetailweatherDataSyncJobJobDetail(){
return JobBuilder.newJob(WeatherDataSyncJob.class).withIdentity("weatherDataSyncJob")
.storeDurably().build();
}
//Trigger 为Job添加定时
@Bean
public TriggerweatherDataSyncTrigger(){
SimpleScheduleBuilder schedBuilder=SimpleScheduleBuilder.simpleSchedule().withIntervalInSeconds(2).repeatForever();
return TriggerBuilder.newTrigger().forJob(weatherDataSyncJobJobDetail()).withIdentity("weatherDataSyncTrigger")
.withSchedule(schedBuilder).build();
}
}
```
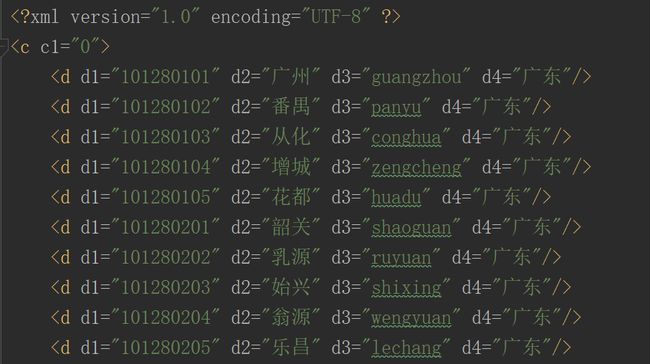
读取XML文件
1.xml文件如下:

2.创建实体类持久化
首先是根元素
//获取根元素名字
@XmlRootElement(name ="c")
//通过字段访问
@XmlAccessorType(XmlAccessType.FIELD)
public class CityList {
//子元素名称
@XmlElement(name ="d")
private Listlist;
}
子元素
@XmlRootElement(name ="d")
@XmlAccessorType(XmlAccessType.FIELD)
public class City {
@XmlAttribute(name ="d1")
private StringcityId;
@XmlAttribute(name ="d2")
private StringcityName;
@XmlAttribute(name ="d3")
private StringcityCode;
@XmlAttribute(name ="d4")
private Stringprovince;
}
3.创建一个工具类使xml转为实体对象
public static ObjectxmlStrObject(Class clazz,String xmlStr)throws Exception{
Object xmlObject=null;
Reader reader=null;
JAXBContext context=JAXBContext.newInstance(clazz);
//XML转为对象的接口
Unmarshaller unmarshaller=context.createUnmarshaller();
reader=new StringReader(xmlStr);
xmlObject=unmarshaller.unmarshal(reader);
if(reader!=null){
reader.close();
}
return xmlObject;
}
4.使用工具类
public ListcityList()throws Exception {
//读取XML文件
Resource resource=new ClassPathResource("citylist.xml");
BufferedReader bufferedReader=new BufferedReader(new InputStreamReader(resource.getInputStream(),"utf-8"));
StringBuffer buffer=new StringBuffer();
String line="";
while ((line=bufferedReader.readLine())!=null){
buffer.append(line);
}
bufferedReader.close();
//XML数据转化为Java对象
CityList cityList= (CityList) XmlBuilder.xmlStrObject(CityList.class,buffer.toString());
return cityList.getList();
}
Eureka注册服务器搭建
1.导入依赖:
//Eureka Server
compilegroup:'org.springframework.cloud',name:'spring-cloud-starter-netflix-eureka-server',version:'2.0.1.RELEASE'
//SpringCloud
compilegroup:'org.springframework.cloud',name:'spring-cloud-dependencies',version:'Finchley.RELEASE',ext:'pom'
2.
在启动类添加注解
@EnableEurekaServer
3.编写配置文件
server:
port:8761
eureka:
instance:
hostname: localhost
client:
register-with-eureka:false
fetch-registry:false
service-url:
defaultZone: http://${eureka.instance.hostname}:${server.port}/eureka/
Eureka客户端搭建
1.导入依赖
//客户端要加入这个依赖 重点!!!!
implementation('org.springframework.boot:spring-boot-starter-web')
//Eureka Server
compilegroup:'org.springframework.cloud',name:'spring-cloud-starter-netflix-eureka-client',version:'2.0.1.RELEASE'
//SpringCloud
compilegroup:'org.springframework.cloud',name:'spring-cloud-dependencies',version:'Finchley.RELEASE',ext:'pom'
2.启动类添加注解
@EnableDiscoveryClient
3.编写配置文件
spring:
application:
name: mirco-weather-eureka-client
eureka:
client:
service-url:
defaultZone: http://localhost:8761/eureka/
Feign客户端使用
Feign 是一个声明web服务客户端,这便得编写web服务客户端更容易,使用Feign 创建一个接口并对它进行注解,它具有可插拔的注解支持包括Feign注解与JAX-RS注解,Feign还支持可插拔的编码器与解码器,Spring Cloud 增加了对 Spring MVC的注解,Spring Web 默认使用了HttpMessageConverters, Spring Cloud 集成 Ribbon 和 Eureka 提供的负载均衡的HTTP客户端 Feign.
1.导入依赖
implementation('org.springframework.boot:spring-boot-starter-web')
//Eureka Client
compilegroup:'org.springframework.cloud',name:'spring-cloud-starter-netflix-eureka-client',version:'2.0.1.RELEASE'
//SpringCloud
compilegroup:'org.springframework.cloud',name:'spring-cloud-dependencies',version:'Finchley.RELEASE',ext:'pom'
//Feign
compilegroup:'org.springframework.cloud',name:'spring-cloud-starter-openfeign',version:'2.0.1.RELEASE'
2.在启动类添加注解
@EnableDiscoveryClient
@EnableFeignClients
3.编写配置文件
spring:
application:
name: mirco-weather-eureka-client-feign
eureka:
client:
service-url:
defaultZone: http://localhost:8761/eureka/
feign:
client:
config:
feignName:
connectTimeout: 5000#连接超时时间
readTimeout: 5000#读数据超时时间
server:
port:8085
4.创建Service层
创建一个接口
如:
//服务名字
@FeignClient("msa-weather-city-eureka")
public interface CityClient {
//服务接口
@GetMapping("/cities/list")
StringlistCity();
}
5.创建控制层测试
@RestController
public class CityController {
@Autowired
private CityClientcityClient;
@GetMapping("/cities")
public StringlistCity(){
String body=cityClient.listCity();
return body;
}
}
API网关Zuul
api网关用于管理各个微服务的沟通,集合在一起
使用步骤:
1.导入依赖
//Zuul
compilegroup:'org.springframework.cloud',name:'spring-cloud-starter-netflix-zuul',version:'2.0.1.RELEASE'
2.在启动类添加注解
@EnableZuulProxy
3.编写配置文件
zuul:
routes:
hi:
path: /city/**
serviceId: msa-weather-city-eureka#转发名字
用于将path: /city/**开头的请求转发到msa-weather-city-eureka的微服务上
使用Spring Cloud Config配置
将配置文件统一管理,放在git上
搭建Spring Cloud Config Server服务
1.添加依赖
//Spring Cloud Config Server
compilegroup:'org.springframework.cloud',name:'spring-cloud-config-server',version:'2.0.1.RELEASE'
2.在启动类添加注释
@EnableConfigServer
3.编写配置文件
spring:
application:
name: mirco-weather-eureka-config-server
cloud:
config:
server:
git:
uri: https://github.com/waylau/spring-cloud-microservices-development #git路径
search-paths: config-repo #查找路径
eureka:
client:
service-url:
defaultZone: http://localhost:8761/eureka/
搭建Spring Cloud Config Client客户端
1.添加依赖
//Spring Cloud Config Client
compilegroup:'org.springframework.cloud',name:'spring-cloud-config-client',version:'2.0.1.RELEASE'
2.在控制类添加依赖
@EnableDiscoveryClient
3.编写配置文件
spring:
application:
name: micro-weather-config-client
cloud:
config:
profile: dev
uri: http://localhost:8888/ #配置服务地址
eureka:
client:
service-url:
defaultZone: http://localhost:8761/eureka/
4.通过
@Value("${auther}")
private Stringauther;
获取配置信息
注意:git的配置文件格式
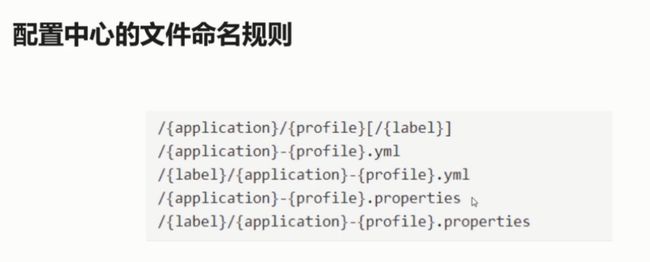
application:服务名
profile:环境
label:分支(branch)
注意客户端名字是否和application一致
集成Hystrix
在一个分布式系统里,许多依赖不可避免的会调用失败,比如超时、异常等,如何能够保证在一个依赖出问题的情况下,不会导致整体服务失败,这个就是Hystrix需要做的事情。Hystrix提供了熔断、隔离、Fallback、cache、监控等功能,能够在一个、或多个依赖同时出现问题时保证系统依然可用。
如何使用
1.添加依赖
//Hystrix
compilegroup:'org.springframework.cloud',name:'spring-cloud-starter-netflix-hystrix',version:'2.0.1.RELEASE'
2.在启动类添加注解
2.1@EnableCircuitBreaker
3.在控制层添加注解
@HystrixCommand(fallbackMethod ="defaultCities")
defaultCities为自定义的回调函数
3.另一种
在调用API网关的服务接口添加
@FeignClient(name ="mirco-weather-eureka-client-zuul",fallback = DataClientFallBack.class)
DataClientFallBack:这个类实现这个接口,为这个接口的每个函数重写回调函数
4.如何测试
当有异常的时候就会调用回调函数
配置熔断
一共有三个状态 打开 关闭 和半打开
当达到下面配置熔断条件的时候,则会熔断.熔断后经过一段时间会尝试再次打开服务,这个时候的状态为半打开状态,他会尝试让请求转到主业务逻辑上,看是否请求成功,当请求成功达到一定的数值时候就会变为打开状态,如果失败则继续为关闭状态.
@HystrixCommand(commandProperties = {
@HystrixProperty(name ="circuitBreaker.enabled",value ="true"), //设置熔断开启状态
@HystrixProperty(name ="circuitBreaker.requestVolumeThreshold",value ="10"),//当在配置时间窗口内达到此数量的失败后,进行短路。默认20个
@HystrixProperty(name ="circuitBreaker.sleepWindowInMilliseconds",value ="10000"),//短路多久以后开始尝试是否恢复,默认5s
@HystrixProperty(name ="circuitBreaker.errorThresholdPercentage",value ="60"),//出错百分比阈值,当达到此阈值后,开始短路。默认50%
})
Hystrix可视化工具使用
1.引入依赖
groupId:org.springframework.cloud
artifactId:spring-cloud-starter-hystrix-dashboard
2.在启动类添加注解
@EnableHystrixDashboard
3.添加配置文件
@Component
public class ServletRegistrationConfig {
@Bean
public ServletRegistrationBeangetServlet() {
HystrixMetricsStreamServlet streamServlet =new HystrixMetricsStreamServlet();
ServletRegistrationBean registrationBean =new ServletRegistrationBean(streamServlet);
registrationBean.setLoadOnStartup(1);
registrationBean.addUrlMappings("/hystrix.stream");
registrationBean.setName("HystrixMetricsStreamServlet");
return registrationBean;
}
}
4.打开管理界面
http://localhost:8082/hystrix
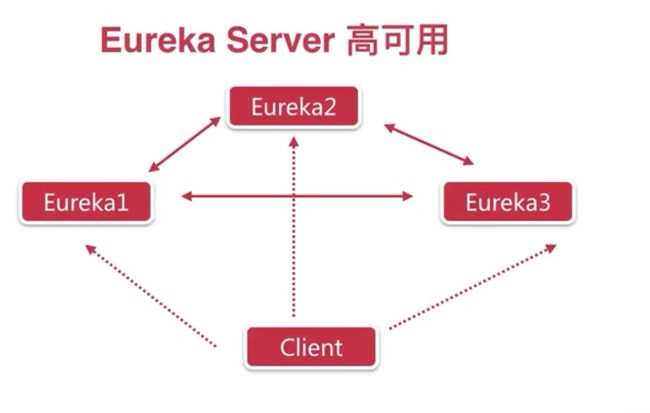
Eureka高可用集群
部署多个Eureka服务,当其中一个服务down掉之后能有其他服务顶替!
3个服务集群为例:
服务端
Server application.yml文件配置
spring:
application:
name: eureka-server
---
spring:
profiles: discovery1
server:
port:8761
eureka:
instance:
hostname: localhost
client:
service-url:
default-zone: http://localhost:8762/eureka/,http://localhost:8763/eureka/
---
spring:
profiles: discovery2
server:
port:8762
eureka:
instance:
hostname: discovery2
client:
service-url:
default-zone: http://localhost:8761/eureka/,http://localhost:8763/eureka/
---
spring:
profiles: discovery3
server:
port:8763
eureka:
instance:
hostname: localhost
client:
service-url:
default-zone: http://localhost:8761/eureka/,http://localhost:8762/eureka/
客户端:
spring:
application:
name: eureka-client
eureka:
client:
service-url:
defaultZone: http://localhost:8761/eureka/,http://localhost:8762/eureka/,http://localhost:8763/eureka/
服务方通信问题
被调用的服务通过新建一个类 XXXClient
@FeignClient(name ="服务名字")向外提供接口
调用方引入被调用方的依赖,然后自动注入服务方XXXClient使用他的方法
不要将数据库表映射的实体类暴露出去
不要重复定义实体类,该属于哪个服务就哪个服务
自己服务接口自己定义,不要在其他服务写Client
mvn -Dmaven.test.skip=true -U clean install:将项目安装到maven仓库
配置Config Client服务注意
因为获取配置要先从eureka寻找config server 所以先要在bootstrap.yml文件中配置eureka地址.如果不配置他只能在默认得eureka端口寻找.
docker启动RabbitMQ
docker run -d --hostname my-rabbit -p 5672:5672 -p 15672:15672 rabbitmq:3.7.8-management
ConfigServer 当配置文件修改自动刷新配置

原理: config-server会从远端的git拉取配置文件存放到本地的git,各微服务通过配置服务中心获取自己的配置文件,
如何动态的获取自己的配置文件呢?
当远程git端配置文件发生改变的时候,通过webhooks(事件钩子,相当于触发事件),然后对config-server进行一个bus-refresh的post请求,config-server就会重新获取新的配置给下面的组件.
curl -v -X POST "http://localhost:9001/actuator/bus-refresh" 对配置服务中心发起一个POST请求达到刷新效果
github的webhooks URL格式:http://f950340e.ngrok.io/monitor
content-type:application/json
使用
在客户端和服务端都需要添加spring-cloud-starter-bus-amqp依赖
服务端
还要添加
在配置文件添加
spring-cloud-config-monitor依赖 用于自动更新
management:
endpoints:
web:
exposure:
include:"*"
客户端
对需要拉取的配置文件字段添加@RefreshScope注解
表示要在这个作用域进行刷新
Zuul中增加跨域就可以不用改动其他服务代码
实现,编写一个配置类
@Configuration
public class CorsConfig {
@Bean
public CorsFiltercorsFilter(){
final UrlBasedCorsConfigurationSource source=new UrlBasedCorsConfigurationSource();
final CorsConfiguration config=new CorsConfiguration();
//是否支持cookie跨域
config.setAllowCredentials(true);
//http:/www.a.com
config.setAllowedOrigins(Arrays.asList("*"));
config.setAllowedHeaders(Arrays.asList("*"));
config.setAllowedMethods(Arrays.asList("*"));
//缓存时间
config.setMaxAge(300l);
source.registerCorsConfiguration("/**",config);
return new CorsFilter(source);
}
}
Spring Cloud Sleuth 链路监控
1.添加依赖
spring-cloud-starter-zipkin
包含sleuth和zipkin
2.可视化工具 使用zipkin
docker命令: docker run-d-p9411:9411 openzipkin/zipkin
3.填写配置文件
spring:
zipkin:#zipkin路径
base-url: http://localhost:9411/
sleuth:
sampler:
probability: 1#抽样百分比 生产环境可以设置为百分百
docker启动 eureka:docker run -p 8761:8761 -d hub.c.163.com/springcloud/eureka
rancher是用来进行管理dokcer应用的