【Moss2010系列】单点登陆配置
Moss中的单点登陆方案是在MOSS系统中,将需要进行单点登陆整合的系统的帐号和密码通过加密保存在MOSS中,在登陆时通过中间页面将帐号和密码解密出来,再POST到其他系统完成登陆,当然如果子系统有更好的登陆接口将更加安全可靠;这种方案实现了单点登陆中的帐号映射问题,但并没有帮助用户实现跳转等功能,要求开发人员对各个系统自行处理登陆,并不算是一个真正的完整的单点登陆解决方案,但在企业内部系统整合时也存在一定的优势,即简单,子系统基本不用进行改动,如果单独开发单点登陆系统的话,避免不了的是对现有系统登陆接口的改变,如数字签名验证、登陆与登出的验证与跳转等。
Moss单点登陆在2010版本中改名为Secure Store Service,可在管理中心服务中找到;进入管理中心---应用程序管理----管理服务应用程序,找到Secure Store Service服务,点击该服务,然后会要求用户创建新的密钥,输入一个复杂的密钥的Key,是用来加密数据的key,完成密钥的创建,就可以创建单点登陆应用程序。
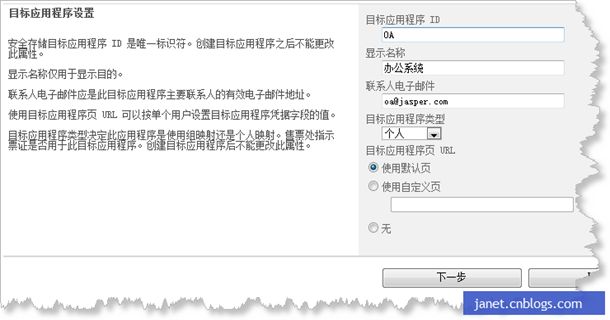
以一个办公系统集成为例,填写如下信息,其中“目标应用程序ID”是用来标识各业务系统的,代表当前业务系统,编写程序中会用到。
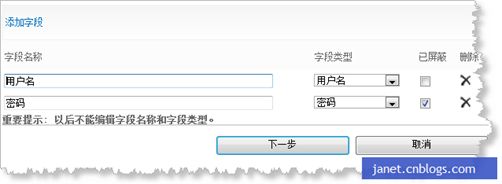
点击下一步会让用户填写该系统需要保存的相关信息,也可以添加字段如邮箱,根据自己系统的情况,如果帐号和MOSS帐号一致,甚至用户列也不是必须的。
下一步为系统提供一个管理帐号,完成创建,系统会在SqlServer中为该业务系统创建一个单独的数据库用来保存该系统的帐号和密码信息,帐号和密码都是加密过的,所以如果要自己添加帐号和密码的话,一般是通过MOSS提供的添加界面来操作,或者通过MOSS提供的编程接口来操作。
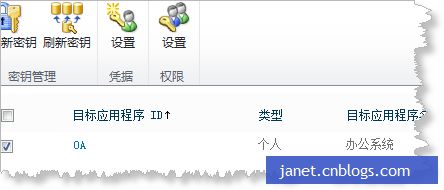
选中刚创建的系统,点操作栏的“凭据设置”按钮,为OA系统添加映射帐号
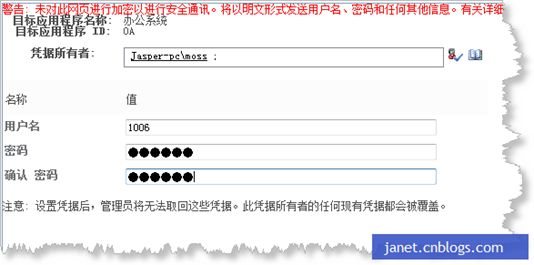
输入相关信息,凭据所有者是用户在MOSS系统中的帐号,用户名列为OA系统中的帐号,密码是用户在OA系统中的密码
这样就为用户1006录入了单点登陆的信息,下面实现单点登陆的帐号获取与跳转
VS中新建一WEB应用程序,也可以直接建一页面在layouts下面,或者Designer中建页面均可,至于如何将Aspx集成MOSS中,如果为Designer页面写后台代码等问题本文将不再解释。
添加程序集引用:Microsoft.SharePoint.dll、Microsoft.Office.SecureStoreService.dll、Microsoft.BusinessData.dll
程序集文件可以 c:\program files\common files\microsoft shared\web server extensions\14\ISAPI 目录下找到
注意:Microsoft.Office.SecureStoreService.dll,有些特殊,在该目录是找不到该文件的,可以在GAC中找到该文件的原始文件,c:\Windows\assembly\GAC_MSIL\Microsoft.Office.SecureStoreService\14.0.0.0__71e9bce111e9429c\Microsoft.Office.SecureStoreService.dll
可以用DOS命令提示把该文件复制出来:
cd c:\Windows\assembly\GAC_MSIL\Microsoft.Office.SecureStoreService\14.0.0.0__71e9bce111e9429c
copy *.* c:\
这样就可以在C盘根目录看到该文件了。
新建一页面OA_Login.aspx,前台代码如下
      1

     <%

     @ Page Language

     =

     "

     C#

     "

      AutoEventWireup

     =

     "

     true

     "

      CodeBehind

     =

     "

     OA_Login.aspx.cs

     "

      Inherits

     =

     "

     Moss2010.Demo.SSO.OA_Login

     "


     %>


      2


     <!

     DOCTYPE html PUBLIC "-//W3C//DTD XHTML 1.0 Transitional//EN" "http://www.w3.org/TR/xhtml1/DTD/xhtml1-transitional.dtd"

     >


      3


     <

     html

     xmlns

     ="http://www.w3.org/1999/xhtml"

     >


      4


     <

     head

     id

     ="Head1"

      runat

     ="server"

     >


      5


     <

     title

     >

     OA系统单点登陆

     </

     title

     >


      6


     </

     head

     >


      7


     <

     body

     >


      8


     <

     form

     action

     ="http://oa.jasper.com/Login_Check.aspx"

      method

     ="POST"

      name

     ="LoginForm"


      9

      autocomplete

     ="off"

     >


     10


     <

     div

     >


     11


     <

     input

     name

     ="username"

      runat

     ="server"

      id

     ="username"

      type

     ="text"


     /><

     br

     />


     12


     <

     input

     name

     ="password"

      runat

     ="server"

      id

     ="password"

      type

     ="text"


     />


     13


     <

     br

     />


     14


     <

     input

     type

     ="submit"

      value

     ="提交"


     />


     15


     </

     div

     >


     16


     <

     asp:Label

     ID

     ="LabMsg"

      runat

     ="server"

     ></

     asp:Label

     >


     17


     </

     form

     >


     18


     </

     body

     >


     19


     </

     html

     >


     20
后台代码:
        1

       using

        System;


        2


       using

        System.Collections.Generic;


        3


       using

        System.Linq;


        4


       using

        System.Web;


        5


       using

        System.Web.UI;


        6


       using

        System.Web.UI.WebControls;


        7


       using

        Microsoft.Office.SecureStoreService.Server;


        8


       using

        Microsoft.SharePoint;


        9


       using

        Microsoft.BusinessData.Infrastructure.SecureStore;


       10


       11


       namespace

        Moss2010.Demo.SSO


       12

       {


       13


       public


       partial


       class

        OA_Login : System.Web.UI.Page


       14

        {


       15


       protected


       void

        Page_Load(

       object

        sender, EventArgs e)


       16

        {


       17


       this

       .LabMsg.Text

       =


       "

       当前登陆用户:

       "


       +

        SPContext.Current.Web.CurrentUser.LoginName;


       18

        List

       <

       string

       >

        userInfoList

       =

        GetUserCredentialCollection(

       "

       oa

       "

       );


       19


       if

        (userInfoList.Count

       >=


       2

       )


       20

        {


       21


       this

       .username.Value

       =

        userInfoList[

       0

       ];


       22


       this

       .password.Value

       =

        userInfoList[

       1

       ];


       23

        }


       24


       else


       25

        {


       26


       this

       .LabMsg.Text

       +=


       "

       ,用户凭据不存在

       "

       ;


       27

        }


       28

        }


       29


       30


       ///


       <summary>


       31


       ///

        获取单点登陆业务系统中当前用户的信息


       32


       ///


       </summary>


       33


       ///


       <param name="appId">

       业务系统标识

       </param>


       34


       ///


       <returns></returns>


       35


       public


       static

        List

       <

       string

       >

        GetUserCredentialCollection(

       string

        appId)


       36

        {


       37

        List

       <

       string

       >

        credentialList

       =


       new

        List

       <

       string

       >

       ();


       38

        SecureStoreProvider prov

       =


       new

        SecureStoreProvider();


       39


       40

        SPServiceContext context

       =

        SPServiceContext.GetContext(SPContext.Current.Site);


       41

        prov.Context

       =

        context;

       //

       当前上下文信息,以便从上下文中找到当前登陆用户


       42


       try


       43

        {


       44

        SecureStoreCredentialCollection cc

       =

        prov.GetCredentials(appId);


       45


       for

        (

       int

        i

       =


       0

       ; i

       <

        cc.Count; i

       ++

       )


       46

        {


       47

        ISecureStoreCredential c

       =

        cc[i];


       48

        IntPtr ptr

       =

        System.Runtime.InteropServices.Marshal.SecureStringToBSTR(c.Credential);


       49


       string

        sDecrypString

       =

        System.Runtime.InteropServices.Marshal.PtrToStringUni(ptr);


       50

        credentialList.Add(sDecrypString);


       51

        }


       52

        }


       53


       catch


       54

        {


       55


       56

        }


       57


       return

        credentialList;


       58

        }


       59

        }


       60

       }


       61


       62
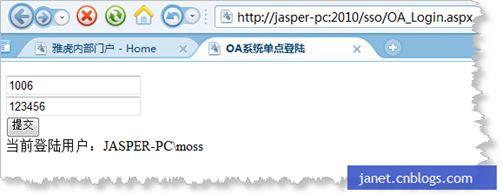
使用moss用户登陆系统,然后点击“办公系统”,进入我们的单点登陆POST页面,可看到:
当前用户在OA系统中的映射的帐号和密码已经获取到了,至于如何POST,POST的参数名,没有严格限制的话就不是问题。
当然应该把这个界面中的用户帐号和密码框,按钮也隐藏掉,自动POST提交然后进入OA系统。
隐藏:<div style=”display:none”>form内容</div>
自动提交可加入脚本:
<script type="text/javascript">
window.onload = function () { document.LoginForm.submit(); };
</script>
准确来讲这种登陆方式并不算是真正的、完整单点登陆解决方案,而更确且的说是提供了一个相关系统密钥存储检索方案,当然MOSS的单点登陆应用并不仅限于系统集成,在BCS业务数据整合中应用也是相当广泛的。如果需要实现完整的单点登陆解决方案,MOSS自带的这个并不是最好的解决方案。
附:更改单点登陆帐号密码相关代码
如果现有提供用户自己修改业务系统的帐号密码可使用如下函数:
/// 更新当前登陆用户在业务系统中的帐号和密码
/// </summary>
/// <param name="appId"> 业务系统标识 </param>
/// <param name="userInfo"> 用户凭据信息,数组为帐号和密码 </param>
public static void SetCredentials( string appId, string [] userInfo)
{
List < SecureStoreCredential > creds = new List < SecureStoreCredential > ();
SecureStoreCredential name = new SecureStoreCredential(toSecureString(userInfo[ 0 ]), SecureStoreCredentialType.UserName);
SecureStoreCredential pwd = new SecureStoreCredential(toSecureString(userInfo[ 1 ]), SecureStoreCredentialType.Password);
creds.Add(name);
creds.Add(pwd);
SecureStoreCredentialCollection credes = new SecureStoreCredentialCollection(creds.ToArray());
SecureStoreServiceProxy proxySs = new SecureStoreServiceProxy();
SPContext.Current.Site.AllowUnsafeUpdates = true ;
SPContext.Current.Web.AllowUnsafeUpdates = true ;
SPServiceContext context = SPServiceContext.GetContext(SPContext.Current.Site);
ISecureStore store = proxySs.GetSecureStore(context);
store.SetCredentials(appId, credes);
}
如果要单独设置某一用户的映射信息,或批量导入用户帐号信息时,可使用如下函数:
2 /// 设置指定用户的登陆凭据
3 /// </summary>
4 /// <param name="appId"> 业务系统标识 </param>
5 /// <param name="userInfo"> 凭据信息 </param>
6 /// <param name="userLoginName"> MOSS登陆帐号: domainName\LoginName </param>
7 public static void SetUserCredentials( string appId, string [] userInfo, string userLoginName)
8 {
9 List < SecureStoreCredential > creds = new List < SecureStoreCredential > ();
10 SecureStoreCredential name = new SecureStoreCredential(toSecureString(userInfo[ 0 ]), SecureStoreCredentialType.UserName);
11 SecureStoreCredential pwd = new SecureStoreCredential(toSecureString(userInfo[ 1 ]), SecureStoreCredentialType.Password);
12 creds.Add(name);
13 creds.Add(pwd);
14 SecureStoreCredentialCollection credes = new SecureStoreCredentialCollection(creds.ToArray());
15 SecureStoreServiceProxy proxySs = new SecureStoreServiceProxy();
16 SPContext.Current.Site.AllowUnsafeUpdates = true ;
17 SPContext.Current.Web.AllowUnsafeUpdates = true ;
18 SPServiceContext context = SPServiceContext.GetContext(SPContext.Current.Site);
19 ISecureStore store = proxySs.GetSecureStore(context);
20 SPClaim claim = SPClaimProviderManager.Local.ConvertIdentifierToClaim(userLoginName, SPIdentifierTypes.WindowsSamAccountName);
21 store.SetUserCredentials(appId, new SecureStoreServiceClaim(claim), credes);
22 }
