Android之TelephonyManager类的使用案例
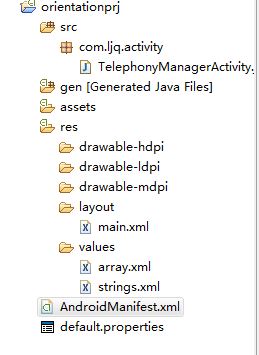
目录结构

main.xml布局文件
     <?

     xml version

     =

     "

     1.0

     "

      encoding

     =

     "

     utf-8

     "

     ?>


     <

     LinearLayout xmlns:android

     =

     "

     http://schemas.android.com/apk/res/android

     "


 android:orientation

     =

     "

     vertical

     "


 android:layout_width

     =

     "

     fill_parent

     "


 android:layout_height

     =

     "

     fill_parent

     "

     >


     <

     ScrollView android:fillViewport

     =

     "

     true

     "


 android:layout_width

     =

     "

     fill_parent

     "


 android:layout_height

     =

     "

     fill_parent

     "

     >


     <

     ListView android:id

     =

     "

     @+id/listView

     "


 android:layout_width

     =

     "

     fill_parent

     "


 android:layout_height

     =

     "

     fill_parent

     "


     />


     </

     ScrollView

     >


     </

     LinearLayout

     >
array.xml文件
     <?

     xml version

     =

     "

     1.0

     "

      encoding

     =

     "

     utf-8

     "

     ?>


     <

     resources

     >


     <

     string

     -

     array name

     =

     "

     listItem

     "

     >


     <

     item

     >

     设备编号

     </

     item

     >


     <

     item

     >

     SIM卡国别

     </

     item

     >


     <

     item

     >

     SIM卡序列号

     </

     item

     >


     <

     item

     >

     SIM卡状态

     </

     item

     >


     <

     item

     >

     软件版本

     </

     item

     >


     <

     item

     >

     网络运营商代号

     </

     item

     >


     <

     item

     >

     网络运营商名称

     </

     item

     >


     <

     item

     >

     手机制式

     </

     item

     >


     <

     item

     >

     设备当前位置

     </

     item

     >


     </

     string

     -

     array

     >


     <

     string

     -

     array name

     =

     "

     simState

     "

     >


     <

     item

     >

     状态未知

     </

     item

     >


     <

     item

     >

     无SIM卡

     </

     item

     >


     <

     item

     >

     被PIN加锁

     </

     item

     >


     <

     item

     >

     被PUK加锁

     </

     item

     >


     <

     item

     >

     被NetWork PIN加锁

     </

     item

     >


     <

     item

     >

     已准备好

     </

     item

     >


     </

     string

     -

     array

     >


     <

     string

     -

     array name

     =

     "

     phoneType

     "

     >


     <

     item

     >

     未知

     </

     item

     >


     <

     item

     >

     GSM

     </

     item

     >


     <

     item

     >

     CDMA

     </

     item

     >


     </

     string

     -

     array

     >


     </

     resources

     >
清单文件
     <?

     xml version

     =

     "

     1.0

     "

      encoding

     =

     "

     utf-8

     "

     ?>


     <

     manifest xmlns:android

     =

     "

     http://schemas.android.com/apk/res/android

     "


     package

     =

     "

     com.ljq.activity

     "

      android:versionCode

     =

     "

     1

     "


 android:versionName

     =

     "

     1.0

     "

     >


     <

     application android:icon

     =

     "

     @drawable/icon

     "


 android:label

     =

     "

     @string/app_name

     "

     >


     <

     activity android:name

     =

     "

     .TelephonyManagerActivity

     "


 android:label

     =

     "

     @string/app_name

     "

     >


     <

     intent

     -

     filter

     >


     <

     action android:name

     =

     "

     android.intent.action.MAIN

     "


     />


     <

     category
 android:name

     =

     "

     android.intent.category.LAUNCHER

     "


     />


     </

     intent

     -

     filter

     >


     </

     activity

     >


     </

     application

     >


     <

     uses

     -

     sdk android:minSdkVersion

     =

     "

     7

     "


     />


     <

     uses

     -

     permission android:name

     =

     "

     android.permission.ACCESS_COARSE_LOCATION

     "


     />


     <

     uses

     -

     permission android:name

     =

     "

     android.permission.READ_PHONE_STATE

     "


     />


     </

     manifest

     >
TelephonyManagerActivity类
     package

      com.ljq.activity;


     import

      java.util.ArrayList;


     import

      android.app.Activity;


     import

      android.content.Context;


     import

      android.os.Bundle;


     import

      android.telephony.TelephonyManager;


     import

      android.view.Gravity;


     import

      android.view.View;


     import

      android.view.ViewGroup;


     import

      android.widget.BaseAdapter;


     import

      android.widget.LinearLayout;


     import

      android.widget.ListView;


     import

      android.widget.TextView;


     public


     class

      TelephonyManagerActivity

     extends

      Activity {


     private

      ListView listView

     =

     null

     ;


     private

      TelephonyManager tm

     =

     null

     ;


     private

      String[] phoneType

     =

     null

     ;


     private

      String[] simState

     =

     null

     ;


     private

      String[] listItems

     =

     null

     ;
 ArrayList

     <

     String

     >

      listValues

     =

     new

      ArrayList

     <

     String

     >

     ();
 BaseAdapter adapter

     =

     new

      BaseAdapter(){


     public


     int

      getCount() {


     return

      listItems.length;
 }


     public

      Object getItem(

     int

      position) {


     return

      listItems[position];
 }


     public


     long

      getItemId(

     int

      position) {


     return

      position;
 }


     public

      View getView(

     int

      position, View convertView, ViewGroup parent) {
 LinearLayout ll

     =

     new

      LinearLayout(TelephonyManagerActivity.

     this

     );
 ll.setOrientation(LinearLayout.VERTICAL);
 TextView tvItem

     =

     new

      TextView(TelephonyManagerActivity.

     this

     );
 tvItem.setTextSize(

     24

     );
 tvItem.setText(listItems[position]);
 tvItem.setGravity(Gravity.LEFT);

     //

     设置在父容器中的对齐方式


      ll.addView(tvItem);
 TextView tvValue

     =

     new

      TextView(TelephonyManagerActivity.

     this

     );
 tvValue.setTextSize(

     18

     );

     //

     设置字体大小


      tvValue.setText(listValues.get(position));

     //

     设置显示的内容


      tvValue.setPadding(

     0

     ,

     0

     ,

     10

     ,

     10

     );

     //

     设置四周边界


      tvValue.setGravity(Gravity.RIGHT);
 ll.addView(tvValue);


     return

      ll;
 }

 };

 @Override


     public


     void

      onCreate(Bundle savedInstanceState) {


     super

     .onCreate(savedInstanceState);
 setContentView(R.layout.main);

 listItems

     =

     getResources().getStringArray(R.array.listItem);
 simState

     =

     getResources().getStringArray(R.array.simState);
 phoneType

     =

     getResources().getStringArray(R.array.phoneType);
 tm

     =

     (TelephonyManager)getSystemService(Context.TELEPHONY_SERVICE);
 listView

     =

     (ListView)findViewById(R.id.listView);
 initListValues();
 listView.setAdapter(adapter);
 }


     /**


 * 获取各个数据项的值


     */


     public


     void

      initListValues(){
 listValues.add(tm.getDeviceId());

     //

     获取设备编号


      listValues.add(tm.getSimCountryIso());

     //

     获取SIM卡国别


      listValues.add(tm.getSimSerialNumber());

     //

     获取SIM卡序列号


      listValues.add(simState[tm.getSimState()]);

     //

     获取SIM卡状态


      listValues.add((tm.getDeviceSoftwareVersion()

     !=

     null

     ?

     tm.getDeviceSoftwareVersion():

     "

     未知

     "

     ));

     //

     获取软件版本


      listValues.add(tm.getNetworkOperator());

     //

     获取网络运营商代号


      listValues.add(tm.getNetworkOperatorName());

     //

     获取网络运营商名称


      listValues.add(phoneType[tm.getPhoneType()]);

     //

     获取手机制式


      listValues.add(tm.getCellLocation().toString());

     //

     获取设备当前位置


      }
}
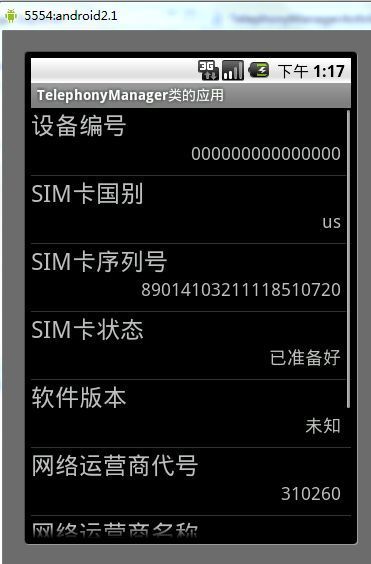
运行结果
