选项卡TabPanel控件
选项面板是一个包括一个或多个选项卡(Tab),同一时刻只显示一个选项卡的这种用户界面。比如下图的IE选项设置界面中,就是一个选项板的应用,选项板上有“常规”、“安全”、“隐私”等选项卡。
2、Ext.TabPanel
Ext中提供了选项板控件TabPanel,由类Ext.TabPanel来定义,该类直接继承自Ext.Panel,因此他实际上也是一个包含特定特性的面板。看下面的代码:
      <

      script type

      =

      "

      text/javascript

      "

      >


 Ext.onReady(

      function

      (){


      new

       Ext.TabPanel({
 renderTo: Ext.getBody(),
 width:

      300

      ,
 height:

      200

      ,
 enableTabScroll:

      true

      ,
 activeTab:

      0

      ,
 items: [{
 title:

      "

      面板1

      "

      ,html:

      "

      <h1>this is the first panel!</h1>

      "


 }, {
 closable :

      true

      ,
 title:

      "

      面板2

      "

      ,
 html:

      "

      <h1>this is the second panel!</h1>

      "


 }, {
 closable :

      true

      ,
 title:

      "

      面板3

      "

      ,
 html:

      "

      <h1>this is the third panel!</h1>

      "


 }]
 });
 });


      <

      /

      script>
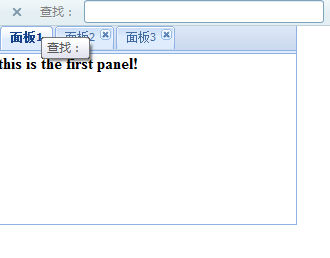
上面的代码定义了一个简单的选项面板,该面板中包含三个tab,初始化时显示第一个tab内容。
3、另外一种使用选项板的方式
也可以直接把html页面中符合特殊条件的DIV标签转换成选项板中的选项,此时需要在TabPanel的配置选项中把autoTabs项设置为true,把deferredRender项设置为false,然后通过applyTo项指定把页面中包含class="x-tab"这种样式的子节点的DOM节点应用于选项板。看下面的例子:
      <

      head

      >


      <

      meta http

      -

      equiv

      =

      "

      description

      "

       content

      =

      "

      This is my page

      "

      >


      <!--

       引入ExtJS样式文件

      -->


      <

      link rel

      =

      "

      stylesheet

      "

       type

      =

      "

      text/css

      "

       href

      =

      "

      <%=request.getContextPath() %>/ext-3.2.0/resources/css/ext-all.css

      "/

      >


      <!--

       引入ExtJS脚本库(两个,一个驱动adapter,另外一个ext

      -

      all.js)

      -->


      <

      script type

      =

      "

      text/javascript

      "

       src

      =

      "

      <%=request.getContextPath() %>/ext-3.2.0/adapter/ext/ext-base.js

      "

      ><

      /

      script>


      <

      script type

      =

      "

      text/javascript

      "

       src

      =

      "

      <%=request.getContextPath() %>/ext-3.2.0/ext-all.js

      "

      ><

      /

      script>


      <

      script type

      =

      "

      text/javascript

      "

      >


 Ext.onReady(

      function

      (){


      new

       Ext.TabPanel({
 applyTo:

      '

      test

      '

      ,
 activeTab:

      0

      ,
 deferredRender:

      false

      ,
 autoTabs:

      true


 });
 });


      <

      /

      script>


      <

      /

      head>


      <

      body

      >


      <

      div id

      =

      "

      test

      "

      >


      <

      div class

      =

      "

      x-tab

      "

       title

      =

      "

      选项1

      "

      >

      A simple tab

      <

      /

      div>


      <

      div class

      =

      "

      x-tab

      "

       title

      =

      "

      选项2

      "

      >

      Another one

      <

      /

      div>


      <

      div title

      =

      "

      选项3

      "

      >


      <

      div class

      =

      "

      x-tab

      "

       title

      =

      "

      选项4

      "

      >

      Another one

      <

      /

      div>


      <

      /

      div>


      <

      /

      div>


      <

      /

      body>
由于“选项3”这个DIV标签的class不是x-tab所以不会转换成选项卡Tab,而“选项4”这个DIV虽然与“选项1”这些节点不在同一个层次,但仍然会把他作为Tab项来同等处理。
4、控制选项板的内容
选项板TabPanel中的选项Tab项可以在初始化的时候通过items时候指定,也可以在TabPanel对象创建以后,使用add()、insert()或remove等来动态添加或删除其中的选项卡Tab。为了演示对面板中tab的操作,我们可以给上面的程序简单的添加一个工具栏按钮,当点击按钮的时候在选项面板中动态添加tab。代码如下:
      <

      script type

      =

      "

      text/javascript

      "

      >


 Ext.onReady(

      function

      (){


      var

       i

      =

      0

      ;


      var

       tab

      =

      new

       Ext.TabPanel({
 renderTo: Ext.getBody(),
 width:

      500

      ,
 height:

      200

      ,
 enableTabScroll:

      true

      ,
 activeTab:

      0

      ,
 bbar:[{
 text:

      "

      添加

      "

      ,
 handler:

      function

      (){
 tab.add({
 title:

      "

      新面板

      "

      +

      i

      ++

      ,
 closable :

      true


 });
 }
 }],
 items:[{
 title:

      "

      面板1

      "

      ,
 html:

      "

      <h1>this is the first panel!</h1>

      "


 }, {
 closable :

      true

      ,
 title:

      "

      面板2

      "

      ,
 html:

      "

      <h1>this is the second panel!</h1>

      "


 },{
 closable :

      true

      ,
 title:

      "

      面板3

      "

      ,
 html:

      "

      <h1>this is the third panel!</h1>

      "


 }]
 });
 });


      <

      /

      script>
添加按钮的事件响应函数内容如下:
tab.add({title:"新面板"+i++,closable : true});
我们直接调用选项面板的add方法,就可以把一个面板添加到选项板中,成为一个新的tab。closeable表示该面板可以关闭,因此在tab上会出现一个关闭tab的图标,点击该图标可以关闭该面板。
可以使用迭代功能,实现批量关闭选项板TabPanel中的所有Tab,比如,可以在上面的bbar中,添加一个按钮来实现关闭所有打开的Tab,该按钮的定义代码如下:
            {

 text:

            "

            关闭所有面板

            "

            ,

 handler:

            function

            (){

 tab.items.each(

            function

            (p){


            if

            (p.closable)tab.remove(p);

 }

 }

}