1 集群入门案例
@Test
    public void testCluster(){
        Set sets = new HashSet<>();
        sets.add(new HostAndPort("192.168.126.129", 7000));
        sets.add(new HostAndPort("192.168.126.129", 7001));
        sets.add(new HostAndPort("192.168.126.129", 7002));
        sets.add(new HostAndPort("192.168.126.129", 7003));
        sets.add(new HostAndPort("192.168.126.129", 7004));
        sets.add(new HostAndPort("192.168.126.129", 7005));
        JedisCluster jedisCluster = new JedisCluster(sets);
        jedisCluster.set("jedis", "集群赋值");
        System.out.println(jedisCluster.get("jedis"));
    }
2 SpringBoot整合Redis集群
1.编辑properties文件
# 配置单台redis服务器
#redis.host=192.168.126.129
#redis.port=6379

##配置redis分片
#redis.nodes=192.168.126.129:6379,192.168.126.129:6380,192.168.126.129:6381

# redis集群配置
redis.nodes=192.168.126.129:7000,192.168.126.129:7001,192.168.126.129:7002,192.168.126.129:7003,192.168.126.129:7004,192.168.126.129:7005
2.编辑配置类
package com.jt.config;

import org.springframework.beans.factory.annotation.Value;
import org.springframework.context.annotation.Bean;
import org.springframework.context.annotation.Configuration;
import org.springframework.context.annotation.PropertySource;
import redis.clients.jedis.*;

import java.util.ArrayList;
import java.util.HashSet;
import java.util.List;
import java.util.Set;

@Configuration  //标识我是配置类
@PropertySource("classpath:/properties/redis.properties")
public class RedisConfig {

    //实现redis集群操作
    @Value("${redis.nodes}")
    private String nodes;       //node,node,node

    @Bean
    public JedisCluster jedisCluster(){
        Set nodeSet = new HashSet<>();
        String[] nodeArray = nodes.split(",");
        for (String node : nodeArray){ //host:port
            String host = node.split(":")[0];
            int port = Integer.parseInt(node.split(":")[1]);
            nodeSet.add(new HostAndPort(host,port));
        }
        return new JedisCluster(nodeSet);
    }

    /*@Bean
    public ShardedJedis shardedJedis(){
        List shards = new ArrayList<>();
        String[] nodeArray = nodes.split(",");
        for (String node : nodeArray){ //node=ip:port
            String host = node.split(":")[0];
            int port = Integer.parseInt(node.split(":")[1]);
            //准备分片节点信息
            JedisShardInfo info  = new JedisShardInfo(host, port);
            shards.add(info);
        }
        return new ShardedJedis(shards);
    }*/


   /* @Value("${redis.host}")
    private String  host;
    @Value("${redis.port}")
    private Integer port;

    @Bean
    public Jedis jedis(){

        return new Jedis(host, port);
    }*/
}
3.编辑AOP配置
@Aspect
@Component
public class CacheAop {
    @Autowired
 private JedisCluster jedis;
//    private ShardedJedis jedis;//配置类中定义的类型
// private Jedis jedis;2 京淘前台项目搭建
2.1 项目准备(配置+导入文件)【maven项目】
1.项目坐标)添加打包/继承/依赖/插件
2.导入静态资源文件
3.关于主启动类说明:(exclude = DataSourceAutoConfiguration.class)//排除数据源自动配置
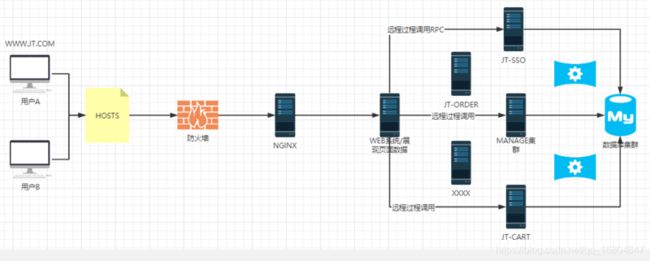
4.域名反向代理(Nginx)【需求: 要求用户通过http://www.jt.com 访问localhost:8092服务器】
1).修改hosts文件:127.0.0.1 www.jt.com
2).修改Nginx配置文件:配置前台服务器,修改之后,重启nginx服务器
5.页面效果展现
6.开启后缀类型匹配
@Configuration
public class MvcConfigurer implements WebMvcConfigurer{
    //开启匹配后缀型配置
    @Override
    public void configurePathMatch(PathMatchConfigurer configurer) {
        configurer.setUseSuffixPatternMatch(true);
    }
}
URL地址小结:
1). http://www.jt.com/index 该请求会被Controller进行拦截.
2). http://www.jt.com/index.html 该请求默认条件下表示获取静态资源文件.不会被拦截.
一般条件下:Controller只拦截前缀类型的请求. 如果需要拦截后缀类型的请求需要单独配置.
2.2 登录注册页面跳转(controller)
package com.jt.controller;
import org.springframework.stereotype.Controller;
import org.springframework.web.bind.annotation.PathVariable;
import org.springframework.web.bind.annotation.RequestMapping;
@Controller
@RequestMapping("/user")
public class UserController {
    /**
 * 业务描述:实现用户登录/注册页面的跳转
 * url1:http://www.jt.com/user/login.html
 * url2:http://www.jt.com/user/register.html * 返回值类型:String
 * 参数:moduleName(页面的名字)
 */
 @RequestMapping("/{moduleName}")
    public String module(@PathVariable String moduleName) {
        return moduleName;
    }
}
总结:
伪静态是相对真实静态来讲的,目的是为了增强搜索引擎的友好性
伪静态技术:以.html结尾的一种动态页面的形式…


