1 前言
如果你同时维护着多个小程序项目,那你每天是否花费了大量的时间在做这样一件时间,切换git分支 -> 执行编译 -> 打开小程序开发者工具 -> 上传小程序。
同时维护着5个小程序(两个微信小程序、两个支付宝小程序、一个字节跳动小程序),我发现我每天要花大量的时间做发布小程序的工作。为此我想到了打造一个类似Jenkins的小程序自动化构建平台,将发布小程序的任务移交给测试同事(是的,我就是这么懒)。
github项目地址,觉得有帮助的话点个start吧。
2 先上项目界面
2.1 登录页
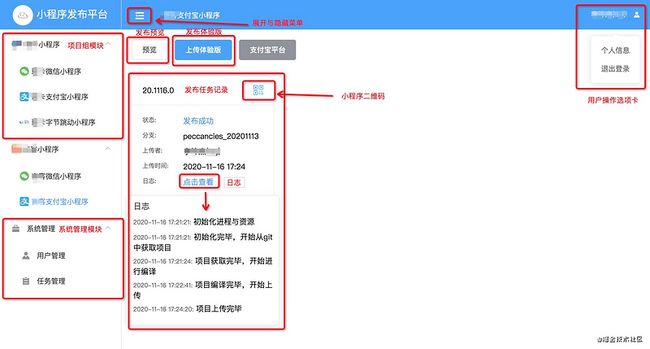
2.2 主页
2.3 主页带备注
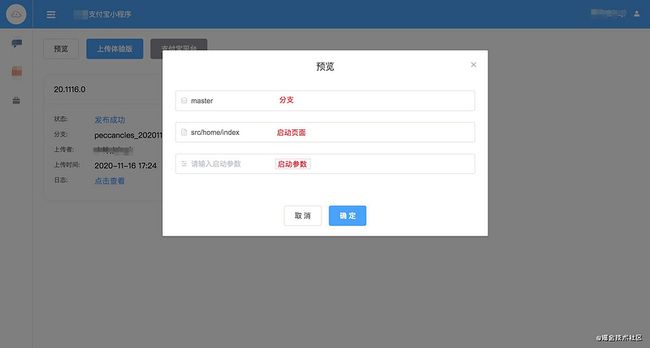
2.4 发布预览
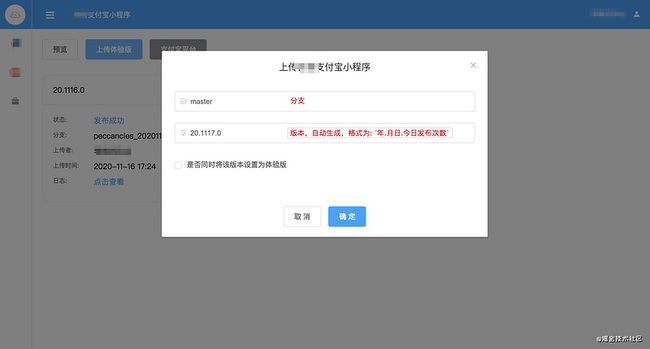
2.5 发布体验版
3 技术实现
下面重点讲解小程序(微信小程序、支付宝小程序、字节跳动小程序)发布功能的实现,其他登录、预览等功能可以在我的github项目中查看。该功能分为三个部分,分别是:
- 下载github/gitlab项目
- 使用子进程编译项目
- 将编译后的代码上传
3.1 首先编写一个配置表,方便后续扩展其他小程序
const ciConfigure = {
  // 标识不同小程序的key,命名规范是`${项目名}_${小程序类型}`
  lzj_wechat: {
    // 小程序appID
    appId: 'wxe10f1d56da44430f',
    // 应用类型,可选值有: miniProgram(小程序)/miniProgramPlugin(小程序插件)/miniGame(小游戏)/miniGamePlugin(小游戏插件)
    type: 'miniProgram',
    // 项目下载地址,分为三类:
    // github地址: `https://github.com:${用户名,我的用户名是 lizijie123}/${代码仓库名,文档代码仓是 uni-mp-study}`
    // v3版本 gitlab地址: `${gitlab地址}/${用户名}/${代码仓库名}/repository/archive.zip`
    // v4版本 gitlab地址: `${gitlab地址}/api/v4/projects/${代码仓库id}/repository/archive`
    // tips: `${gitlab地址}/api/v3/projects`有返回值即为v3版本gitlab,`${gitlab地址}/api/v4/projects`有返回值即为v4版本gitlab,返回的数据中id字段就是代码仓库的id
    storeDownloadPath: 'https://github.com:lizijie123/uni-mp-study',
    // gitlab项目,则需要设置gitlab的privateToken,在gitlab个人中心可以拿到
    privateToken: '',
    // 小程序打包构建命令
    buildCommand: 'npm run build:wx',
    // 小程序打包构建完,输出目录与根目录的相对位置
    buildProjectChildrenPath: '/dist/build/mp-weixin',
    // 微信小程序与支付宝小程序需要非对称加密的私钥,privateKeyPath是私钥文件相对根目录的地址,在微信公众平台中拿到
    privateKeyPath: '/server/utils/CI/private/lzj-wechat.key',
    // 与微信小程序开发者工具中的几个设置相同
    setting: {
      es7: false,
      minify: false,
      autoPrefixWXSS: false,
    },
  },
  lzj_alipay: {
    // 下文讲到支付宝小程序再补充完善
  },
  lzj_toutiao: {
    // 下文讲到字节跳动小程序再补充完善
  },
}

export default ciConfigure
3.1 获取github/gitlab项目
下载git项目采用download-git-repo
# 安装download-git-repo
npm i download-git-repo -S
首先封装一个函数来计算项目地址,与项目存储在本地的路径
import ciConfigure from './utils/ci-configure'

// 获取项目地址与本地存储地址
// @params miniprogramType: 小程序类型,与配置文件中的key的值对应
// @parmas branch: 分支名
// @params version: 版本号
// @return: { projectPath: 项目存储在本地的路径, storePath: 项目地址 }
function getStorePathAndProjectPath (miniprogramType, branch, version) {
    let storePath = ''
    if (ciConfigure[miniprogramType].storeDownloadPath.includes('github')) {
      storePath = `${ciConfigure[miniprogramType].storeDownloadPath}#${branch}`
    } else {
      storePath = `direct:${ciConfigure[miniprogramType].storeDownloadPath}?private_token=${ciConfigure[miniprogramType].privateToken}`
      if (storePath.includes('v4')) {
        storePath += `&ref=${branch}`
      } else {
        storePath += `&sha=${branch}`
      }
    }
    const projectPath = path.join(process.cwd(), `/miniprogram/${miniprogramType}/${version}`)

    return {
      storePath,
      projectPath,
    }
  }
接着封装一个函数来下载项目
import * as downloadGit from 'download-git-repo'

// 下载github/gitlab项目
// @parmas storePath: 项目地址
// @params projectPath: 项目存储在本地的路径
function download (storePath, projectPath) {
  return new Promise((resolve, reject) => {
    downloadGit(storePath, projectPath, null, err => {
      if (err) reject(err)
      resolve()
    })
  })
}
3.2 使用子进程编译项目
使用shelljs来简化子进程(child_process)模块的操作
# 安装shelljs
npm install shelljs -S
封装一个函数来执行shell命令
import * as shell from 'shelljs'

// 执行shell命令
// @parmas command: 待执行的shell命令
// @params cwd: 待执行shell命令的执行目录
function execPromise (command, cwd) {
  return new Promise(resolve => {
    shell.exec(command, {
      // 值为true则开启新的子进程执行shell命令,false则使用当前进程执行shell命令,会阻塞node进程
      async: true,
      silent: process.env.NODE_ENV === 'development',
      stdio: 'ignore',
      cwd,
    }, (...rest) => {
      resolve(...rest)
    })
  })
}
封装编译项目的函数,这部分可以根据自己的项目自行调整
// 下载依赖包并执行编译命令
// @params miniprogramType: 小程序类型,与配置文件中的key的值对应
// @params projectPath: 项目存储在本地的路径
async build (miniprogramType, projectPath) {
  // 下载依赖包
  await execPromise(`npm install`, projectPath)
  await execPromise(`npm install --dev`, projectPath)
   // 执行编译命令
  await execPromise(ciConfigure[miniprogramType].buildCommand, projectPath)
}
3.3 将编译后的代码上传(微信小程序版)
3.3.1 获取上传代码用的非对称加密私钥
登录小程序后台 -> 开发 -> 开发设置 -> 小程序代码上传中生成秘钥(配置文件中的privateKeyPath字段就是这里来的)
3.3.2 继续实现功能
使用miniprogram-ci来上传代码
# 安装
npm install miniprogram-ci -S
封装代码上传函数
import * as ci from 'miniprogram-ci'

// 微信小程序上传代码
// @params miniprogramType: 小程序类型,与配置文件中的key的值对应
// @params projectPath: 项目存储在本地的路径
// @params version: 版本号
// @params projectDesc: 描述
// @params identification: ci机器人标识,这个可不传
async function upload ({ miniprogramType, projectPath, version, projectDesc = '', identification }) {
  const project = initProject(projectPath, miniprogramType)

  await ci.upload({
    project,
    version,
    desc: projectDesc,
    setting: ciConfigure[miniprogramType].setting,
    onProgressUpdate: process.env.NODE_ENV === 'development' ? console.log : () => {},
    robot: identification ? identification : null
  })
}

// 创建ci projecr对象
// @params projectPath: 项目存储在本地的路径
// @params miniprogramType: 小程序类型,与配置文件中的key的值对应
function initProject (projectPath, miniprogramType) {
  return new ci.Project({
    appid: ciConfigure[miniprogramType].appId,
    type: ciConfigure[miniprogramType].type,
    projectPath: `${projectPath}${ciConfigure[miniprogramType].buildProjectChildrenPath}`,
    privateKeyPath: path.join(process.cwd(), ciConfigure[miniprogramType].privateKeyPath),
    ignores: ['node_modules/**/*'],
  })
}
3.4 使用上述封装好的函数做一次完整的流程
// 上传小程序
// @params miniprogramType: 小程序类型,与配置文件中的key的值对应
// @params version: 版本号
// @params branch: 分支
// @params projectDesc: 描述
// @params projectPath: 项目存储在本地的路径
// @params identification: ci机器人标识,微信小程序用
// @params experience: 是否将当前版本设置为体验版,支付宝小程序用
async upload ({ miniprogramType, version, branch, projectDesc, identification, experience }) {
  // 获取项目地址与本地存储地址
  const { storePath, projectPath } = getStorePathAndProjectPath(miniprogramType, branch, version)
  // 下载项目到本地
  download(storePath, projectPath)
  // 构建项目
  build(miniprogramType, projectPath)
  // 上传体验版
  await wechatCi.upload({
    miniprogramType,
    projectPath,
    version,
    projectDesc,
    identification,
    experience,
  })
}
4 其他小程序的上传
4.1 支付宝小程序
使用[alipay-dev]()来上传代码
# 安装
npm install alipay-dev -S
4.1.1 获取上传代码用的非对称加密公钥与私钥
# 先在本地生成非对称加密的公钥与私钥
npx alipaydev key create -w
4.1.2 将刚刚生成的公钥设置到支付宝开发工具秘钥中
设置开发工具秘钥 -> 将公钥粘贴至开发工具公钥 -> 保存,即可得到工具ID(toolId)(将这里得到的toolId和私钥放置到配置文件中)
4.1.3 继续实现功能
完善支付宝小程序的配置文件
const ciConfigure = {
  lzj_wechat: { 省略 },
  lzj_alipay: {
    // 同上
    appId: '2021002107681948',
    // 工具id,支付宝小程序设置了非对称加密的公钥后会生成
    toolId: 'b6465befb0a24cbe9b9cf49b4e3b8893',
    // 同上
    storeDownloadPath: 'https://github.com:lizijie123/uni-mp-study',
    // gitlab项目,则需要设置gitlab的privateToken
    privateToken: '',
    // 同上
    buildCommand: 'npm run build:ap',
    // 同上
    buildProjectChildrenPath: '/dist/build/mp-alipay',
    // 同上
    privateKeyPath: '/server/utils/CI/private/lzj-alipay.key',
  },
  lzj_toutiao: { 省略 },
}
接着封装支付宝小程序上传代码函数
// 上传体验版
// @params miniprogramType: 小程序类型,与配置文件中的key的值对应
// @params projectPath: 项目存储在本地的路径
// @params version: 版本号
// @params experience: 是否将该版本设置为体验版
async function upload ({ miniprogramType, projectPath, version, experience }) {
  initProject(miniprogramType)

  const res = await ci.miniUpload({
    project: `${projectPath}${ciConfigure[miniprogramType].buildProjectChildrenPath}`,
    appId: ciConfigure[miniprogramType].appId,
    packageVersion: version,
    onProgressUpdate: process.env.NODE_ENV === 'development' ? console.log : () => {},
    experience: experience ? experience : false,
  })
  if (res.qrCodeUrl) {
    return res.qrCodeUrl
  }
}

// 创建ci projecr对象
// @params projectPath: 项目存储在本地的路径
// @params miniprogramType: 小程序类型,与配置文件中的key的值对应
function initProject (projectPath: string, miniprogramType: string) {
  return new ci.Project({
    appid: ciConfigure[miniprogramType].appId,
    type: ciConfigure[miniprogramType].type,
    projectPath: `${projectPath}${ciConfigure[miniprogramType].buildProjectChildrenPath}`,
    privateKeyPath: path.join(process.cwd(), ciConfigure[miniprogramType].privateKeyPath),
    ignores: ['node_modules/**/*'],
  })
}
4.2 字节跳动小程序
完善字节跳动小程序配置
const ciConfigure = {
  lzj_wechat: { 省略 },
  lzj_alipay: { 省略 },
  lzj_toutiao: {
    // 字节跳动小程序账号(登录时的那个)
    account: '',
    // 字节跳动小程序密码(登录时的那个)
    password: '',
    // 同上
    storeDownloadPath: 'https://github.com:lizijie123/uni-mp-study',
    // 同上
    privateToken: '',
    // 同上
    buildCommand: 'npm run build:tt',
    // 同上
    buildProjectChildrenPath: '/dist/build/mp-toutiao',
  },
}使用tt-ide-cli来上传代码
# 安装
npm install tt-ide-cli -S
接着封装字节跳动小程序上传代码函数,注意:字节跳动小程序目前只能使用命令行的方式上传代码
// 上传体验版
// @params miniprogramType: 小程序类型,与配置文件中的key的值对应
// @params projectPath: 项目存储在本地的路径
// @params version: 版本号
// @params projectDesc: 描述
async upload ({ miniprogramType, projectPath, version, projectDesc }) {
    const currentPath = process.cwd()
    // 登录命令
    const login = `npx tma login-e '${ciConfigure[miniprogramType].account}' '${ciConfigure[miniprogramType].password}'`
    // 上传命令
    const up = `npx tma upload -v '${version}' -c '${projectDesc ? projectDesc : '暂无描述'}' ${projectPath}${ciConfigure[miniprogramType].buildProjectChildrenPath}`
    await execPromise(login, currentPath)
    await execPromise(up, currentPath)
  }
5 交流
项目已在生成环境中运行了一段时间了,再也不用工作到一半被叫去发布小程序了,下面是项目github地址,欢迎clone,觉得不错的话来点个Star吧。


