前言

在「Vue3」中,创建一个组件实例由 createApp 「API」完成。创建完一个组件实例,我们需要调用 mount() 方法将组件实例挂载到页面中:
createApp({
    ...
}).mount("#app");
在源码中整个组件的创建过程:
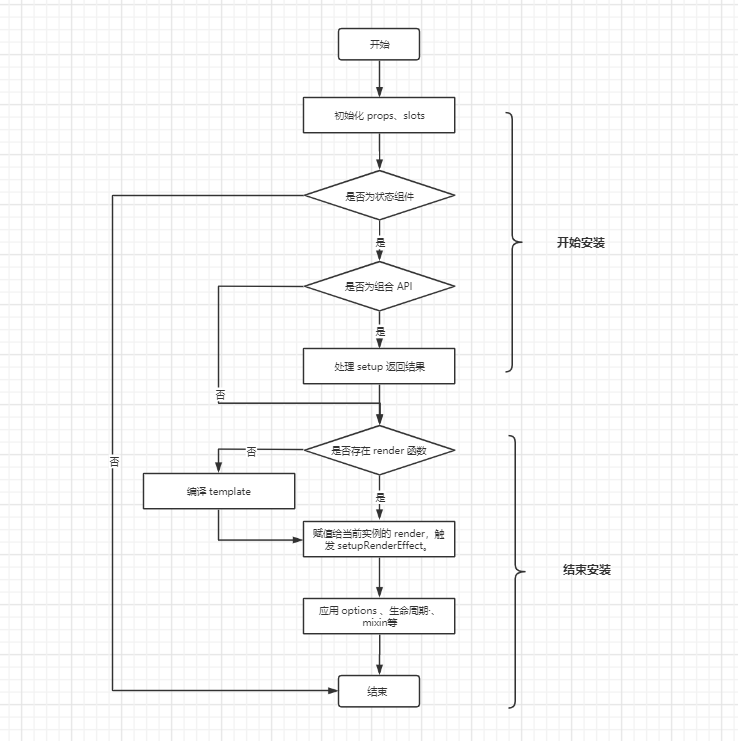
mountComponent() 实现的核心是 setupComponent(),它可以分为两个过程:
- 开始安装,它会初始化
props、slots、调用setup()、验证组件和指令的合理性。 - 结束安装,它会初始化
computed、data、watch、mixin和生命周期等等。
那么,接下来我们仍然从源码的角度,详细地分析一下这两个过程。
1 开始安装
setupComponent() 的定义:
// packages/runtime-core/src/component.ts
function setupComponent(
  instance: ComponentInternalInstance,
  isSSR = false
) {
  isInSSRComponentSetup = isSSR

  const { props, children, shapeFlag } = instance.vnode
  const isStateful = shapeFlag & ShapeFlags.STATEFUL_COMPONENT  // {A}
  initProps(instance, props, isStateful, isSSR) // {B}
  initSlots(instance, children) // {C}

  const setupResult = isStateful
    ? setupStatefulComponent(instance, isSSR)
    : undefined // {D}
  isInSSRComponentSetup = false
  return setupResult
}
抛开 SSR 的逻辑,B 行和 C 行会先初始化组件的 props 和 slots。然后,在 A 行判断 shapeFlag 为 true 时,调用 setupStatefulComponent()。
这里又用到了shapeFlag,所以需要强调的是shapeFlag和patchFlag具有一样的地位(重要性)。
而 setupStatefulComponent() 则会处理组合 Composition API,即调用 setup()。
1.1 setupStatefulComponent
setupStatefulComponent() 定义(伪代码):
// packages/runtime-core/src/component.ts
setupStatefulComponent(
  instance: ComponentInternalInstance,
  isSSR: boolean
) {
  const Component = instance.type as ComponentOptions
  // {A} 验证逻辑
  ...
  instance.proxy = new Proxy(instance.ctx, PublicInstanceProxyHandlers)
  ...
  const { setup } = Component
  if (setup) {
    const setupContext = (instance.setupContext =
      setup.length > 1 ? createSetupContext(instance) : null)

    currentInstance = instance // {B}
    pauseTracking() // {C}
    const setupResult = callWithErrorHandling(
      setup,
      instance,
      ErrorCodes.SETUP_FUNCTION,
      [__DEV__ ? shallowReadonly(instance.props) : instance.props, setupContext]
    ) // {D}
    resetTracking() // {E}
    currentInstance = null

    if (isPromise(setupResult)) {
      ...
    } else {
      handleSetupResult(instance, setupResult, isSSR) // {F}
    }
  } else {
    finishComponentSetup(instance, isSSR)
  }
}
首先,在 B 行会给当前实例 currentInstance 赋值为此时的组件实例 instance,在回收 currentInstance 之前,我们会做两个操作暂停依赖收集、恢复依赖收集:
暂停依赖收集 pauseTracking():
// packages/reactivity/src/effect.ts
function pauseTracking() {
  trackStack.push(shouldTrack)
  shouldTrack = false
}
恢复依赖收集 resetTracking():
// packages/reactivity/src/effect.ts
resetTracking() {
  const last = trackStack.pop()
  shouldTrack = last === undefined ? true : last
}
本质上这两个步骤是通过改变 shouldTrack 的值为 true 或 false 来控制此时是否进行依赖收集。之所以,shouldTrack 可以控制是否进行依赖收集,是因为在 track 的执行开始有这么一段代码:
// packages/reactivity/src/effect.ts
function track(target: object, type: TrackOpTypes, key: unknown) {
  if (!shouldTrack || activeEffect === undefined) {
    return
  }
  ...
}那么,我们就会提出疑问为什么这个时候需要暂停依赖收?这里,我们回到 D 行:
const setupResult = callWithErrorHandling(
      setup,
      instance,
      ErrorCodes.SETUP_FUNCTION,
      [__DEV__ ? shallowReadonly(instance.props) : instance.props, setupContext]
    ) // {D}
在 DEV 环境下,我们需要通过 shallowReadonly(instance.props) 创建一个基于组件 props 的拷贝对象 Proxy,而 props 本质上是响应式地,这个时候会触发它的 track 逻辑,即依赖收集,明显这并不是开发中实际需要的订阅对象,所以,此时要暂停 props 的依赖收集,过滤不必要的订阅。
相比较,「Vue2.x」泛滥的订阅关系而言,这里不得不给「Vue3」对订阅关系处理的严谨思维点赞!
通常,我们 setup() 返回的是一个 Object,所以会命中 F 行的逻辑:
handleSetupResult(instance, setupResult, isSSR)1.2 handleSetupResult
handleSetupResult() 定义:
// packages/runtime-core/src/component.ts
function handleSetupResult(
  instance: ComponentInternalInstance,
  setupResult: unknown,
  isSSR: boolean
) {
  if (isFunction(setupResult)) {
    instance.render = setupResult as InternalRenderFunction
  } else if (isObject(setupResult)) {
    if (__DEV__ && isVNode(setupResult)) {
      warn(
        `setup() should not return VNodes directly - ` +
          `return a render function instead.`
      )
    }
    instance.setupState = proxyRefs(setupResult)
    if (__DEV__) {
      exposeSetupStateOnRenderContext(instance)
    }
  } else if (__DEV__ && setupResult !== undefined) {
    warn(
      `setup() should return an object. Received: ${
        setupResult === null ? 'null' : typeof setupResult
      }`
    )
  }
  finishComponentSetup(instance, isSSR)
}
handleSetupResult() 的分支逻辑较为简单,主要是验证 setup() 返回的结果,以下两种情况都是不合法的:
setup()返回的值是render()的执行结果,即VNode。setup()返回的值是null、undefined或者其他非对象类型。
1.3 小结
到此,组件的开始安装过程就结束了。我们再来回顾一下这个过程会做的几件事,初始化 props、slot以及处理 setup() 返回的结果,期间还涉及到一个暂停依赖收集的微妙处理。
需要注意的是,此时组件并没有开始创建,因此我们称之为这个过程为安装。并且,这也是为什么官方文档会这么介绍 setup():
一个组件选项, 在创建组件之前执行,一旦 props 被解析,并作为组合 API 的入口点
2 结束安装
finishComponentSetup() 定义(伪代码):
// packages/runtime-core/src/component.ts
function finishComponentSetup(
  instance: ComponentInternalInstance,
  isSSR: boolean
) {
  const Component = instance.type as ComponentOptions
  ...
  if (!instance.render) { // {A}
    if (compile && Component.template && !Component.render) {
      ...
      Component.render = compile(Component.template, {
        isCustomElement: instance.appContext.config.isCustomElement || NO,
        delimiters: Component.delimiters
      })
      ...
    }

    instance.render = (Component.render || NOOP) as InternalRenderFunction // {B}
    if (instance.render._rc) {
      instance.withProxy = new Proxy(
        instance.ctx,
        RuntimeCompiledPublicInstanceProxyHandlers
      )
    }
  }

  if (__FEATURE_OPTIONS_API__) { // {C}
    currentInstance = instance
    applyOptions(instance, Component)
    currentInstance = null
  }
  ...
}
整体上 finishComponentSetup() 可以分为三个核心逻辑:
- 绑定
render函数到当前实例instance上(行 A),这会两种情况,一是手写render函数,二是模板template写法,它会调用compile编译模板生成render函数。 - 为模板
template生成的render函数(行 B),单独使用一个不同的has陷阱。因为,编译生成的render函数是会存在withBlock之类的优化,以及它会有一个全局的白名单来实现避免进入has陷阱。 - 应用
options(行 C),即对应的computed、watch、lifecycle等等。
2.1 applyOptions
applyOptions() 定义:
// packages/runtime-core/src/componentOptions.ts
function applyOptions(
  instance: ComponentInternalInstance,
  options: ComponentOptions,
  deferredData: DataFn[] = [],
  deferredWatch: ComponentWatchOptions[] = [],
  asMixin: boolean = false
) {
  ...
}
由于, applyOptions() 涉及的代码较多,我们先不看代码,看一下整体的流程: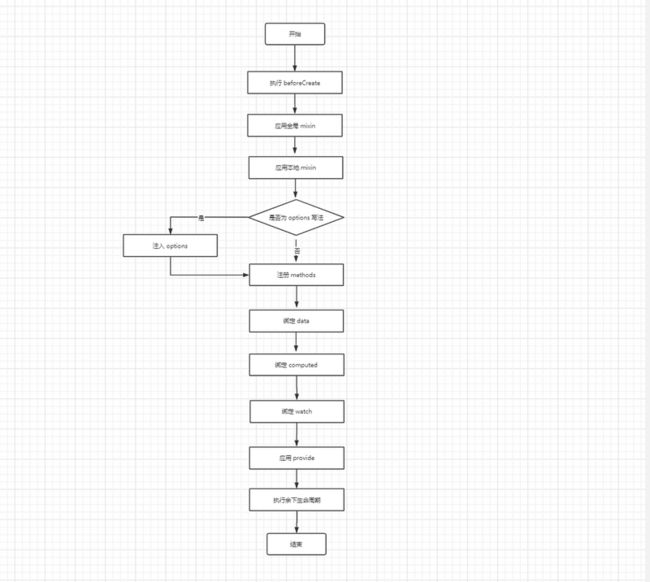
applyOptions() 的流程并不复杂,但是从流程中我们总结出两点平常开发中忌讳的点:
- 不要在
beforeCreate中访问mixin相关变量。 - 由于本地
mixin后于全局mixin执行,所以在一些变量命名重复的场景,我们需要确认要使用的是全局mixin的这个变量还是本地的mixin。
对于
mixin 重名时选择本地还是全局的处理,有兴趣的同学可以去官方文档了解。
我们再从代码层面看整个流程,这里分析几点常关注的属性是怎么初始化的:
2.1.1 注册事件(methods)
if (methods) {
  for (const key in methods) {
    const methodHandler = (methods as MethodOptions)[key]
    if (isFunction(methodHandler)) {
      ctx[key] = methodHandler.bind(publicThis) // {A}
      if (__DEV__) {
        checkDuplicateProperties!(OptionTypes.METHODS, key)
      }
    } else if (__DEV__) {
      warn(
        `Method "${key}" has type "${typeof methodHandler}" in the component definition. ` +
          `Did you reference the function correctly?`
      )
    }
  }
}
事件的注册,主要就是遍历已经处理好的 methods 属性,然后在当前上下文 ctx 中绑定对应事件名的属性 key 的事件 methodHandler(行 A)。并且,在开发环境下会对当前上下文属性的唯一性进行判断。
2.1.2 绑定计算属性(computed)
if (computedOptions) {
    for (const key in computedOptions) {
      const opt = (computedOptions as ComputedOptions)[key]
      const get = isFunction(opt)
        ? opt.bind(publicThis, publicThis)
        : isFunction(opt.get)
          ? opt.get.bind(publicThis, publicThis)
          : NOOP // {A}
      if (__DEV__ && get === NOOP) {
        warn(`Computed property "${key}" has no getter.`)
      }
      const set =
        !isFunction(opt) && isFunction(opt.set)
          ? opt.set.bind(publicThis)
          : __DEV__
            ? () => {
                warn(
                  `Write operation failed: computed property "${key}" is readonly.`
                )
              }
            : NOOP // {B}
      const c = computed({
        get,
        set
      }) // {C}
      Object.defineProperty(ctx, key, {
        enumerable: true,
        configurable: true,
        get: () => c.value,
        set: v => (c.value = v)
      }) {D}
      if (__DEV__) {
        checkDuplicateProperties!(OptionTypes.COMPUTED, key)
      }
    }
  }
绑定计算属性主要是遍历构建好的 computedOptions,然后提取每一个计算属性 key 对应的 get 和 set(行 A),也是我们熟悉的对于 get 是强校验,即计算属性必须要有 get,可以没有 set,如果没有 set(行 B),此时它的 set 为:
() => {
  warn(
    `Write operation failed: computed property "${key}" is readonly.`
  )
}
所以,这也是为什么我们修改一个没有定义
set 的计算属性时会提示这样的错误。
然后,在 C 行会调用 computed 注册该计算属性,即 effect 的注册。最后,将该计算属性通过 Object.defineProperty 代理到当前上下文 ctx 中(行 D),保证通过 this.computedAttrName 可以获取到该计算属性。
2.1.3 生命周期处理
生命周期的处理比较特殊的是 beforeCreate,它是优于 mixin、data、watch、computed 先处理:
if (!asMixin) {
  callSyncHook('beforeCreate', options, publicThis, globalMixins)
  applyMixins(instance, globalMixins, deferredData, deferredWatch)
}
至于其余的生命周期是在最后处理,即它们可以正常地访问实例上的属性(伪代码):
if (lifecycle) {
  onBeforeMount(lifecycle.bind(publicThis))
}
2.2 小结
结束安装过程,主要是初始化我们常见的组件上的选项,只不过我们可以不用 options 式的写法,但是实际上源码中仍然是转化成 options 处理,主要也是为了兼容 options 写法。并且,结束安装的过程比较重要的一点就是调用各个生命周期,而熟悉每个生命周期的执行时机,也可以便于我们平常的开发不犯错。
写在最后
这是「深度解读 Vue3 源码」系列的第四篇文章,理论上也是第七篇。每写完一篇,我都在思考如何表达才能使得文章的阅读性变得更好,而这篇文章表达方式也是在翻译了两篇 Dr. Axel Rauschmayer 大佬文章后,我思考的几点文章中需要做的改变。最后,文章中如果存在不当的地方,欢迎各位同学提 Issue。
为什么是第七篇,因为我将会把这个系列的文章汇总成一个 Git Page,所以,有一些文章并没有同步这里,目前正在整理中。
往期文章回顾
深度解读 Vue3 源码 | 内置组件 teleport 是什么“来头”?
深度解读 Vue 3 源码 | compile 和 runtime 结合的 patch 过程
深度解读 Vue 3 源码 | 从编译过程,理解静态节点提升
❤️爱心三连击
写作不易,如果你觉得有收获的话,可以爱心三连击!!!
