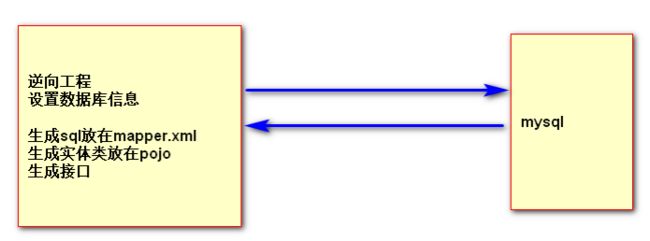
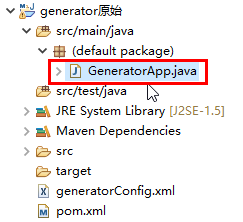
Mybatis概述
MyBatis是一个优秀的持久层框架,它对jdbc的操作数据库的过程进行封装,使 开发者只需要关注SQL本身,而不需要花费精力去处理例如注册驱动、创建 connection、创建statement、手动设置参数、结果集检索等jdbc繁杂的过程代码。
Mybatis通过xml或注解的方式将要执行的各种statement(statement、 preparedStatemnt)配置起来,并通过java对象和statement中的sql进行映射生成 终执行的sql语句,后由mybatis框架执行sql并将结果映射成java对象并返回。
总之,Mybatis对JDBC访问数据库的过程进行了封装,简化了JDBC代码,解决 JDBC将结果集封装为Java对象的麻烦.
下图是MyBatis架构图: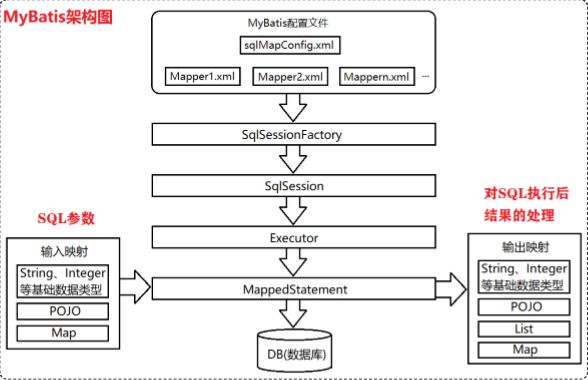
(1)mybatis-config.xml是Mybatis的核心配置文件,通过其中的配置可以生成 SqlSessionFactory,也就是SqlSession工厂
(2)基于SqlSessionFactory可以生成SqlSession对象
(3)SqlSession是一个既可以发送SQL去执行,并返回结果,类似于JDBC中的 Connection对象,也是Mybatis中至关重要的一个对象。
(4)Executor是SqlSession底层的对象,用于执行SQL语句
(5)MapperStatement对象也是SqlSession底层的对象,用于接收输入映射(SQL 语句中的参数),以及做输出映射(即将SQL查询的结果映射成相应的结果)
Mybatis实现
逆向工程
实现CRUD操作
第一步:复制逆向工程生成的Mapper接口和xml文件以及pojo实体类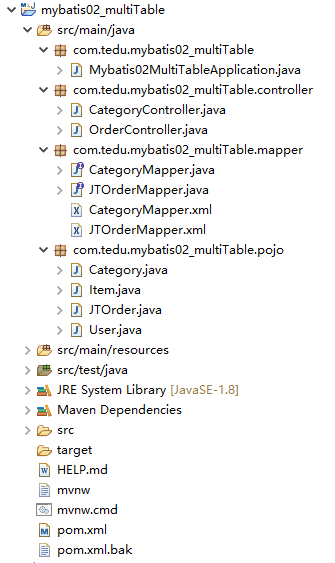
第二步:主程序上添加包扫描@MapperScan("...")
package com.tedu.mybatis02_multiTable;

import org.mybatis.spring.annotation.MapperScan;
import org.springframework.boot.SpringApplication;
import org.springframework.boot.autoconfigure.SpringBootApplication;

@SpringBootApplication
//框架为com.tedu.jtmall.mapper包下的接口自动创建代理对象
@MapperScan("com.tedu.mybatis02_multiTable.mapper")
public class Mybatis02MultiTableApplication {

    public static void main(String[] args) {
        SpringApplication.run(Mybatis02MultiTableApplication.class, args);
    }

}
第三步:配置yml文件
server:
  port: 8080

spring:
    datasource:
        driver-class-name: com.mysql.cj.jdbc.Driver
        url: jdbc:mysql://localhost:3306/mall?useUnicode=true&characterEncoding=UTF-8&serverTimezone=GMT%2b8
        username: root
        password: root

mybatis:
  mapperLocations: classpath:com.tedu.jtmall.mapper/*.xml

logging:
  path: ./logs
  level:
    com.tedu.jtmall.mapper: debug
第四步:创建控制层CategoryController类,完成查询操作
1.创建CategoryController类
package com.tedu.mybatis02_multiTable.controller;

import org.springframework.beans.factory.annotation.Autowired;
import org.springframework.web.bind.annotation.RequestMapping;
import org.springframework.web.bind.annotation.RestController;
import com.tedu.mybatis02_multiTable.mapper.CategoryMapper;
import com.tedu.mybatis02_multiTable.pojo.Category;

@RestController
public class CategoryController {
    @Autowired
    CategoryMapper categoryMapper;

    @RequestMapping("/cat")
    public Category cat() {
        return categoryMapper.selectCategory(1);
    }
}
2.编辑查看xml文件
MybatisPlus+Lombok
利用MP可,可有spring自动生成xml文件,切接口中底层已自定义基本的CRUD方法,可省略。
Lombok可在pojo类上添加注解,自动生成get、set、构造函数等方法。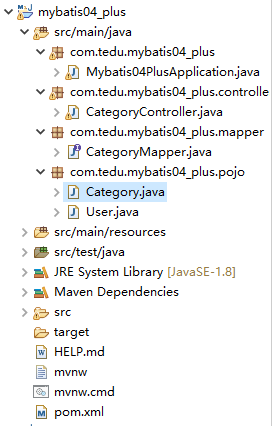
第一步:添加Lombok、MP核心库、springboot整合mp的依赖
    4.0.0

        org.springframework.boot
        spring-boot-starter-parent
        2.3.4.RELEASE


    com.tedu
    mybatis04_plus
    0.0.1-SNAPSHOT
    mybatis04_plus
    Demo project for Spring Boot


        1.8


            org.projectlombok
            lombok
            true


            com.baomidou
            mybatisplus-spring-boot-starter
            1.0.5


            com.baomidou
            mybatis-plus
            2.3


            org.springframework.boot
            spring-boot-starter-web


            org.mybatis.spring.boot
            mybatis-spring-boot-starter
            2.1.3


            mysql
            mysql-connector-java
            runtime


            org.springframework.boot
            spring-boot-starter-test
            test


                    org.junit.vintage
                    junit-vintage-engine


                org.springframework.boot
                spring-boot-maven-plugin
第二步:pojo类上添加@Data注解,自动生成get、set方法
package com.tedu.mybatis04_plus.pojo;

import lombok.Data;

@Data//lombok会为User生成set,get
//从网上下载代码,如果发现实体类没有set(),get(),加了@data,
//说明项目用了lombok
public class User {
    Integer userId;
}
第三步:pojo类上添加注解实现MP
package com.tedu.mybatis04_plus.pojo;

import com.baomidou.mybatisplus.annotations.TableField;
import com.baomidou.mybatisplus.annotations.TableName;
import lombok.Data;

//对应catepory表
//实现映射,以前是在CategoryMapper.xml中实现
@Data
@TableName("category")
public class Category {
    //映射到category_id列
    //以前是在xml中写rsult column=category_id property=categoryId
    @TableField("category_id")
    Integer categoryId;

    @TableField("category_name")
    String categoryName;
}
第四步:创建接口CategoryMapper继承BaseMapper
package com.tedu.mybatis04_plus.mapper;

import com.baomidou.mybatisplus.mapper.BaseMapper;
import com.tedu.mybatis04_plus.pojo.Category;

//以前为们要写insert(),delete(),update(),select()
//BaseMapper中有insert(),delete(),update(),select()
public interface CategoryMapper extends BaseMapper{

}
第五步:创建CategoryController类
package com.tedu.mybatis04_plus.controller;

import java.util.List;


import org.springframework.beans.factory.annotation.Autowired;
import org.springframework.web.bind.annotation.RequestMapping;
import org.springframework.web.bind.annotation.RestController;

import com.baomidou.mybatisplus.mapper.EntityWrapper;
import com.tedu.mybatis04_plus.mapper.CategoryMapper;
import com.tedu.mybatis04_plus.pojo.Category;

@RestController
public class CategoryController {
    @Autowired
    CategoryMapper categoryMapper;

    @RequestMapping("/select")
    public List select(){
        //设置排序
        EntityWrapper wrapper=new EntityWrapper();
        wrapper.orderBy("category_id desc");
        //调用baseMapper中的selectList()
        return categoryMapper.selectList(wrapper);
    }
}
第六步:创建启动类Mybatis04PlusApplication
package com.tedu.mybatis04_plus;

import java.lang.reflect.Method;
import org.mybatis.spring.annotation.MapperScan;
import org.springframework.boot.SpringApplication;
import org.springframework.boot.autoconfigure.SpringBootApplication;
import com.tedu.mybatis04_plus.pojo.User;

@MapperScan("com.tedu.mybatis04_plus.mapper")
@SpringBootApplication
public class Mybatis04PlusApplication {

    public static void main(String[] args) {
        SpringApplication.run(Mybatis04PlusApplication.class, args);

    //测试User类有没有set(),get()
        User user=new User();
        user.setUserId(6688);
        System.out.println(user.getUserId());
        Class clazz=User.class;
        Method[] methods=clazz.getDeclaredMethods();
        for (Method method : methods) {
            System.out.println(method.getName());

        }

    }

}
动态sql
foreach 标签:可以对传过来的参数数组或集合进行遍历,以下是foreach标签 上的各个属性介绍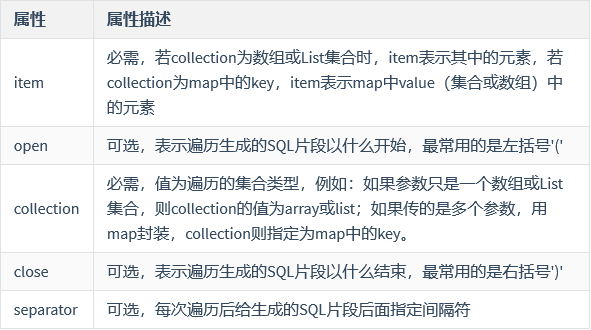
第一步:创建springboot项目mybatis03_dynamicSql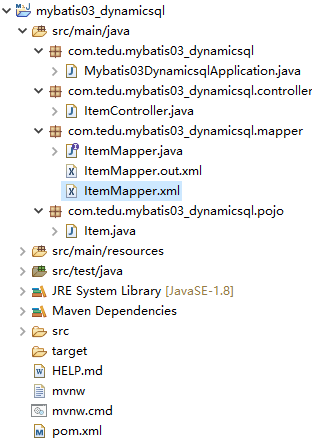
第二步:创建Item实体类
package com.tedu.mybatis03_dynamicsql.pojo;
//对应item表
@Data
public class Item {
    Integer itemId;
    String itemName;
第三步:创建Mapper接口
package com.tedu.mybatis03_dynamicsql.mapper;
//操作Item表的
import java.util.List;
import com.tedu.mybatis03_dynamicsql.pojo.Item;
public interface ItemMapper {
//如果返回的是多个数据,加个list
public List- select(Item item);
//查询多个商品
public List
- list(List
idList);
} 第四步:启动类上添加包扫描@MapperScan("...")
@SpringBootApplication
@MapperScan("com.tedu.dynamicSql.mapper")
public class DynamicSqlApplication {

    public static void main(String[] args) {
        SpringApplication.run(DynamicSqlApplication.class, args);
    }
}
第五步:创建控制层ItemController
package com.tedu.mybatis03_dynamicsql.controller;
import java.util.ArrayList;
import java.util.List;
import org.springframework.beans.factory.annotation.Autowired;
import org.springframework.web.bind.annotation.RequestMapping;
import org.springframework.web.bind.annotation.RestController;
import com.tedu.mybatis03_dynamicsql.mapper.ItemMapper;
import com.tedu.mybatis03_dynamicsql.pojo.Item;
@RestController
public class ItemController {
//从spring ioc的容器中获取代理对象
@Autowired
ItemMapper itemMapper;
@RequestMapping("/item")
public List- select(Item item){
return itemMapper.select(item);
}
@RequestMapping("/list")
public List
- list(){
ArrayList
idList=new ArrayList();
idList.add(2);
idList.add(3);
return itemMapper.list(idList);
}
} 第六步:创建xml文件
占位符#{}和${}的区别
1.#{}相当于JDBC中的问号(?)占位符,是为SQL语句中的参数值进行占位,大部分情况下都是使用#{}占位符;并且当#{}占位符是为字符串或者日期类型的值进行占位时,在参数值传过来替换占位符的同时,会进行转义处理(在字符串或日期类型的值的两边加上单引号);
2.${}是为SQL片段(字符串)进行占位,将传过来的SQL片段直接拼接在占位符所在的位置,不会进行任何的转义处理.(由于是直接将参数拼接在SQL语句中,因此可能会引发SQL注入攻击问题)
在mapper文件中: select * from emp where name=#{name}
在程序执行时: select * from emp where name=?
参数:王海涛,将参数传入,替换占位符
select * from emp where name=王海涛; -- 错误
select * from emp where name=‘王海涛’; -- 正确
需要注意的是:使用 ${} 占位符为SQL语句中的片段占位时,即使只有一个占位符,需要传的也只有一个参数,也需要将参数先封装再传递!
