iOS开发-微博客户端-基本界面搭建(01)
1>创建程序载入界面
- (BOOL)application:(UIApplication *)application didFinishLaunchingWithOptions:(NSDictionary *)launchOptions
{
//1>创建窗口
self.window = [[UIWindow alloc] initWithFrame:[UIScreen mainScreen].bounds];
//2>设置窗口的根控制器
UITabBarController *tabBarController = [[UITabBarController alloc] init];
self.window.rootViewController = tabBarController;
//3>显示窗口
[self.window makeKeyAndVisible];
return YES;
}
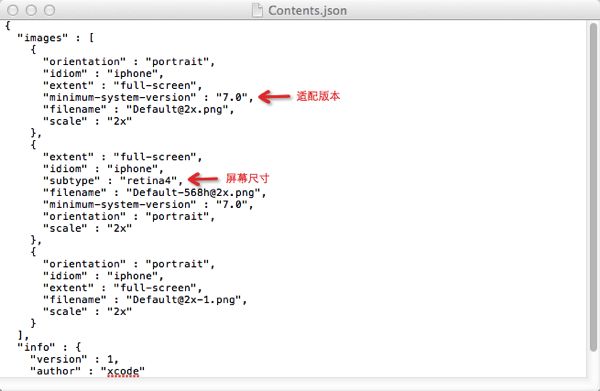
2>LaunchImage配置
LaunchImage.launchimage文件下的Contents.json文件中记录了LaunchImage的详细配置:

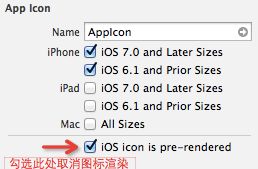
3>取消APP图标渲染

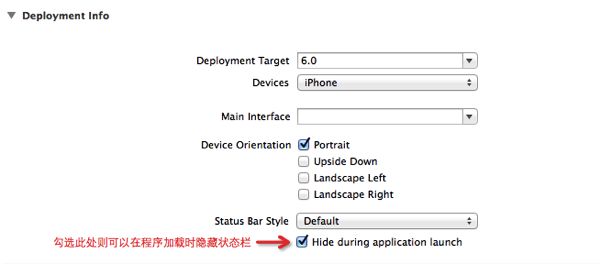
4>程序加载时隐藏状态栏

在程序加载完成后如需恢复状态栏显示,可以在didFinishLaunchingWithOptions方法中调用[application setStatusBarHidden:NO]方法;
5>添加TabBar控制器及其子控制器
自定义一个TabBarViewController类继承UITabBarController类用来创建自定义的TabBarView,并在该类中的viewDidLoad方法中创建子控制器
- (void)viewDidLoad
{
[super viewDidLoad];
//添加子控制器
UIViewController *home = [[UIViewController alloc] init];
home.view.backgroundColor = [UIColor redColor];
home.tabBarItem.title = @"首页";
home.tabBarItem.image = [UIImage imageNamed:@"tabbar_home"];
[home.tabBarItemsetSelectedImage:[UIImage imageNamed:@"tabbar_home_selected"]];
[self addChildViewController:home];
UIViewController *message = [[UIViewControlleralloc] init];
message.view.backgroundColor = [UIColor orangeColor];
message.tabBarItem.title = @"消息";
message.tabBarItem.image = [UIImage imageNamed:@"tabbar_message_center"];
[message.tabBarItem setSelectedImage:[UIImage imageNamed:@"tabbar_message_center_selected"]];
[self addChildViewController:message];
UIViewController *discover = [[UIViewControlleralloc] init];
discover.view.backgroundColor = [UIColor greenColor];
discover.tabBarItem.title = @"发现";
discover.tabBarItem.image = [UIImage imageNamed:@"tabbar_discover"];
[discover.tabBarItem setSelectedImage:[UIImage imageNamed:@"tabbar_discover_selected"]];
[self addChildViewController:discover];
UIViewController *profile = [[UIViewController alloc] init];
profile.view.backgroundColor = [UIColor blueColor];
profile.tabBarItem.title = @"我";
profile.tabBarItem.image = [UIImage imageNamed:@"tabbar_profile"];
[profile.tabBarItem setSelectedImage:[UIImage imageNamed:@"tabbar_profile_selected"]];
[self addChildViewController:profile];
}
6>渲染图片
在iOS7中,会对selectedImage的图片再次渲染为蓝色,要想显示原图,就必须要取消渲染;
取消渲染调用的方法:
selectedImage = [selectedImage imageWithRenderingMode:UIImageRenderingModeAlwaysOriginal];
7>优化添加子控制器代码
将添加子控制器到TabBarViewController的代码进行优化,建立如下方法:
- (void)addOneChildViewController:(UIViewController *)viewController withTitle:(NSString *)title imageName:(NSString *)imageName selectedImageName:(NSString *)selectedImageName
{
viewController.view.backgroundColor = ZFRandomColor;
viewController.tabBarItem.title = title;
viewController.tabBarItem.image = [UIImage imageNamed:imageName];
UIImage *image = [UIImage imageNamed:selectedImageName];
if (iOS7) {
image = [image imageWithRenderingMode:UIImageRenderingModeAlwaysOriginal];
}
[viewController.tabBarItem setSelectedImage:image];
[self addChildViewController:viewController];
}
其中ZFRandomColor和iOS7为自定义宏,其宏定义在Prefix.pch文件下:
#ifdef __OBJC__
#import <UIKit/UIKit.h>
#import <Foundation/Foundation.h>
#import <CoreData/CoreData.h>
#define ZFRandomColor [UIColor colorWithRed:arc4random_uniform(256)/255.0 green:arc4random_uniform(256)/255.0 blue:arc4random_uniform(256)/255.0 alpha:1.0]
#define iOS7 [[UIDevice currentDevice].systemVersion doubleValue] >= 7.0
#endif
由于imageWithRenderingMode方法只在iOS7环境下有效,因此此处代码需要添加条件判断语句进行系统适配,通过获取当前运行环境的系统版本来判断是否编译此方法;
8>图片适配
为UIImage添加一个分类,用于image的系统适配:
@implementation UIImage (Extension)
+ (UIImage *)imageWithName:(NSString *)imageName
{
UIImage *image = nil;
if (iOS7) {
NSString *name = [imageName stringByAppendingString:@"_os7"];
image = [UIImage imageNamed:name];
}
if (!image) {
image = [UIImage imageNamed:imageName];
}
return image;
}
@end