Wix 安装部署教程(三)自定义安装界面和行为
接上一篇自定义安装界面,这篇继续探索,首先介绍下,Wix为我们定义了五种风格,每种风格的UI都是有一定顺序的。我们可以改变安装顺序,也可以完全自定义一个Dialog插入其中。比如Wix_Mondo 风格的顺序就如下,但不一定每个dialog会在安装的时候展示。
 View Code
五、改变UI界面的安装顺序
要做到这一步,需要借助Wix的源码了,源码下载:http://wix.codeplex.com/SourceControl/latest 。这里我选的界面风格是 WixUI_Mondo,源码不用全部打开,直接搜WixUI_Mondo.wxs,找到后直接丢到VS中就可以了。我们试着把展示许可证书的这一步跳过,这需要三步:
1)将源码中Fragment中的内容全部copy到Product 元素中 一个ui和一个uiref元素
2)删除两个与LicenseAgreementDlg 相关的Publish 元素,pubulish元素定义了页面了上一步,下一步这些操作。Event="NewDialog" 表示打开一个对话框,value就表示,需要打开的对话框Id。
3)然后同理改变WelcomeDlg和下一步和SetupTypeDlg的上一步 相互在value中指向彼此。
4) 这个时候出现了两个Id="WixUI_Mondo ,将之前UI中的<UIRef Id="WixUI_Mondo" /> 注释掉就可以了。
再次安装,就不再出现许可证书页面了。
全部的代码如下,我们也可以留意下源码中publish元素中的text 其实就是个条件表达式,1就是执行,还有or。 NOT Installed AND NOT PATCH表示没有安装也没有打补丁。 等等
 View Code
六、自定义Dialog
自定义界面,需要借助源码了,这一节,也可以参考 子林的博客 http://blog.csdn.net/duanzilin/article/details/5956727
在找到WixUI_Mondo.wxs 的源码文件夹中,随便找一个名字中有Dlg的wxs文件,丢到vs中就可以看见一个Dlg 是个什么样的结构。 比如LicenseAgreementDlg.wxs 的源码如下
 View Code
Control 是个主要的元素,相当于vs中的控件了。但这里是个统称,通过Type也决定这个是一个lable 还是个text(edit) type的类型有 Billboard, Bitmap, CheckBox, ComboBox, DirectoryCombo, DirectoryList, Edit, GroupBox, Hyperlink, Icon, Line, ListBox, ListView, MaskedEdit, PathEdit, ProgressBar, PushButton, RadioButtonGroup, ScrollableText, SelectionTree, Text, VolumeCostList, VolumeSelectCombo , 需要定义类型,位置,大小,文本。
自定义一个页面插入进去,需要两步。
1.先新建一个wxs文件,右键 添加 新建项 选择Installer File 。命名为SpecialDlg 修改为
<?xml version="1.0" encoding="UTF-8"?>

<Wix xmlns="http://schemas.microsoft.com/wix/2006/wi">

  <Fragment>

    <UI>

      <Dialog Id="SpecialDlg" Width="370" Height="270" Title="this is a special dialog made by rjstone ">

        <Control Id="BannerBitmap" Type="Bitmap" X="0" Y="0" Width="370" Height="44" TabSkip="no" Text="!(loc.LicenseAgreementDlgBannerBitmap)" />

        <Control Id="BannerLine" Type="Line" X="0" Y="44" Width="370" Height="0" />

        <Control Id="BottomLine" Type="Line" X="0" Y="234" Width="370" Height="0" />

        <Control Id="Description" Type="Text" X="25" Y="23" Width="340" Height="15" Transparent="yes" NoPrefix="yes" Text="!(loc.LicenseAgreementDlgDescription)" />

        <Control Id="Title" Type="Text" X="15" Y="6" Width="200" Height="15" Transparent="yes" NoPrefix="yes" Text="!(loc.LicenseAgreementDlgTitle)" />

        <Control Id="MyLabel" Width="40" Height="40" Type="Text" X="30" Y="63" Text="Soga" />

        <Control Id="Back" Type="PushButton" X="180" Y="243" Width="56" Height="17" Text="!(loc.WixUIBack)" />

        <Control Id="Next" Type="PushButton" X="236" Y="243" Width="56" Height="17" Default="yes" Text="!(loc.WixUINext)"/>

      </Dialog>

    </UI>

  </Fragment>

</Wix>
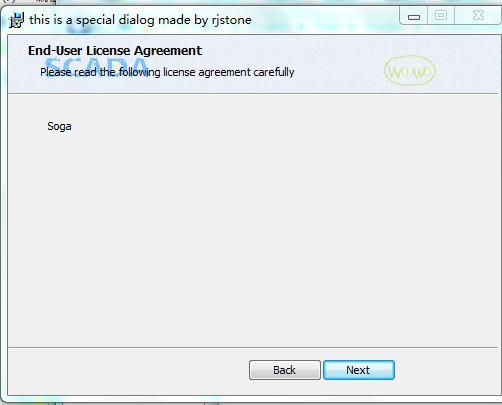
这就是个简单的对话框,因为不像html或者wpf 那么直观,这个看起来确实有点不“形象” ,生成就是如下的样子。 我们可以看line text title 各自对应的地方

千万不要少了 下面的两个按钮,不然安装到这就傻眼了。 这只是个简单的页面,但我们如何加入到安装目录中呢,需要第二步
2. 插入到安装顺序中,我们先把之前的UI顺序复原,把LicenseAgreementDlg 还原在WelcomeDlg后面,再在这两者之间插入上面的SpecialDlg 。修改Product中的publish元素
      <Publish Dialog="WelcomeDlg" Control="Next" Event="NewDialog" Value="SpecialDlg">NOT Installed AND NOT PATCH</Publish>

      <Publish Dialog="WelcomeDlg" Control="Next" Event="NewDialog" Value="VerifyReadyDlg">Installed AND PATCH</Publish>

      <Publish Dialog="SpecialDlg" Control="Back" Event="NewDialog" Value="WelcomeDlg">1</Publish>

      <Publish Dialog="SpecialDlg" Control="Next" Event="NewDialog" Value="LicenseAgreementDlg">1</Publish>

      <Publish Dialog="LicenseAgreementDlg" Control="Back" Event="NewDialog" Value="SpecialDlg">1</Publish>

      <Publish Dialog="LicenseAgreementDlg" Control="Next" Event="NewDialog" Value="SetupTypeDlg" Order="2">LicenseAccepted = "1"</Publish>
当然,需要复杂的界面,还需要加入自定义的行为,比如让用户输入再检测,并调用dll中的方法,这写wix都是可以做到的。
今天关于自定义界面的就到这里,明天继续。
