径向基函数RBF三维网格变形
前言
之前写过径向基函数(RBF)神经网络做分类或者拟合。然后挖了个坑说在《Phase-Functioned Neural Networks for Character Control》里面提到了用于做地形编辑,所以这篇博客就是解析一下如何用RBF做网格编辑系统。
参考博客:
Noe’s tutorial on deforming 3D geometry using RBFs
基于参考博客的人脸网格编辑code
有很多网格变形算法的python包PyGem
《Real-Time Shape Editing using Radial Basis Functions》
简介
为了更好理解什么是网格变形,直接看第二个参考博客的效果:
图中实现的效果就是蓝色的点是黄色人脸模型的几个关键点,绿色的点是另一个没被显示的人脸模型的对应人脸3D关键点,使用RBF变形算法,基于蓝色到绿色的变换关系,将人脸变形到绿色关键点上。至于这个功能的用途请自行探索,后续有时间的话,搞不好我也会基于这个技术做个好玩的东东出来。
理论
其实理论基本就是参考博客的内容,不过那个博客里面对径向基函数的描述不是特别清晰。特别注意的是从PyGem工具包提供的RBF形变函数来看,RBF网格编辑会有个半径参数,可以控制形变影响区域,其实就是在计算径向基的时候,加了个额外的系数。
RBF插值
径向基函数插值的作用是能够在一些2D/3D离散点之间进行平滑插值。假设在3维空间中有M个离散点 x i x_i xi,RBF就能提供整个离散空间中的平滑插值函数。函数就是M个径向基函数 g ( r i ) g(r_i) g(ri)的结果之和,其中 r i r_i ri是估算点和原始点的距离:
F ( x ) = ∑ i = 1 M a i g ( ∣ ∣ x – x i ∣ ∣ ) + c 0 + c 1 x + c 2 y + c 3 z , x = ( x , y , z ) ⋯ ( 1 ) F(\mathbf{x}) = \sum_{i=1}^M a_i g(||\mathbf{x} – \mathbf{x}_i||) + c_0 + c_1 x + c_2 y + c_3 z, \mathbf{x} = (x,y,z) \cdots \mathbf{(1)} F(x)=i=1∑Maig(∣∣x–xi∣∣)+c0+c1x+c2y+c3z,x=(x,y,z)⋯(1)
其中 a i a_i ai是常量系数,后面四项 c 0 c_0 c0到 c 3 c_3 c3是一次多项式系数,这些项的就是无法单独使用径向基函数完成的一个仿射变换。
根据已有的M个离散值,可以构建M个函数 F ( x i , y i , z i ) = F i F(x_i,y_i,z_i)=F_i F(xi,yi,zi)=Fi,然后基于此,构建M+4个线性方程组 G A = F GA=F GA=F,其中 F = ( F 1 , F 2 , … , F M , 0 , 0 , 0 , 0 ) F=(F_1,F_2,\ldots,F_M,0,0,0,0) F=(F1,F2,…,FM,0,0,0,0), A = ( a 1 , a 2 , … , a M , c 0 , c 1 , c 2 , c 3 ) A=(a_1,a_2,\ldots,a_M,c0,c1,c2,c3) A=(a1,a2,…,aM,c0,c1,c2,c3),以及G是一个 ( M + 4 ) × ( M + 4 ) (M+4)\times(M+4) (M+4)×(M+4)的矩阵
G = [ g 11 g 12 ∙ ∙ ∙ g 1 M 1 x 1 y 1 z 1 g 21 g 22 ∙ ∙ ∙ g 2 M 1 x 2 y 2 z 2 ∙ ∙ ∙ ∙ ∙ ∙ ∙ ∙ ∙ ∙ ∙ ∙ ∙ ∙ ∙ ∙ ∙ ∙ ∙ ∙ ∙ ∙ ∙ ∙ ∙ ∙ ∙ ∙ ∙ ∙ g M 1 g M 2 ∙ ∙ ∙ g M M 1 x M y M z M 1 1 ∙ ∙ ∙ 1 0 0 0 0 x 1 x 2 ∙ ∙ ∙ x M 0 0 0 0 y 1 y 2 ∙ ∙ ∙ y M 0 0 0 0 z 1 z 2 ∙ ∙ ∙ z M 0 0 0 0 ] \mathbf{G} = \left[\begin{array}{cccccccccc}g_{11} & g_{12} & \bullet & \bullet & \bullet & g_{1M} & 1 & x_1 & y_1 & z_1 \\ g_{21} & g_{22} & \bullet & \bullet & \bullet & g_{2M} & 1 & x_2 & y_2 & z_2 \\ \bullet & \bullet & \bullet & \bullet & \bullet & \bullet & \bullet & \bullet & \bullet & \bullet \\ \bullet & \bullet & \bullet & \bullet & \bullet & \bullet & \bullet & \bullet & \bullet & \bullet \\ \bullet & \bullet & \bullet & \bullet & \bullet & \bullet & \bullet & \bullet & \bullet & \bullet \\ g_{M1} & g_{M2} & \bullet & \bullet & \bullet & g_{MM} & 1 & x_M & y_M & z_M \\ 1 & 1 & \bullet & \bullet & \bullet & 1 & 0 & 0 & 0 & 0 \\ x_1 & x_2 & \bullet & \bullet & \bullet & x_M & 0 & 0 & 0 & 0 \\ y_1 & y_2 & \bullet & \bullet & \bullet & y_M & 0 & 0 & 0 & 0 \\ z_1 & z_2 & \bullet & \bullet & \bullet & z_M & 0 & 0 & 0 & 0\end{array}\right] G=⎣⎢⎢⎢⎢⎢⎢⎢⎢⎢⎢⎢⎢⎢⎢⎡g11g21∙∙∙gM11x1y1z1g12g22∙∙∙gM21x2y2z2∙∙∙∙∙∙∙∙∙∙∙∙∙∙∙∙∙∙∙∙∙∙∙∙∙∙∙∙∙∙g1Mg2M∙∙∙gMM1xMyMzM11∙∙∙10000x1x2∙∙∙xM0000y1y2∙∙∙yM0000z1z2∙∙∙zM0000⎦⎥⎥⎥⎥⎥⎥⎥⎥⎥⎥⎥⎥⎥⎥⎤
其中 g i j = g ( ∣ ∣ x i − x j ∣ ∣ ) g_{ij}=g(||x_i-x_j||) gij=g(∣∣xi−xj∣∣),g有很多不同的选择,同时也会导致不同的解。在参考博客中,使用了shift log function:
g ( t ) = log ( t 2 + k 2 ) , k 2 ≥ 1 g(t)=\sqrt{\log{(t^2+k^2)}},k^2\geq1 g(t)=log(t2+k2),k2≥1
可以直接设置 k = 1 k=1 k=1,然后根据式(1)方程组,得到系数向量A。
其实上面的 g g g就是传说中的径向基函数了,根据scipy的文档发现常用的径向基函数有:
'multiquadric': sqrt((r/self.epsilon)**2 + 1)
'inverse': 1.0/sqrt((r/self.epsilon)**2 + 1)
'gaussian': exp(-(r/self.epsilon)**2)
'linear': r
'cubic': r**3
'quintic': r**5
'thin_plate': r**2 * log(r)
这些函数在PyGem里面有独立的实现,只不过PyGem里面加入了半径系数r控制插值影响区域,比如对gaussian的实现:
def gaussian_spline(X, r=1):
        result = np.exp(-(X * X) / (r * r))
        return result
详细可自行查看PyGem源码
偏移插值(Interpolating displacements)
上一节的插值是给了一系列的离散点,求解这些位于这些离散点间的值。而偏移插值的意思又是什么捏?假设M个3D坐标点对应的形变信息都知道了,也就是有另一个3D偏移向量 u i u_i ui,将对应索引的 x i x_i xi进行了偏移,此时就可以将 x i x_i xi视为控制点,这些点被移动到了 x i + u i x_i+u_i xi+ui,RBF插值就是能够计算其余剩下的3D点对应的偏移量。
设 x i = ( x i , y i , z i ) \mathbf{x}_i = (x_i, y_i, z_i) xi=(xi,yi,zi)和 u i = ( u i x , u i y , u i z ) \mathbf{u}_i = (u^x_i, u^y_i, u^z_i) ui=(uix,uiy,uiz),那么同样可以列出线性方程组:
G A x = ( u 1 x , u 2 x , … , u M x , 0 , 0 , 0 , 0 ) T \mathbf{G} \mathbf{A}_x = (u^x_1, u^x_2, \ldots, u^x_M, 0, 0, 0, 0)^T GAx=(u1x,u2x,…,uMx,0,0,0,0)T
G A y = ( u 1 y , u 2 y , … , u M y , 0 , 0 , 0 , 0 ) T \mathbf{G} \mathbf{A}_y = (u^y_1, u^y_2, \ldots, u^y_M, 0, 0, 0, 0)^T GAy=(u1y,u2y,…,uMy,0,0,0,0)T
G A z = ( u 1 z , u 2 z , … , u M z , 0 , 0 , 0 , 0 ) T \mathbf{G} \mathbf{A}_z = (u^z_1, u^z_2, \ldots, u^z_M, 0, 0, 0, 0)^T GAz=(u1z,u2z,…,uMz,0,0,0,0)T
其中 G \mathbf{G} G和 A \mathbf{A} A与上一节描述的差不多,只不过求解目标从 F F F变成了偏移量 u u u。
求解完毕以后,需要对任意点x进行偏移量的计算,这一点文章没讲,但是从源码中分析发现就是 F F F的计算公式:
F ( x ) = ∑ i = 1 M a i g ( ∣ ∣ x – x i ∣ ∣ ) + c 0 + c 1 x + c 2 y + c 3 z , x = ( x , y , z ) ⋯ ( 1 ) F(\mathbf{x}) = \sum_{i=1}^M a_i g(||\mathbf{x} – \mathbf{x}_i||) + c_0 + c_1 x + c_2 y + c_3 z, \mathbf{x} = (x,y,z) \cdots \mathbf{(1)} F(x)=i=1∑Maig(∣∣x–xi∣∣)+c0+c1x+c2y+c3z,x=(x,y,z)⋯(1)
这也难怪,毕竟偏移插值也是RBF理论,所以在即使求解目标不同,但是形式相同的情况下,插值函数还是一样的。
核心代码解析
C++
求解阶段
第二个参考博客的代码就是第一个参考博客的c++实现,其中有两个核心与上述理论对应,代码基于RBF插值理论实现了开头的人脸变形;
所以细节一:计算控制点的偏移量
// move control points
for (unsigned int i = 0; i源码里面还有个系数(-cosf(morphtime)/2+0.5)不用管它,单纯为了显示变换过程设置的时间。
细节二计算形变系数,也就是公式1的代码如下:
RBFInterpolator(vector<real> x, vector<real> y, vector<real> z, vector<real> f)
{

	successfullyInitialized = false; // default value for if we end init prematurely.

	M = f.size();

	// all four input vectors must have the same length.
	if ( x.size() != M || y.size() != M || z.size() != M )
		return;

	ColumnVector F = ColumnVector(M + 4);
	P = Matrix(M, 3);

	Matrix G(M + 4,M + 4);

	// copy function values
	for (unsigned int i = 1; i <= M; i++)
		F(i) = f[i-1];

	F(M+1) = 0;  F(M+2) = 0;  F(M+3) = 0;  F(M+4) = 0;

	// fill xyz coordinates into P
	for (unsigned int i = 1; i <= M; i++)
	{

		P(i,1) = x[i-1];
		P(i,2) = y[i-1];
		P(i,3) = z[i-1];
	}

	// the matrix below is symmetric, so I could save some calculations Hmmm. must be a todo
	for (unsigned int i = 1; i <= M; i++)
	for (unsigned int j = 1; j <= M; j++)
	{

		real dx = x[i-1] - x[j-1];
		real dy = y[i-1] - y[j-1];
		real dz = z[i-1] - z[j-1];

		real distance_squared = dx*dx + dy*dy + dz*dz;

		G(i,j) = g(distance_squared);
	}

	//Set last 4 columns of G
	for (unsigned int i = 1; i <= M; i++)
	{

		G( i, M+1 ) = 1;
		G( i, M+2 ) = x[i-1];
		G( i, M+3 ) = y[i-1];
		G( i, M+4 ) = z[i-1];
	}

	for (unsigned int i = M+1; i <= M+4; i++)
	for (unsigned int j = M+1; j <= M+4; j++)
		G( i, j ) = 0;

	//Set last 4 rows of G
	for (unsigned int j = 1; j <= M; j++)
	{

		G( M+1, j ) = 1;
		G( M+2, j ) = x[j-1];
		G( M+3, j ) = y[j-1];
		G( M+4, j ) = z[j-1];
	}

	Try
	{

		Ginv = G.i();

		A = Ginv*F;
		successfullyInitialized = true;
	}
    CatchAll {
      cout << BaseException::what() << endl; }
}
这里调用的时候, x , y , z x,y,z x,y,z就是控制点的原始坐标, f f f就是偏移量,比如对三个坐标分别建立插值函数:
RBFX = RBFInterpolator(controlPointPosX, controlPointPosY, controlPointPosZ, controlPointDisplacementX );
RBFY = RBFInterpolator(controlPointPosX, controlPointPosY, controlPointPosZ, controlPointDisplacementY );
RBFZ = RBFInterpolator(controlPointPosX, controlPointPosY, controlPointPosZ, controlPointDisplacementZ );
整个过程就是先利用距离和径向基函数构建 ( M + 4 ) × ( M + 4 ) (M+4)\times(M+4) (M+4)×(M+4)维度的 G G G
for (unsigned int i = 1; i <= M; i++)
	for (unsigned int j = 1; j <= M; j++)
	{
		real dx = x[i-1] - x[j-1];
		real dy = y[i-1] - y[j-1];
		real dz = z[i-1] - z[j-1];

		real distance_squared = dx*dx + dy*dy + dz*dz;

		G(i,j) = g(distance_squared);
	}
然后构建 ( M + 4 ) (M+4) (M+4)维度的 F F F,再去求解 G A = F GA=F GA=F。
推断阶段
当任意的顶点过来以后,需要调用如下代码:
interpolate(real x, real y, real z)
{
	if (!successfullyInitialized)
		return 0.0f;
	real sum = 0.0f;
	// RBF part
	for (unsigned int i = 1; i <= M; i++)
	{
		real dx = x - P(i,1);
		real dy = y - P(i,2);
		real dz = z - P(i,3);
		real distance_squared = dx*dx + dy*dy + dz*dz;
		sum += A(i) * g(distance_squared);
	}
	//affine part
	sum += A(M+1) + A(M+2)*x + A(M+3)*y + A(M+4)*z;
	return sum;
}
大致意思就是,需要将被估算顶点与M个已知形变顶点求基于距离的径向基函数的加和,然后使用系数乘一下,就得到了新的坐标,调用方法如下
void deformObject(TriangleMesh* res, TriangleMesh* initialObject, RBFInterpolator rbfX, RBFInterpolator rbfY, RBFInterpolator rbfZ)
{

	for (unsigned int i = 0; i < res->getParticles().size(); i++)
	{

		Vector3 oldpos = initialObject->getParticles()[i].getPos();

		Vector3 newpos;
		newpos[0] = oldpos[0] + rbfX.interpolate(oldpos[0], oldpos[1], oldpos[2]);
		newpos[1] = oldpos[1] + rbfY.interpolate(oldpos[0], oldpos[1], oldpos[2]);
		newpos[2] = oldpos[2] + rbfZ.interpolate(oldpos[0], oldpos[1], oldpos[2]);

		res->getParticles()[i].setPos(newpos);
	}
}
python
求解阶段
在PyGem代码中有实现,由于python对矩阵的操作更加简洁,所以看起来很清晰
def _get_weights(self, X, Y):
    npts, dim = X.shape
    H = np.zeros((npts + 3 + 1, npts + 3 + 1))
    H[:npts, :npts] = self.basis(cdist(X, X), self.radius)#, **self.extra)
    H[npts, :npts] = 1.0
    H[:npts, npts] = 1.0
    H[:npts, -3:] = X
    H[-3:, :npts] = X.T

    rhs = np.zeros((npts + 3 + 1, dim))
    rhs[:npts, :] = Y
    weights = np.linalg.solve(H, rhs)
    return weights
其中X,Y就是对应控制点形变前后的坐标位置,可以发现这里并没有按照常理出牌,正常情况应该就是对形变前后的差值做求解,不过事实证明,并不影响最终结果。
其中self.basis对应的是几种径向基函数的一个:
__bases = {

    'gaussian_spline': RBFFactory.gaussian_spline,
    'multi_quadratic_biharmonic_spline': RBFFactory.multi_quadratic_biharmonic_spline,
    'inv_multi_quadratic_biharmonic_spline': RBFFactory.inv_multi_quadratic_biharmonic_spline,
    'thin_plate_spline': RBFFactory.thin_plate_spline,
    'beckert_wendland_c2_basis': RBFFactory.beckert_wendland_c2_basis,
    'polyharmonic_spline': RBFFactory.polyharmonic_spline
}
求解方式也是没有用 G − 1 F G^{-1}F G−1F,而是直接用np.linalg.solve求解了。
推断阶段
def __call__(self, src_pts):
    self.compute_weights()

    H = np.zeros((src_pts.shape[0], self.n_control_points + 3 + 1))
    H[:, :self.n_control_points] = self.basis(
        cdist(src_pts, self.original_control_points),
        self.radius)
    #**self.extra)
    H[:, self.n_control_points] = 1.0
    H[:, -3:] = src_pts
    return np.asarray(np.dot(H, self.weights))
与求解阶段一样,先计算待预测坐标点与控制点的距离,然后输入到径向基函数中,最后利用系数乘一下,就得到了待预测坐标点的形变后位置。
实验
简单网格形变
蓝色的标记为规规整整的原始网格,黑色圆点为选取的形变点,红色三角为目标形变点,最终整个网格的形变结果就是红色三角形了。
人头形变
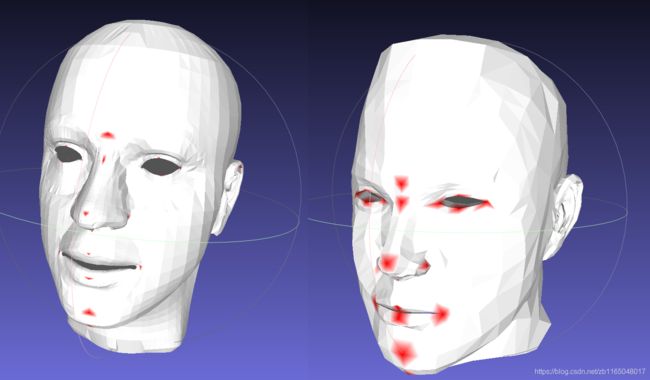
将c++两个人头拿过来,将控制点进行着色后,使用meshlab可视化看看
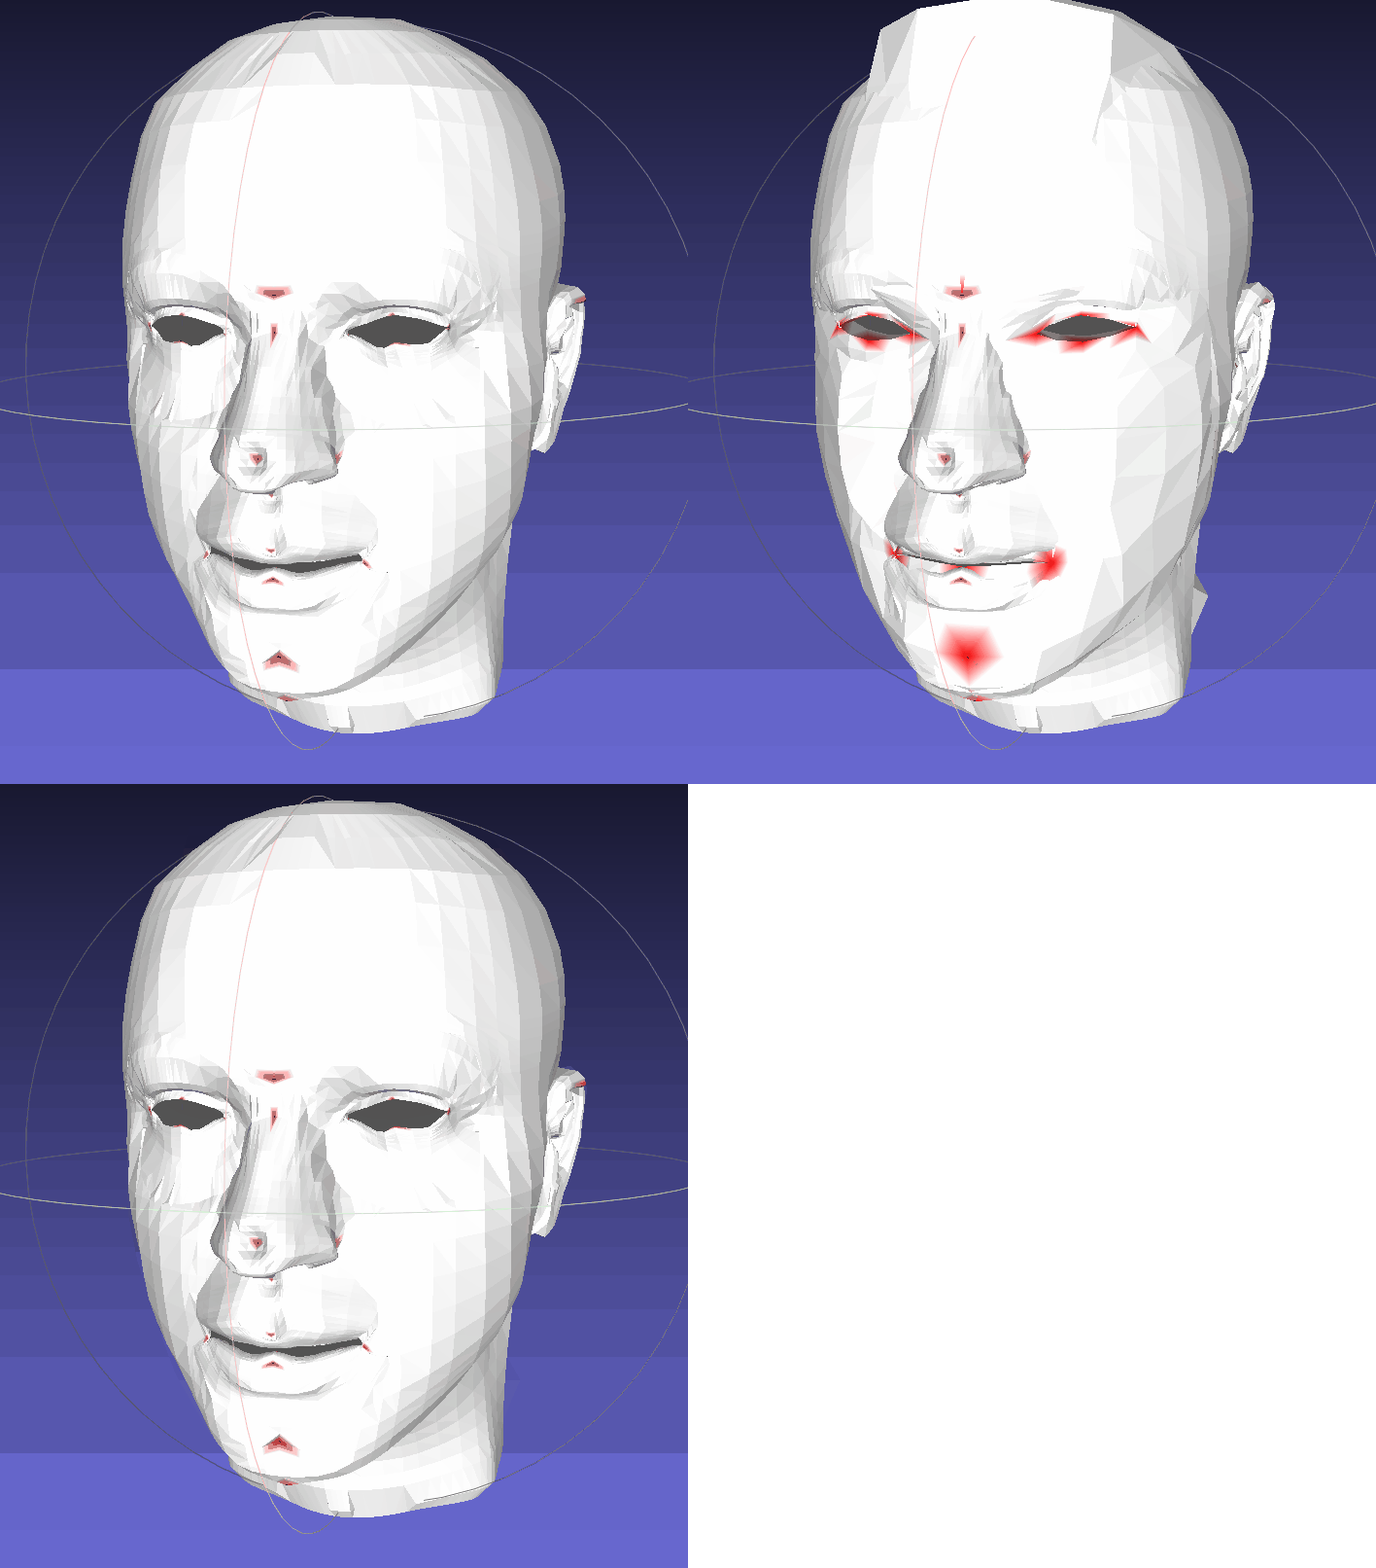
在python中将PyGem的代码抠出来,测试一下半径影响:
当形变半径影响为0.5时候
当形变半径影响为1.0时候,就是标准的RBF插值了
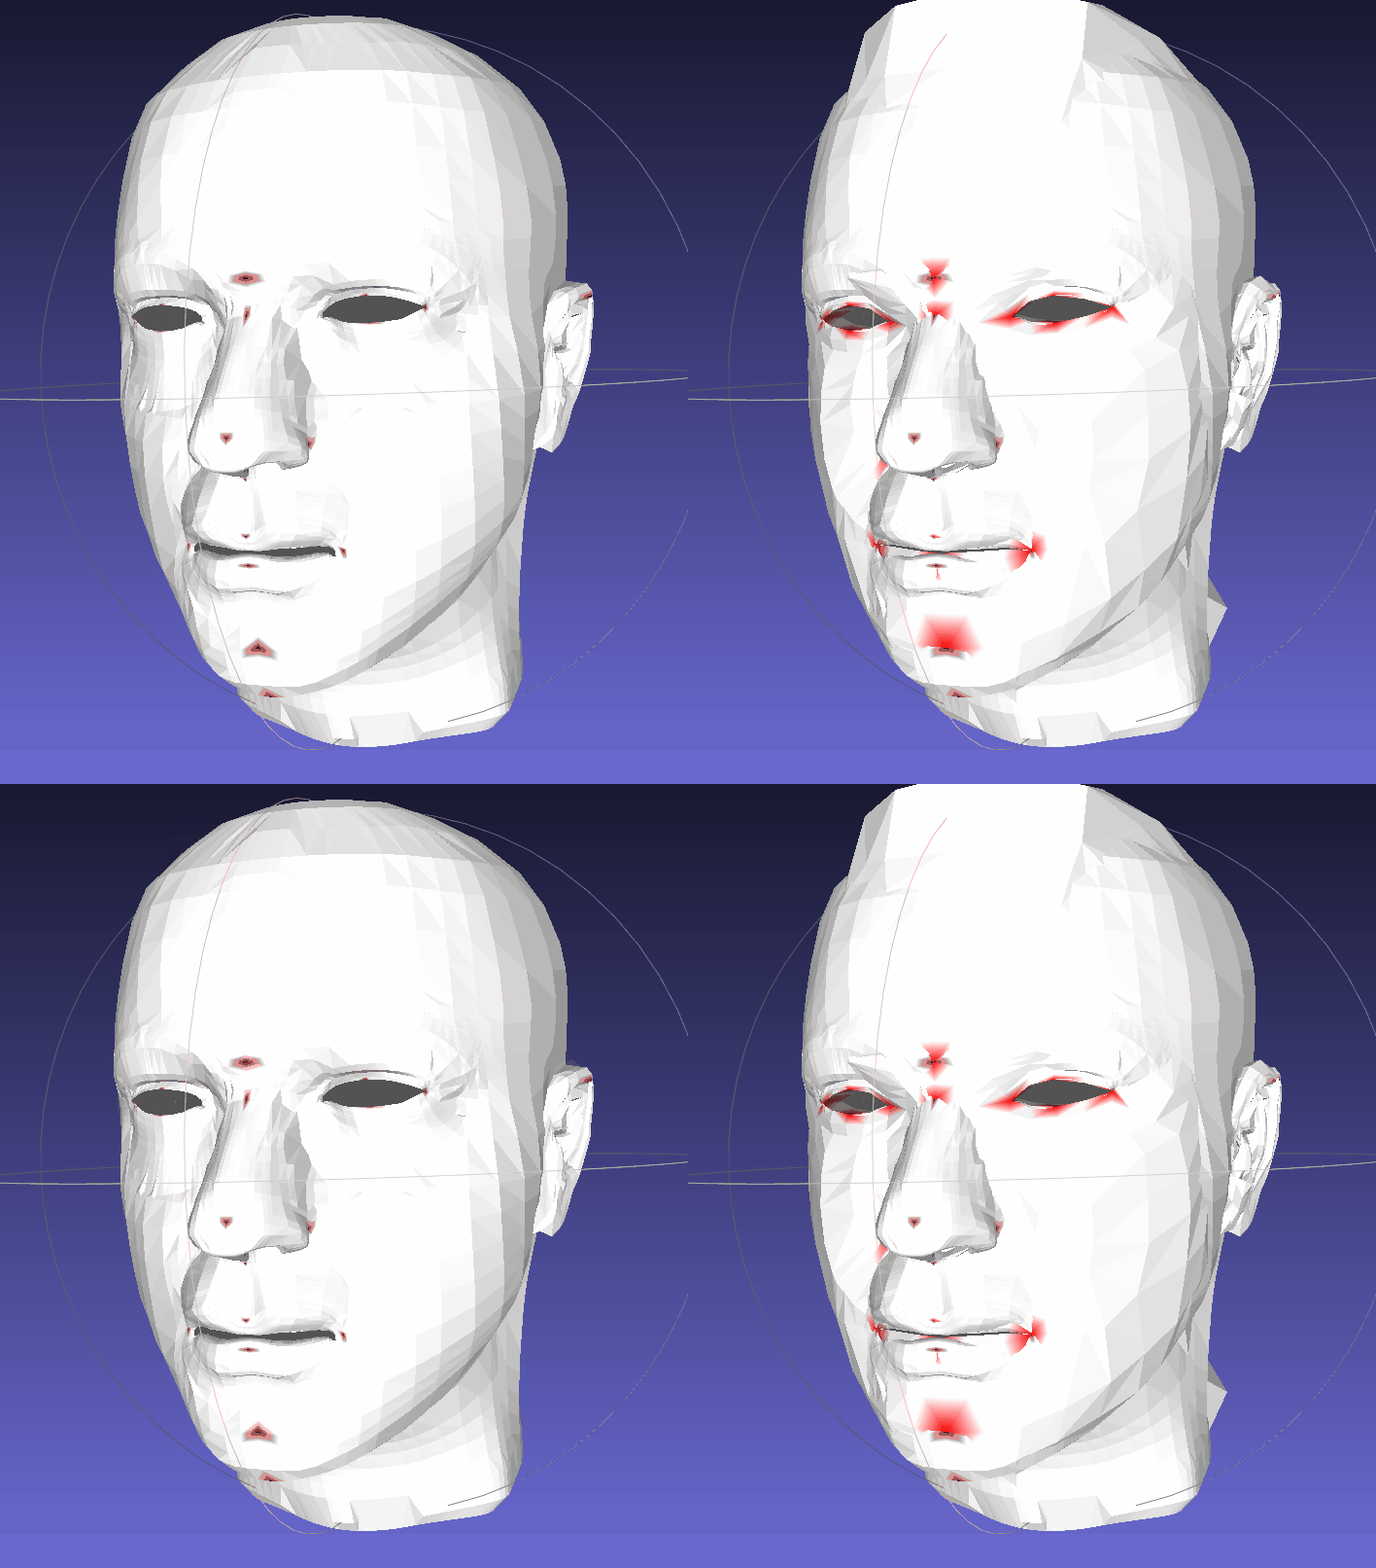
将0.5和1.0的放一起对比一下:

可以发现半径的设置的确对变形结果有一定影响。半径较小的时候,鼻子都被捏塌了,半径大点就好点,实际人脸变形的过程中,我们是不会使用这么简单的几个点的,肯定会加入更多的关键点。
后记
好像理论非常的简单,就是一个方程组的求解,只不过方程组的建立与径向基函数有关系。这玩意好像可以用来做捏脸什么的,以后有机会试试。
python版本的代码可以去PyGem上找到,或者本博客的代码在我的github上能找到,关注微信公众号查看公众号简介有,或者CSDN左侧栏有github网址。


