手写Spring-SpringMVC
1.知识点
手写SpringMVC之前,我们需要对他的五大组件和执行流程要有一定的了解
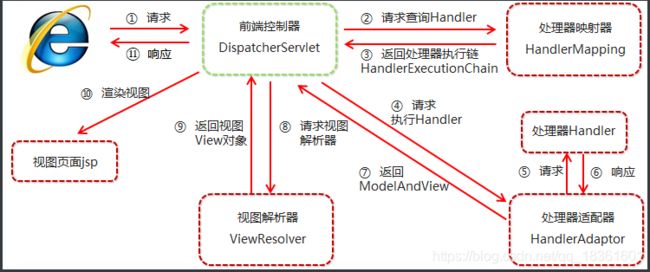
首先我们要知道springmvc的五大组件,如图,分别是
1.前端控制器DispatcherServlet,
2.处理器映射器HandlerMapping
3.处理器适配器HandlerAdaptor
4.处理器Handler
5.视图解析器ViewResolver
SpringMVC执行流程:
当用户请求会经过前端控制器,前端控制器会向处理器映射器查询处理请求的Handler,处理器映射器会返回处理器执行链(包括经过哪些过滤器等),前端控制器再向处理器适配器请求具体执行的Handler处理器,由处理器适配分配具体的处理器处理请求,请求完成会返回ModelAndView给前端控制器,再交由视图解析器,进行页面渲染再响应给用户
2.动手
该篇在上一篇手写IOC的基础上的实现
1.开始我们需要将一些属性封装为对象,所以我们准备好几个实体类
Request: 封装用户请求的请求路径和方法(如GET,POST…)
Param: 维护一个map 存储参数名和参数值
Handler: 定义Controller类的Class类型和方法为属性,即一个Controller类对应一个Handler实体
再定义两个返回数据实体Data和视图实体View
Data:定义返回模型
View:定义视图路径,和数据模型属性
/**
 * @description: 实体,请求类中的方法和请求路径和@RequestMapping注解里的方法和路径一致
 * @author: cgw
 * @date: 2020-12-23
 */
public class Request {

        /**
         * 请求方法
         */
        private String requestMethod;

        /**
         * 请求路径
         */
        private String requestPath;

        public Request(String requestMethod, String requestPath) {

            this.requestMethod = requestMethod;
            this.requestPath = requestPath;
        }

        public String getRequestMethod() {

            return requestMethod;
        }

        public String getRequestPath() {

            return requestPath;
        }

        @Override
        public int hashCode() {

            int result = 17;
            result = 31 * result + requestMethod.hashCode();
            result = 31 * result + requestPath.hashCode();
            return result;
        }

        @Override
        public boolean equals(Object obj) {

            if (this == obj) return true;
            if (!(obj instanceof Request)) return false;
            Request request = (Request) obj;
            return request.getRequestPath().equals(this.requestPath) && request.getRequestMethod().equals(this.requestMethod);
        }
    }
/**
 * @description: 用于封装Controller方法的参数
 * @author: cgw
 * @date: 2020-12-23
 */
public class Param {


    private Map<String, Object> paramMap;

    public Param() {

    }

    public Param(Map<String, Object> paramMap) {

        this.paramMap = paramMap;
    }

    public Map<String, Object> getParamMap() {

        return paramMap;
    }

    public boolean isEmpty(){

        return MapUtils.isEmpty(paramMap);
    }
}
/**
 * @description: 实体,封装了Controller的Class对象和Method方法
 * @author: cgw
 * @date: 2020-12-23
 */
public class Handler {

        /**
         * Controller 类
         */
        private Class<?> controllerClass;

        /**
         * Controller 方法
         */
        private Method controllerMethod;

        public Handler(Class<?> controllerClass, Method controllerMethod) {

            this.controllerClass = controllerClass;
            this.controllerMethod = controllerMethod;
        }

        public Class<?> getControllerClass() {

            return controllerClass;
        }

        public Method getControllerMethod() {

            return controllerMethod;
        }
    }
/**
 * @description: TODO
 * @author: cgw
 * @date: 2020-12-23
 */
public class View {


    /**
     * 视图路径
     */
    private String path;

    /**
     * 模型数据
     */
    private Map<String, Object> model;

    public View(String path) {

        this.path = path;
        model = new HashMap<String, Object>();
    }

    public View addModel(String key, Object value) {

        model.put(key, value);
        return this;
    }

    public String getPath() {

        return path;
    }

    public Map<String, Object> getModel() {

        return model;
    }
}
/**
 * @description: TODO
 * @author: cgw
 * @date: 2020-12-23
 */
public class Data {


    /**
     * 模型数据
     */
    private Object model;

    public Data(Object model) {

        this.model = model;
    }

    public Object getModel() {

        return model;
    }
}
2.做好准备工作后,再写我们的核心功能,首先我们提供几个Helper类
ControllerHelper:维护一个Map,key是自定义的Request对象,value是处理器(Handler对象)
RequestHelper:将用户请求中的参数封装为Param对象
HelperLoader:用于集中初始化所有Helper类
/**
 * @description: Controller助手类,
 *                  主要是维护一个map,key为Request对象,value是处理器,
 *                  该类主要是遍历所有的Controller类,获取请求路径,请求方法(get,post...)封装为Request对象,
 *                  controller的class类型和类的方法封装为Handler处理器对象
 * @author: cgw
 * @date: 2020-12-23
 */
public final class ControllerHelper {


    /**
     * REQUEST_MAP为 "请求-处理器" 的映射
     */
    private static final Map<Request, Handler> REQUEST_MAP = new HashMap<Request, Handler>();

    static {

        //遍历所有Controller类
        Set<Class<?>> controllerClassSet = ClassHelper.getControllerClassSet();
        if (CollectionUtils.isNotEmpty(controllerClassSet)) {

            for (Class<?> controllerClass : controllerClassSet) {

                //暴力反射获取所有方法
                Method[] methods = controllerClass.getDeclaredMethods();
                //遍历方法
                if (ArrayUtils.isNotEmpty(methods)) {

                    for (Method method : methods) {

                        //判断是否带RequestMapping注解
                        if (method.isAnnotationPresent(RequestMapping.class)) {

                            RequestMapping requestMapping = method.getAnnotation(RequestMapping.class);
                            //请求路径
                            String requestPath = requestMapping.value();
                            //请求方法
                            String requestMethod = requestMapping.method().name();

                            //封装请求和处理器
                            Request request = new Request(requestMethod, requestPath);
                            Handler handler = new Handler(controllerClass, method);//具体的控制器方法就是一个handler
                            REQUEST_MAP.put(request, handler);
                        }
                    }
                }
            }
        }
    }

    /**
     * 获取 Handler
     */
    public static Handler getHandler(String requestMethod, String requestPath) {

        Request request = new Request(requestMethod, requestPath);
        return REQUEST_MAP.get(request);
    }
}
/**
 * @description: 助手类,将请求参数封装到map中
 *                 前端控制器收到HTTP请求后, 从HTTP中获取请求参数,然后封装到Param(一个存储map的实体)中,key:参数名 value:参数值
 * @author: cgw
 * @date: 2020-12-23
 */
public final class RequestHelper {


    /**
     * 获取请求参数
     */
    public static Param createParam(HttpServletRequest request) throws IOException {

        Map<String, Object> paramMap = new HashMap<>();
        Enumeration<String> paramNames = request.getParameterNames();
        //没有参数
        if (!paramNames.hasMoreElements()) {

            return null;
        }

        //get和post参数都能获取到
        while (paramNames.hasMoreElements()) {

            String fieldName = paramNames.nextElement();
            String fieldValue = request.getParameter(fieldName);
            paramMap.put(fieldName, fieldValue);
        }

        return new Param(paramMap);
    }
}
/**
 * @description: 助手类,让加载类
 *          让类加载更集中,加载一些HELPLoader
 * @author: cgw
 * @date: 2020-12-24
 */
public final class HelperLoader {


    public static void init() {

        Class<?>[] classList = {

                ClassHelper.class,
                BeanHelper.class,
                IocHelper.class,
                ControllerHelper.class
        };
        for (Class<?> cls : classList) {

            ClassUtil.loadClass(cls.getName());
        }
    }
}
3.最后就是我们最最核心的前端控制器了,先上代码
/**
 * @description: 前端控制器类,首先执行init()方法来加载相关的helper类,每次请求的具体过程
 *              每次请求都会执行service()方法,首先将请求封装为Request对象,然后从映射处理器
 *               (REQUEST_MAP)中获取到处理器,然后从客户端请求中获取Param参数,执行处理器方法
 *               判断返回类型是view类型,则跳转,为data类型,则返回json
 * @author: cgw
 * @date: 2020-12-24
 */
@WebServlet(urlPatterns = "/*", loadOnStartup = 0)
public class DispatcherServlet extends HttpServlet {


    @Override
    public void init(ServletConfig servletConfig) throws ServletException {

        //初始化相关的helper类
        HelperLoader.init();

        //获取ServletContext对象, 用于注册Servlet
        ServletContext servletContext = servletConfig.getServletContext();

        //注册处理jsp和静态资源的servlet
        registerServlet(servletContext);
    }

    /**
     * DefaultServlet和JspServlet都是由Web容器创建
     * org.apache.catalina.servlets.DefaultServlet
     * org.apache.jasper.servlet.JspServlet
     */
    private void registerServlet(ServletContext servletContext) {

        //动态注册处理JSP的Servlet
        ServletRegistration jspServlet = servletContext.getServletRegistration("jsp");
        jspServlet.addMapping(ConfigHelper.getAppJspPath() + "*");

        //动态注册处理静态资源的默认Servlet
        ServletRegistration defaultServlet = servletContext.getServletRegistration("default");
        defaultServlet.addMapping("/favicon.ico"); //网站头像
        defaultServlet.addMapping(ConfigHelper.getAppAssetPath() + "*");
    }

    @Override
    public void service(HttpServletRequest request, HttpServletResponse response) throws ServletException, IOException {

        String requestMethod = request.getMethod().toUpperCase();
        String requestPath = request.getPathInfo();

        //这里根据Tomcat的配置路径有两种情况, 一种是 "/userList", 另一种是 "/context地址/userList".
        String[] splits = requestPath.split("/");
        if (splits.length > 2) {

            requestPath = "/" + splits[2];
        }

        //根据请求获取处理器(这里类似于SpringMVC中的映射处理器)
        Handler handler = ControllerHelper.getHandler(requestMethod, requestPath);
        if (handler != null) {

            Class<?> controllerClass = handler.getControllerClass();//获取Controller类的Class类型
            Object controllerBean = BeanHelper.getBean(controllerClass);//根据Class类型获取具体的实例对象

            //初始化参数
            Param param = RequestHelper.createParam(request);

            //调用与请求对应的方法(这里类似于SpringMVC中的处理器适配器)
            Object result;
            Method actionMethod = handler.getControllerMethod();
            //通过反射,使用具体的bean执行具体的方法(类似于处理器适配器交由具体的处理器处理)
            if (param == null || param.isEmpty()) {

                result = ReflectionUtil.invokeMethod(controllerBean, actionMethod);
            } else {

                result = ReflectionUtil.invokeMethod(controllerBean, actionMethod, param);
            }

            //跳转页面或返回json数据(这里类似于SpringMVC中的视图解析器)
            if (result instanceof View) {

                handleViewResult((View) result, request, response);
            } else if (result instanceof Data) {

                handleDataResult((Data) result, response);
            }
        }
    }

    /**
     * 跳转页面
     */
    private void handleViewResult(View view, HttpServletRequest request, HttpServletResponse response) throws IOException, ServletException {

        String path = view.getPath();
        if (StringUtils.isNotEmpty(path)) {

            if (path.startsWith("/")) {
      //重定向
                response.sendRedirect(request.getContextPath() + path);
            } else {
      //请求转发
                Map<String, Object> model = view.getModel();
                for (Map.Entry<String, Object> entry : model.entrySet()) {

                    request.setAttribute(entry.getKey(), entry.getValue());
                }
                request.getRequestDispatcher(ConfigHelper.getAppJspPath() + path).forward(request, response);
            }
        }
    }

    /**
     * 返回JSON数据
     */
    private void handleDataResult(Data data, HttpServletResponse response) throws IOException {

        Object model = data.getModel();
        if (model != null) {

            response.setContentType("application/json");
            response.setCharacterEncoding("UTF-8");
            PrintWriter writer = response.getWriter();
            String json = JSON.toJSON(model).toString();
            writer.write(json);
            writer.flush();
            writer.close();
        }
    }
}
前端控制器实际上是一个Servlet,这里配置拦截所有请求,根据Servlet的生命周期我们知道Servlet先执行init()方法,在init()方法中我们先统一初始化所有的Helper类,动态注册处理JSP的Servlet和动态注册处理静态资源的默认Servlet.当每次请求访问我们的前端控制器的时候,都会执行我们的Service()方法,在Service()方法中,首先获取请求方法和请求路径,然后找到具体处理的处理器,即要执行我们的Controller类中的方法,我们需要获取到处理器具体实例对象,再封装请求参数,最后使用反射执行具体方法.根据返回类型决定跳转视图还是返回数据.
总结:总而言之,根据执行流程我们能大致清楚springmvc在请求中做了哪些事情,在本案例中我们能比较清晰的明白springmvc实现的方式方法,感受到spring框架帮我们做了哪些事情,通过本文,使我在使用springmvc的时候,将更得心应手.
本文学习参考总结至手写springmvc