Findbugs安装使用文档
一、简介
Findbugs 是一个静态分析工具,它检查类或者 JAR 文件,将字节码与一组缺陷模式进行对比以发现可能的问题。利用这个工具,就可以在不实际运行程序的情况对软件进行分析。它可以帮助改进代码的质量。
Findbugs提供了方便操作的可视化界面,同时也可以作为Eclipse的一个插件来使用,而我们使用得最多的还是作为Eclipse的插件来使用。
二、使用方法
Findbugs可以通过三种方法使用,可以通过Ant工具,通过Ant提供的Swing操作界面和作为Eclipse的一个插件来使用。
1. Ant工具
Ant是一个很好的Java自动执行工具。
Findbugs官方提供了Ant的findbugs操作方法,我们可以通过这样一个build.xml文件来使用findbugs。
<project name="项目名" default="all">
<property name="findbugs.home" value="findbugs解压路径" />
<path id="findbugs.path">
<fileset dir="findbugs解压路径">
<include name="**/*.jar" />
</fileset>
</path>
<taskdef name="findbugs"
classname="edu.umd.cs.findbugs.anttask.FindBugsTask"
classpathref="findbugs.path" />
<!-- 定义findbugs的home,findbugs的task要使用 -->
<target name="findbugs">
<findbugs home="${findbugs.home}"
output="xml:withMessages" outputFile="生成的文件">
<!-- 以上定义findbugs查找的类路径 -->
<auxClasspath path="${findbugs.home}/lib/findbugs-ant.jar" />
<auxClasspath>
<fileset dir="lib"
includes="*.jar" />
</auxClasspath>
<sourcePath path="源文件路径" />
<class location="生成类路径" />
</findbugs>
</target>
</project>
比如:我这里有一个我放在博客上的项目的findbugs的ant操作的build文件。
<project name="Calendar" default="all">
<property name="findbugs.home" value="http://www.cnblogs.com/findbugs-1.3.8" />
<path id="findbugs.path">
<fileset dir="http://www.cnblogs.com/findbugs-1.3.8">
<include name="**/*.jar" />
</fileset>
</path>
<taskdef name="findbugs"
classname="edu.umd.cs.findbugs.anttask.FindBugsTask"
classpathref="findbugs.path" />
<!-- 定义findbugs的home,findbugs的task要使用 -->
<target name="findbugs">
<mkdir dir="target/findbugs"/>
<findbugs home="${findbugs.home}"
output="xml:withMessages" outputFile="target/findbugs/calendar-fb.xml">
<!-- 以上定义findbugs查找的类路径 -->
<auxClasspath path="${findbugs.home}/lib/findbugs-ant.jar" />
<auxClasspath>
<fileset dir="lib"
includes="*.jar" />
</auxClasspath>
<sourcePath path="src" />
<class location="target/classes" />
</findbugs>
</target>
</project>
设置好Ant的环境后,在命令中使用ant -f build.xml,或者在Eclipse直接运行build.xml文件,运行后生成了一个xml文件,如果你想用Html的格式查看findbugs的结果,可以把output属性设为:html。这样就可以通过Html来查看findbugs的结果了。
2. 提供的Swing工具
Ant操作是专家级的操作,一般对于Java不是很熟悉的人,写build.xml文件。比起Ant来,使用Findbugs提供的Swing工具会使Findbugs的操作更加简单。运行Findbugs解压包中的bin文件夹下的findbugs.bat文件。
Findbugs的Swing工具初始主界面如下:
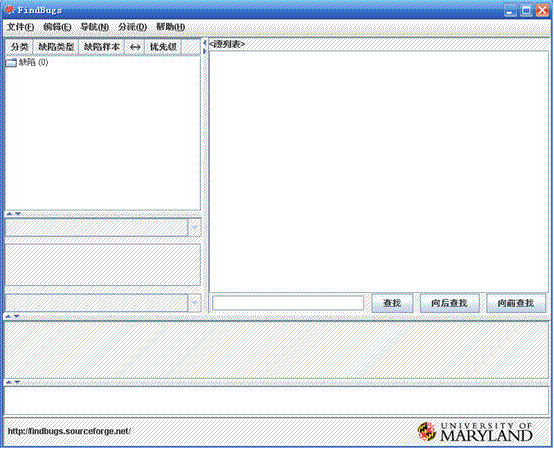
在分析项目之前,我们必须要新建一个项目来分析,选择文件->新建
显示新建项目的界面如下图:
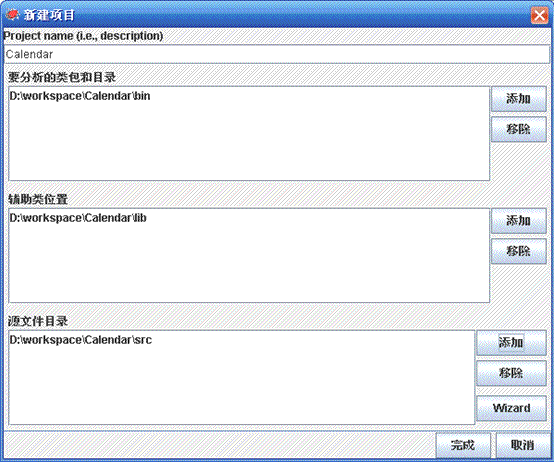
然后添加要分析的类包和目录(可以选择编译好的类所在的文件夹,也可以选择生成的jar包),再添加辅助类所在的文件夹和源文件所在的文件夹(java文件所在的文件夹)。再点击完成就可以建立一个要分析的项目。
建立项目后,会自动先自动开始解析项目。
解析后界面:
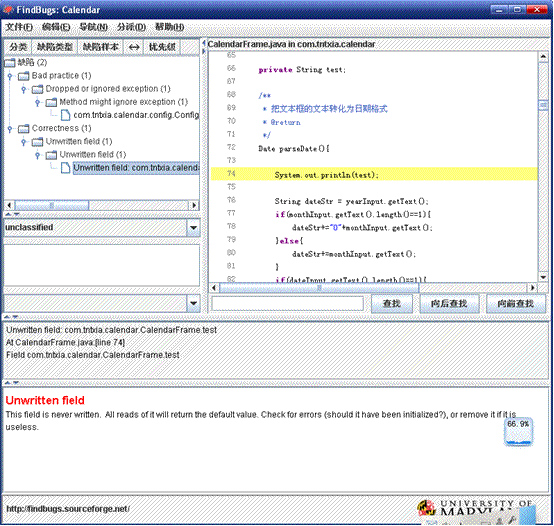
其中左边是缺陷的树结构列表,点击其中一个Bug,可以在右边的界面中,显示Bugs的源文件以及所在的位置。
2.3 Findbugs Eclipse插件
Eclipse的Findbugs插件,可以将Findbugs集成到Eclipse中使用。
2.3.1 Findbugs的Eclipse插件安装方法
1. 在线安装
安装地址:http://findbugs.cs.umd.edu/eclipse
2. 离线安装
下载Findbugs插件,将它放入Eclipse下的plusin文件夹,然后重启Eclipse
2.3.2 Findbugs的Eclipse插件使用
安装了Findbugs插件后。右击点击你要检查的项目选择【Find Bugs】->【Find Bugs】进行检查。
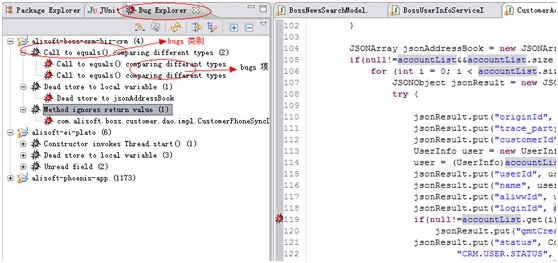
要查看Findbugs检查出了哪些Bug,可以选择Windows菜单->Show View->Bug Explorer,打开Bug Explorer面板。
如果想要查看某个Bug详细的信息,则可以选择Windows菜单->Open Perspective,然后选择FindBugs就可以打开FindBugs的Properties面板,在这个面板里面可以看到最详尽的Bugs信息。
FindBugs插件的安装与使用
FindBugs 网站 http://findbugs.sourceforge.net/bugDescriptions.html提供了完整的类型清单。
- In Eclipse, click on Help -> Software Update -> Find and Install...
- Choose the Search for new features to install option, and click Next.
- Click New Remote Site.
- Enter the following:
- Name: FindBugs update site
- URL: one of the following (note: no final slash on the url)
- http://findbugs.cs.umd.edu/eclipse for official releases
- http://findbugs.cs.umd.edu/eclipse-candidate for candidate releases and official releases
- http://findbugs.cs.umd.edu/eclipse-daily for all releases, including developmental ones
- "FindBugs update site" should appear under Sites to include in search.
Click the checkbox next to it to select it, and click Finish. - You should see FindBugs Feature under Select features to install.
(You may have to click on one or two triangles to make it visible in the tree.)
Select the checkbox next to it and click next. - Select the I accept option to accept the license and click Next.
- Make sure the location is correct where you're installing it. The default (your workspace) should be fine. Click Finish.
- The plugin is not digitally signed. Go ahead and install it anyway.
- Click Yes to make Eclipse restart itself.
它是干嘛的?
哪里下载?
如何安装?

copy到eclipse的plugin目录中去;

怎么用?
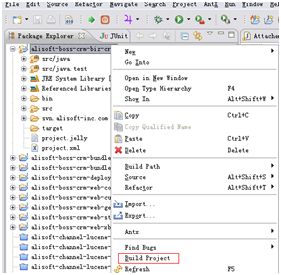
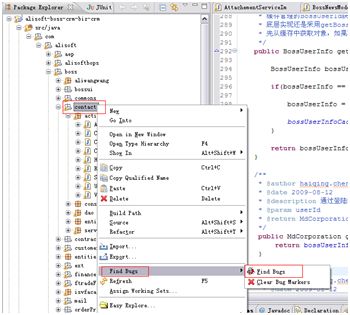
(eclipse 左下角)

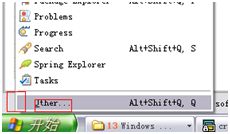
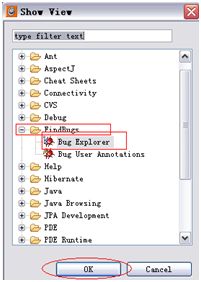
找出的bug有3中颜色, 黑色的臭虫标志是分类, 红色的臭虫表示严重bug发现后必须修改代码,橘黄色的臭虫表示潜在警告性bug 尽量修改。(附录是各种bug的解释及修改方案,请大家按附表参考修改)
参考资料
所有插件都必须配置在这个文件里才可以使用,这个文件的格式是