SAE python+chrome扩展快速存储喜欢的图片(可做图床)
想必大家都知道sina推了一个叫Sina App Engine(SAE)的东西,就是模仿google的GAE啦.这个东西可以做免费的服务器用,SAE最近支持了python,作为一个业余的python爱好者,天上掉下的馅饼岂有不吃之理?
本屌的业余爱好就是看微博,糗百上的搞笑段子,一碰到经典搞笑的图片就想保存下来留作日后慢慢欣赏。所以呢,我就在SAE上用python搭了一个小网站,上传些平时存下来的搞笑图片:http://yesyouknow.sinaapp.com.(基情提醒:不要把本屌的小网站搞瘫了)可是这样每次看到搞笑图片的都先要保存到本地,然后还要找时间打包上传,想想都烦的慌啊。
还好有强大的chrome,在简单的看了chrome开发教程后(教程点我),本屌依葫芦画瓢做了一个扩展,可以一键上传图片到本屌的小网站。想试一试的基友们可以下载这个扩展:点我,打开下载后的文件只要直接将yesyouknow.crx文件拖拽到chrome浏览器窗口上就能安装了.最后在网页图片上右击便会弹出如下菜单:
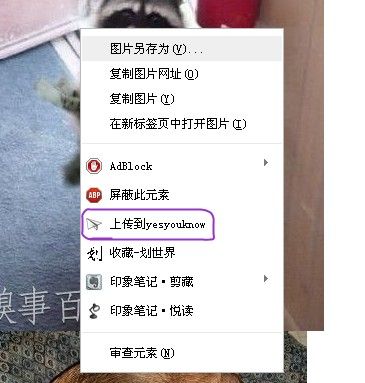
看到那个”上传到yesyouknow”的菜单了嘛,点了过后就会上传到yesyouknow.sinaapp.com啦,刷新下网站就会看到刚刚上传的图片鸟.在yesyouknow网站上的图片可以直接引用,也可以到SAE的管理后台批量下载,这样是不是很方便了呢?
下面介绍实现方法,关于如何在SAE用python建站,可以直接去SAE首页以及SAE python手册查看,这里本屌就不罗嗦了.直接上代码.
SAE Python支持web.py,所以开发方便了不少.
1. 网站首页:index.py
这里很简单就是从storage存储中获取图片的链接列表,然后按时间排序每页显示4张图片.
# -*- coding: utf-8 -*- import sae import web import string class Index: def GET(self): page_index=-1 user_data=web.input(page='0') page_index=string.atoi(user_data.page) st=sae.storage.Client() st_list=st.list('yesyouknow2') url_list=[]#只存放排序后的url,其它的都去掉 for d in st_list: url_list.append(st.url('yesyouknow2',d['name'])) url_list.sort() url_list.reverse() html_pic='' part_list=[] html_info="" if page_index>=len(st_list): page_index-=4 html_info='<div align="center">~~~~~~~~~这是最后一页了~~~~~~~~~~</div>' elif page_index<0: page_index=0 html_info='<div align="center">~~~~~~~~~~这是第一页~~~~~~~~~~~~~~</div>' if page_index+4>=len(url_list): part_list=url_list[page_index:] else: part_list=url_list[page_index:page_index+4] for puburl in part_list: #print part_list html_pic+='<div align="center"><img src="%s"/></div>'%(puburl.encode('utf-8')) html_space="<p> </p>" html_page=r'<div align="center"><a href="?page=%s">上一页</a> <a href="?page=%s">下一页</a></div>'%(str(page_index-4),str(page_index+4)) html_head=r'<html><head><meta http-equiv="content-type" content="text/html; charset=utf-8" /><title>嘿嘿</title></head><body>' html_end=r'</body></html>' html_count=r'<div align="center">当前共%s张图片</div>'%(str(len(url_list))) form=r''' <div align="center">可以上传单个图片,也可以打包为zip文件批量上传.文件大小控制在7M以内 <form action="http://yesyouknow.sinaapp.com/upload" method="post" enctype="multipart/form-data"> <input type="file" name="myfile" /> <input type="submit" /> </form> </div> ''' html=html_head html+=html_count html+=form html+=html_page html+=html_space html+=html_info html+=html_pic html+=html_space html+=html_page html+=html_end return html
2.接受上传文件的代码:upload.py
这里处理在网站首页上传的图片,如果上传的是zip文件,就在内存中解压,然后将图片挨个放进storange中
# -*- coding: utf-8 -*-

import sae.storage

import web

import zipfile

from datetime import datetime


class Upload:

    def POST(self):

        web.header("Content-Type","text/html; charset=utf-8")

        x=web.input(myfile={})

        if 'myfile' in x and x.myfile.filename!='':

            self.file_upload(x)

        web.seeother('/')


    def file_upload(self,x):

        filepath=x.myfile.filename.replace('\\','/')

        filename=filepath.split('/')[-1]

        filename=datetime.now().strftime("%Y%m%d%H%M%S%f")+'.'+filename.split('.')[-1]#将文件名修改为当前日期,方便后面排序

        if ".zip" in filename:

            self.unzip_upload(x.myfile.file)

        else:

            st=sae.storage.Client()

            ob=sae.storage.Object(x.myfile.file.read())

            sturl=st.put('yesyouknow2',filename,ob)


    def unzip_upload(self,zip_file):

        st=sae.storage.Client()

        z=zipfile.ZipFile(zip_file)

        namelist=z.namelist()

        for name in namelist:

            file=z.read(name)

            filename=datetime.now().strftime("%Y%m%d%H%M%S%f")+'.'+name.split('.')[-1]#日期加上文件后缀名

            ob=sae.storage.Object(file)

            st.put('yesyouknow2',filename,ob)
3.接受chrome扩展发送过来的图片链接:backupdate.py
#coding:utf-8

##接收chrome插件上传的图片链接,将图片下载存储到storage中.

import sae

import web

import urllib2

import sae.storage

from datetime import datetime


class Backupdate:

    def GET(self):

        web.header('Access-Control-Allow-Origin','*')

        user_data=web.input(src="no_exist")

        img_src=user_data.src

        img_data=urllib2.urlopen(img_src).read()

        filename=datetime.now().strftime("%Y%m%d%H%M%S%f")+'.'+img_src.split('.')[-1]#将文件名修改为当前日期,方便后面排序

        st=sae.storage.Client()

        ob=sae.storage.Object(img_data)

        st.put('yesyouknow2',filename,ob)

        return "ok",img_src
4.至于chrome扩展的话就更简单了,只用了一个函数用来发送当前的图片链接给yesyouknow网站.
chrome.contextMenus.create方法就是创建菜单了,点击菜单就会通过yesyouknowOnClick()来处理
//上传你喜欢的图片到yesyouknow.sinaapp.com

function yesyouknowOnClick(info,tab){

  console.log("hello yesyouknow");

  console.log(info.srcUrl);

  xmlhttp=new XMLHttpRequest();

  url="http://yesyouknow.sinaapp.com/backupdate?src=";

  url+=info.srcUrl;

  console.log(url)

  xmlhttp.open("GET",url,false);

  xmlhttp.send(null);

}

var title_yesyouknow=chrome.contextMenus.create({"title": "上传到yesyouknow","contexts":["image"],"onclick":yesyouknowOnClick});
最后附上yesyouknow小站源码:点我
祝大家玩得开心.