Liunx下Tomcat+MYSQL+Nginx配置
环境:centos6.4 min
#安装编译库及依赖模块
yum -y install gcc gcc-c++ autoconf automake make
yum -y install zlib zlib-devel openssl openssl--devel pcre pcre-devel
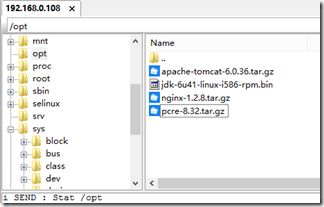
#上传需要的软件
#安装JDK与Tomcat
查看当系统JDK版本 java –version
#修改权限
chmod 777 jdk-6u41-linux-i586-rpm.bin
./jdk-6u41-linux-i586-rpm.bin
#可以不加
vi /etc/profile
#加入
JAVA_HOME=/usr/java/jdk1.6.0_41
CLASSPATH=.:JAVAHOME/libPATH=JAVA_HOME/bin:$PATH
export JAVA_HOME CLASSPATH PATH
#保存退出
:wq
#解压Tomcat
tar zxvf apache-tomcat-6.0.36.tar.gz
#安装Mysql
#是否已经安装了mysql数据库
rpm -qa | grep mysql
#卸载Mysql
rpm -e mysql
rpm -e --nodeps mysql
#可下载的版本
yum list | grep mysql
#安装Mysql
yum install -y mysql-server mysql mysql-deve
#查看
rpm -qi mysql-server
#启动mysql服务 首先会初始化配置
service mysqld start
#重启Mysql的服务
service mysqld restart
#开机自动启动
chkconfig --list | grep mysqld
chkconfig mysqld on
#为root账号设置密码
mysqladmin -u root password '123'
#登录Mysql
mysql -u root -p
show databases;
#查看配置
cat /etc/my.cnf
#数据库存放位置
cd /var/lib/mysql/
#mysql数据库日志
cat /var/log/mysqld.log
#查看端口
netstat –anp
#Mysql编码问题
#MySQL数据库默认的编码
character set :latin1
collation : latin1_swedish_ci
#查看当前编码
SHOW VARIABLES LIKE 'character_set%';
+--------------------------+----------------------------+
| Variable_name | Value |
+--------------------------+----------------------------+
| character_set_client | latin1 |
| character_set_connection | latin1 |
| character_set_database | latin1 |
| character_set_filesystem | binary |
| character_set_results | latin1 |
| character_set_server | latin1 |
| character_set_system | utf8 |
| character_sets_dir | /usr/share/mysql/charsets/ |
+--------------------------+----------------------------+
#查看MySQL支持的编码
mysql> show character set;
#修改编码
vi /etc/my.cnf
[client]
default-character-set=utf8
[mysql]
default-character-set=utf8
[mysqld]
default-character-set = utf8
collation-server = utf8_unicode_ci
init-connect='SET NAMES utf8'
character-set-server = utf8
找到[mysqld]下增加(未测试)
CentOS 5之前版本
character-set-server=utf8
CentOS 6以上的版本
character-set-server=utf8
#修改一个已有数据库的编码
ALTER DATABASE linuxcast CHARACTER SET utf8 COLLATE utf8_general_ci;
#创建数据库的时候指定编码
CREATE DATABASE testDB
DEFAULT CHARACTER SET utf8
DEFAULT COLLATE utf8_general_ci;
#查看编码
#重启MySQL服务
service mysqld restart
#防火墙端口
iptables -A INPUT -p tcp -m state --state NEW -m tcp --dport 3306 -j ACCEPT
service iptables save
service iptables restart
service iptables stop
#设置mysql远程访问
mysql -u root -p
GRANT ALL PRIVILEGES ON *.* TO 'root'@'%' IDENTIFIED BY 'passwd' WITH GRANT OPTION;
flush privileges;
#安装Nginx
yum install wget
cd /opt
wget http://nginx.org/download/nginx-1.2.8.tar.gz
tar zxvf nginx-1.2.8.tar.gz
cd nginx-1.2.8
./configure --prefix=/opt/nginx --with-http_stub_status_module --with-http_gzip_static_module --with-http_ssl_module
make && make install
配置参数:
--prefix=path 定义服务器保存文件的目录,默认为/usr/local/nginx
--sbin-path=path nginx执行文件名,默认为prefix/sbin/nginx
--conf-path=path 设置nginx.conf配置文件名,默认为prefix/conf/nginx.conf
--pid-path=path 设置nginx.pid文件名,它用来保存nginx主进程的进程ID,默认为prefix/logs/nginx.pid
--error-log-path=path 设置错误日志文件名,默认为prefix/logs/error.log
--http-log-path=path 设置HTTP请求日志文件名,默认为prefix/logs/access.log
--user-name=path 设置未授权用户名,默认为nobody
--group=name 设置组名,默认为未授权用户名
--with-select_module 编译或取消编译利用select()方法的模块
--with-poll_module 编译或取消编译利用poll()方法的模块
--without-http_gzip_module 取消编译HTTP服务器压缩响应的模块,需要zlip库
--without-http_rewrite_module 取消编译HTTP服务器重定向请求或修改请求URI地址的模块,需要PCRE库
--without-http_proxy_module 取消编译HTTP服务器代理模块
--with-http_ssl_module 编译添加对HTTPS协议的支持,需要OpenSSL库
--with-pcre=path 设置PCRE库的源代码路径,下载PCRE源码后解压缩到指定的path即可,剩下的交给nginx的./configure和make命令完成
--with-pcre-jit 编译PCRE库支持及时编译
--with-zlib=path 设置zlib库源代码的路径,同样下载zlib源码后解压到指定的path即可
--with-cc-opt=parameters 设置CFLAGS变量的额外参数
--with-ld-opt=parameters 设置链接时的额外参数--with-openssl=/usr/include #启用ssl
--with-pcre=/usr/include/pcre/ #启用正规表达式
--with-http_stub_status_module #安装可以查看nginx状态的程序
--with-http_memcached_module #启用memcache缓存
--with-http_rewrite_module #启用支持url重写===================================================================================
./configure \
--user=nginx \
--group=nginx \
--prefix=/usr/share \
--sbin-path=/usr/sbin/nginx \
--conf-path=/etc/nginx/nginx.conf \
--error-log-path=/var/log/nginx/error.log \
--http-log-path=/var/log/nginx/access.log \
--pid-path=/var/log/run/nginx.pid \
--lock-path=/var/log/lock/subsys/nginx \
--with-http_ssl_module \
--with-http_realip_module \
--with-http_addition_module \
--with-http_sub_module \
--with-http_dav_module \
--with-http_flv_module \
--with-http_gzip_static_module \
--with-http_stub_status_module \
--with-http_perl_module \
--with-mail \
--with-mail_ssl_module
make
make install
编译选项参考:http://wiki.nginx.org/NginxInstallOptions
#iptables配置
vi /etc/sysconfig/iptables
#添加配置项
-A INPUT -m state --state NEW -m tcp -p tcp --dport 80 -j ACCEPT
-A INPUT -m state --state NEW -m tcp -p tcp --dport 8080 -j ACCEPT
-A INPUT -m state --state NEW -m tcp -p tcp --dport 3306 -j ACCEPT
特别提示:正确的应该是添加到默认的22端口这条规则的下面
#重启防火墙
/etc/rc.d/init.d/iptables restart 或 service iptables restart
#查看现在的防火墙设置
iptables -L -n 或/etc/init.d/iptables status
#关闭防火墙
/etc/init.d/iptables stop
#停止关闭
#查询nginx主进程号
ps -ef | grep nginx
#停止进程
kill -QUIT 主进程号
#快速停止
kill -TERM 主进程号
#强制停止
kill -9 nginx
#Nginx
#端口查看
netstat –na|grep 80
#测试配置文件是否有错误
/opt/nginx/sbin/nginx –t
#重新加载配置
/opt/nginx/sbin/nginx -s reload
#启动nginx
/opt/nginx/sbin/nginx
#停止nginx
/opt/nginx/sbin/nginx –s stop
#Nginx配置
#默认配置
#user  nobody;

worker_processes  1;


#error_log  logs/error.log;

#error_log  logs/error.log  notice;

#error_log  logs/error.log  info;

#pid        logs/nginx.pid;

events {

    worker_connections  1024;

}


http {

    include       mime.types;

    default_type  application/octet-stream;


    #log_format  main  '$remote_addr - $remote_user [$time_local] "$request" '

    #                  '$status $body_bytes_sent "$http_referer" '

    #                  '"$http_user_agent" "$http_x_forwarded_for"';


    #access_log  logs/access.log  main;


    sendfile        on;

    #tcp_nopush     on;


    #keepalive_timeout  0;

    keepalive_timeout  65;


    #gzip  on;


    server {

        listen       80;

        server_name  localhost;


        #charset koi8-r;


        #access_log  logs/host.access.log  main;


        location / {

            root   html;

            index  index.html index.htm;

        }


        #error_page  404              /404.html;


        # redirect server error pages to the static page /50x.html

        #

        error_page   500 502 503 504  /50x.html;

        location = /50x.html {

            root   html;

        }


        # proxy the PHP scripts to Apache listening on 127.0.0.1:80

        #

        #location ~ \.php$ {

        #    proxy_pass   http://127.0.0.1;

        #}


        # pass the PHP scripts to FastCGI server listening on 127.0.0.1:9000

        #

        #location ~ \.php$ {

        #    root           html;

        #    fastcgi_pass   127.0.0.1:9000;

        #    fastcgi_index  index.php;

        #    fastcgi_param  SCRIPT_FILENAME  /scripts$fastcgi_script_name;

        #    include        fastcgi_params;

        #}


        # deny access to .htaccess files, if Apache's document root

        # concurs with nginx's one

        #

        #location ~ /\.ht {

        #    deny  all;

        #}

    }


    # another virtual host using mix of IP-, name-, and port-based configuration

    #

    #server {

    #    listen       8000;

    #    listen       somename:8080;

    #    server_name  somename  alias  another.alias;


    #    location / {

    #        root   html;

    #        index  index.html index.htm;

    #    }

    #}


    # HTTPS server

    #

    #server {

    #    listen       443;

    #    server_name  localhost;


    #    ssl                  on;

    #    ssl_certificate      cert.pem;

    #    ssl_certificate_key  cert.key;


    #    ssl_session_timeout  5m;


    #    ssl_protocols  SSLv2 SSLv3 TLSv1;

    #    ssl_ciphers  HIGH:!aNULL:!MD5;

    #    ssl_prefer_server_ciphers   on;


    #    location / {

    #        root   html;

    #        index  index.html index.htm;

    #    }

    #}


}
#Tomcat部署springmvc测试项目
上传项目到/opt目录下,新建ROOT.XML放在Catalina/localhost目录下
<?xml version='1.0' encoding='utf-8'?>

  <Context crossContext="true" docBase="/opt/springmvc/" path="" reloadable="true">

</Context>
#启动项目
cd /opt/apache-tomcat-6.0.36/bin
./start.sh
#访问
http://192.168.0.108:8080
#修改NG配置
#user  nobody;

worker_processes
2
;


error_log  logs/error.log;

events {

    use epoll;

    worker_connections  1024;

}


http {

    include       mime.types;

    default_type  application/octet-stream;


    log_format  main  '$remote_addr - $remote_user [$time_local] "$request" '

                      '$status $body_bytes_sent "$http_referer" '

                      '"$http_user_agent" "$http_x_forwarded_for"';


      #tcp_nodelay on;

    sendfile    on;

    keepalive_timeout  65;


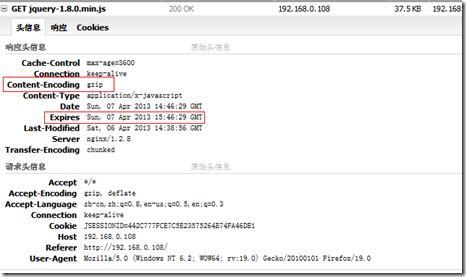
    #启用gzip

      gzip on;

      gzip_min_length  1000;

      gzip_buffers     4 8k;

      gzip_http_version 1.1;

      gzip_types       text/plain application/x-javascript text/css application/xml;


    include proxy.conf;

    upstream tomcat_server {

      server 127.0.0.1:8080;

    }


    server {

        listen       80;

        server_name  localhost;

        index  index.html index.htm index.shtml index.jsp;

          root /opt/springmvc;


        location ~ \.(html|shtml|jsp|jspx|do|action)?$ {                 #所有jsp的页面均交由tomcat处理

                proxy_set_header Host $host;

                proxy_set_header X-Forwarded-For $remote_addr;

              proxy_pass   http://tomcat_server;

        }


        location ~ .*\.(gif|jpg|jpeg|png|bmp|swf)$                       #设定访问静态文件直接读取不经过tomcat

        {

            expires   30d;

          }

            location ~ .*\.(js|css)?$ {

            expires   1h;

          }


        #error_page  404              /404.html;                          #404页面

        error_page   500 502 503 504  /50x.html;

        location = /50x.html

        {

            root   html;

        }


        location /nginxstatus {

            stub_status on;

            access_log on;

            auth_basic "nginxstatus";

            #auth_basic_user_file conf/passwd;

        }

    }

}
#添加proxy.conf配置
#允许客户端请求的最大的单个文件字节数

client_max_body_size    10m;

#缓冲区代理缓冲用户端请求的最大字节数 可以理解为先保存到本地再传给用户

client_body_buffer_size 128k;

#跟后端服务器连接的超时时间_发起握手等候响应超时时间

proxy_connect_timeout   300;

#连接成功后_等候后端服务器响应时间_其实已经进入后端的排队等候处理

proxy_read_timeout      300;

#后端服务器数据回传时间_就是在规定时间内后端服务器必须传完所有的数据

proxy_send_timeout      300;

#代理请求缓冲区_这个缓冲区间会保存用户的头信息以供Nginx进行规则处理_一般只要能够保存下头信息即可

proxy_buffer_size       4k;

#同上 告诉Nginx保存单个用的几个Buffer 最大用多大空间

proxy_buffers           4 32k;

#如果系统忙的时候可以申请更大的proxy_buffers 官方推荐*2

proxy_busy_buffers_size 64k;

#proxy 缓存临时文件的大小

proxy_temp_file_write_size 64k;
#启动NG与Tomcat
#启动NG
/opt/nginx/sbin/nginx
#检查是否正确
/opt/nginx/sbin/nginx
#重新加载配置
/opt/nginx/sbin/nginx -s reload
#停止
/opt/nginx/sbin/nginx -s stop
#查看
Tomcat:http://192.168.0.108:8080
Nginx:http://192.168.0.108
Nginxstatus:http://192.168.0.108/nginxstatus
nginx配置参数
#使用哪个用户启动nginx 前面是用户,后面是组
user www www;
#nginx工作的进程数量,一般认为配置值与机器核数相等为佳
worker_processes 2;
# [ debug | info | notice | warn | error | crit ] 错误日志的位置
error_log /var/htdocs/logs/nginx_error.log crit;#进程号保存文件
pid /usr/local/nginx/nginx.pid;#最大文件描述符 建议设置启动nginx的shell可以打开的最大文件描述符
#修改/etc/sysctl.conf,增加fs.file-max=6553560,fs.file-max是指系统所有进程一共可以打开的文件数量
#可以使用ulimit -Hn/-Sn查看该值,可以修改/etc/security/limits.conf,增加以下两行,*表示对所有用户有效
#* soft nofile 65535
#* hard nofile 65535#运行/sbin/sysctl -p命令,重新登录shell生效
worker_rlimit_nofile 65535;events
{
# use [ kqueue | rtsig | epoll | /dev/poll | select | poll ];
use epoll; #使用epoll(linux2.6的高性能方式,了解epoll相关知识和原理可上网络搜索)
worker_connections 51200; #每个进程最大连接数(最大连接=连接数x进程数)
}http
{
#文件扩展名与文件类型映射表,具体查看同目录下的mime.types
include mime.types;#默认文件类型
default_type application/octet-stream;#日志文件格式
log_format main 'remoteaddr−remote_user [timelocal]request '
'"status"body_bytes_sent "httpreferer"′′"http_user_agent" "$http_x_forwarded_for"';log_format download 'remoteaddr−remote_user [timelocal]′′"request" statusbytes_sent '
'"httpreferer""http_user_agent" '
'"httprange""sent_http_content_range"';#默认编码
charset gb2312,utf-8;server_names_hash_bucket_size 128;
#开启高效文件传输模式
sendfile on;
#以下两个选项用于防止网络阻塞 参考http://i.cn.yahoo.com/nesta2001zhang/blog/p_104/
tcp_nopush on;
tcp_nodelay on;#长链接超时时间
keepalive_timeout 300;#fastcgi连接超时时间,下面的看字面意思都能理解个大概了,就不解释了.
fastcgi_connect_timeout 300;
fastcgi_send_timeout 300;
fastcgi_read_timeout 300;
fastcgi_buffer_size 128k;
fastcgi_buffers 4 256k;
fastcgi_busy_buffers_size 256k;
fastcgi_temp_file_write_size 256k;
fastcgi_temp_path /dev/shm;#打开gzip压缩
gzip on;
#最小压缩文件大小,一般大于2k的文件使用gzip能提升效率,否则很小的文件压缩反倒更消耗服务器性能
gzip_min_length 2k;
#压缩缓冲区
gzip_buffers 48k;
#压缩版本(默认1.1,前端为squid2.5使用1.0)
gzip_http_version 1.1;
#压缩类型,默认就已经包含text/html 所以下面就不用再写了,当然写上去的话,也不会有问题,但是会有一个warn
gzip_types text/plain application/x-javascript text/css text/html text/javascript application/xml;
#错误页面
error_page 404 /404.html;
error_page 403 /404.html;
#上传文件大小限制
client_max_body_size 20m;
#设定请求头缓存,如果请求header过大,会使用large_client_header_buffers 来读取
client_header_buffer_size 16k;
large_client_header_buffers 464k;
#设定负载均衡的服务器列表
upstream mysvr {
#weigth参数表示权值,权值越高被分配到的几率越大
#本机上的Squid开启3128端口
server localhost:8080 weight=5;
server 127.0.0.1:8080 weight=1;
}
#下面开始虚拟主机的配置
server
{
listen 80;
server_name localhost;#设定本虚拟主机的访问日志
access_log logs/access.log main;#如果访问 /img/*, /js/*, /css/* 资源,则直接取本地文件,不通过squid
#如果这些文件较多,不推荐这种方式,因为通过squid的缓存效果更好
location ~ ^/(images|javascript|js|css|flash|media|static)/ {
root #应用的根目录;#刷新时间,根据静态文件修改的频度来调整,开发测试阶段可以短一些,生产阶段可以长一些
expires 24h;
}#对 "/" 启用
location / {#http://后面跟upstream 的名字
proxy_pass http://myserver ;
proxy_redirect off;
proxy_set_header Host host;proxysetheaderX−Real−IPremote_addr;
proxy_set_header X-Forwarded-For $proxy_add_x_forwarded_for;
client_max_body_size 10m


