vant area地区选择组件使用方法
目录
-
-
- 一、介绍
- 二、引入
-
- 1、安装vant
- 2、引入
- 三、使用
-
一、介绍
Vant 是有赞前端团队开源的移动端组件库,于 2017 年开源,已持续维护 4 年时间。Vant 对内承载了有赞所有核心业务,对外服务十多万开发者,是业界主流的移动端组件库之一。目前 Vant 官方提供了 Vue 2 版本、Vue 3 版本和微信小程序版本,并由社区团队维护 React 版本。
地区层级选择组件属于比较复杂的业务组件,使用vant地区选择组件同时,可以对组件样式进行修改,以满足个人业务要求。
二、引入
1、安装vant
使用npm i vant即可安装vant最新版本:
npm i vant
安装完毕之后可以选择按需引入组件或者全局引入vant组件,这里我们选择按需引入。
2、引入
- 引入插件
babel-plugin-import 是一款 babel 插件,它会在编译过程中将 import 的写法自动转换为按需引入的方式。引入方法如下:
npm i babel-plugin-import -D
- 添加babel的配置
使用babel配置不会出现组件样式无法加载问题,否则则需要按需引入组件样式文件。
// 在.babelrc 中添加配置
// 注意:webpack 1 无需设置 libraryDirectory
{

  "plugins": [
    ["import", {

      "libraryName": "vant",
      "libraryDirectory": "es",
      "style": true
    }]
  ]
}

// 对于使用 babel7 的用户,可以在 babel.config.js 中配置
module.exports = {

  plugins: [
    ['import', {

      libraryName: 'vant',
      libraryDirectory: 'es',
      style: true
    }, 'vant']
  ]
};
- 导入组件
通常使用地区选择组件,需要搭配底部弹出组件Popup一起使用,引入两个vant组件:
import AreaList from '@/assets/js/area.js'
import Vue from 'vue';
import {
      Area, Popup } from 'vant';
Vue.use(Area);
Vue.use(Popup);
其中,引入的AreaList包含了所有的地区的地区代码,文件地址为:https://download.csdn.net/download/m0_46309087/14001917。
三、使用
引入Area, Popup两个组件以后,通过阅读两个组件API文档使用这两个组件,以下是两个组件api文档,这里api接口较多,我们仅选择我们需要的几个api做说明:
- popup
| 参数 | 说明 | 类型 | 默认值 |
|---|---|---|---|
| v-model (value) | 是否显示弹出层 | boolean | false |
| position | 弹出位置,可选值为 top bottom right left | string | center |
- Area
| 事件 | 说明 | 回调参数 |
|---|---|---|
| confirm | 点击右上方完成按钮 | 一个数组参数 |
| cancel | 点击取消按钮时 | - |
对于area组件,以上两个事件对应的是确认和取消两个按钮的事件,其他的api详见VantDOC;

地区组件最关键的就是入参与出参,入参数据格式为:
{

  province_list: {

    110000: '北京市',
    120000: '天津市'
  },
  city_list: {

    110100: '北京市',
    110200: '县',
    120100: '天津市',
    120200: '县'
  },
  county_list: {

    110101: '东城区',
    110102: '西城区',
    110105: '朝阳区',
    110106: '丰台区'
    120101: '和平区',
    120102: '河东区',
    120103: '河西区',
    120104: '南开区',
    120105: '河北区',
    // ....
  }
}
完整的数据见https://download.csdn.net/download/m0_46309087/14001917。
选择完毕点击确定按钮,confirm事件获取参数,出参数据格式为:
//返回的数据整体为一个数组,数组内包含 columnsNum 个数据, 每个数据对应一列选项中被选中的数据。

//code 代表被选中的地区编码, name 代表被选中的地区名称

[
  {

    code: '110000',
    name: '北京市',
  },
  {

    code: '110100',
    name: '北京市',
  },
  {

    code: '110101',
    name: '东城区',
  },
];
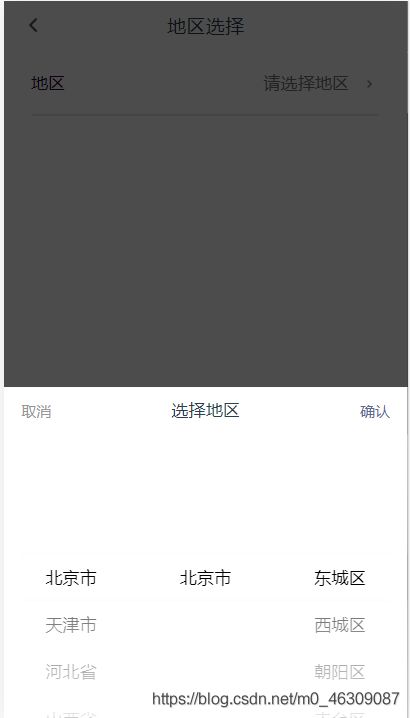
实现的效果如下图:
完整代码如下:
<template>
  <div>
    <div class="flex-input">
      <div class="tx-lable">{
     {
      itemName }}</div>
      <div class="tx-input" @click="areaChoose">
        <input
          type="text"
          :placeholder="phdText"
          v-model="chooseValue"
          readonly
        />
        <img src="@/assets/images/toRight.png" />
      </div>
    </div>
    <DLine v-show="showUnderline"></DLine>
    <van-popup v-model="showAddrPopup" position="bottom">
      <van-area
        title="选择地区"
        :area-list="areaList"
        @cancel="showAddrPopup = false"
        @confirm="confArea"
        @visible-item-count="itemCount"
      />
    </van-popup>
  </div>
</template>
<script>
import DLine from "@/components/DLine";
import AreaList from "@/assets/js/area.js";
import Vue from "vue";
import {
      Area, Popup } from "vant";
Vue.use(Area);
Vue.use(Popup);
export default {

  props: {

    itemName: {

      type: String, //按钮名称
      default: "地区"
    },
    phdText: {

      type: String, //按钮名称
      default: "请选择地区"
    },
    showUnderline: {

      type: Boolean,
      default: true
    }
  },
  components: {

    DLine
  },
  data() {

    return {

      areaList: {
     }, //省市区列表
      itemCount: 7,
      showAddrPopup: false, //弹出层展示
      chooseValue: ""
    };
  },
  created() {

    this.initParams();
  },
  methods: {

    clickhandle() {

      //使用emit,第一个参数为子组件组件方法,第二个参数为该方法传递的参数
      this.$emit("clickhandle", 5);
    },
    initParams() {

      this.areaList = AreaList;
    },
    areaChoose() {

      this.showAddrPopup = true;
    },
    confArea(data) {

      // this.chooseArea = data;
      for(let i = 0; i<data.length; i++) {

        this.chooseValue = data[i].name + this.chooseValue;
      }
    }
  }
};
</script>
<style lang="scss" scoped>
.flex-input {

  display: flex;
  justify-content: space-between;
  background-color: #ffffff;
  height: 56px;
  padding: 0 25px;
  div {

    font-size: 16px;
    color: #2e042c;
    letter-spacing: 0;
  }
}
.tx-lable {

  margin: 16px 0;
  height: 24px;
  line-height: 24px;
  vertical-align: -webkit-baseline-middle;
}
.tx-input {

  display: flex;
  justify-content: flex-end;
  margin: 16px 0;
  line-height: 24px;
  input {

    border: none;
    margin-right: 5px;
    text-align: right;
  }
  input::-moz-placeholder {

    color: #f6e9f7;
  }
  img {

    margin: 7px 5px;
    height: 12px;
    width: 12px;
  }
}
</style>