ElasticSearch讲解
1.介绍
ElasticSearch vs Solr 总结
(1)es基本是开箱即用,非常简单。Solr安装略微复杂一丢丢,可关注(solr6.6教程-基础环境搭建(一))
(2)Solr 利用 Zookeeper 进行分布式管理,而 Elasticsearch 自身带有分布式协调管理功能。
(3)Solr 支持更多格式的数据,比如JSON、XML、CSV,而 Elasticsearch 仅支持json文件格式。
(4)Solr 官方提供的功能更多,而 Elasticsearch 本身更注重于核心功能,高级功能多有第三方插件提供,例如图形化界面需要kibana友好支撑
(5)Solr 查询快,但更新索引时慢(即插入删除慢),用于电商等查询多的应用;
ES建立索引快(即查询慢),即实时性查询快,用于facebook新浪等搜索。
Solr 是传统搜索应用的有力解决方案,但 Elasticsearch 更适用于新兴的实时搜索应用。
(6)Solr比较成熟,有一个更大,更成熟的用户、开发和贡献者社区,而 Elasticsearch相对开发维护者较少,更新太快,学习使用成本较高。
默认情况下,在Elasticsearch中的每个索引被分配5个主分片和一份拷贝,这意味着假设你的集群中至少有两个节点,你的索引将会有5个主分片和5个复制分片(每个主分片对应一个复制分片,5个复制分片组成一个完整拷贝),总共每个索引有10个分片。
2.安装
2.1.Ubuntu安装
https://www.elastic.co/downloads/past-releases
下载elasticsearch-6.3.2.tar.gz
解压tar -xf elasticsearch-6.3.2.tar.gz
运行cd elasticsearch-6.3.2/bin
./elasticsearch
报错:
Java HotSpot™ 64-Bit Server VM warning: INFO: os::commit_memory(0x00000000c5330000, 986513408, 0) failed; error=‘Cannot allocate memory’ (errno=12)
Sudo shutdown
虚拟机修改内存为2g
或减小内存
Cd config
Vim jvm.options

改为512m

报错:
max file descriptors [4096] for elasticsearch process is too low, increase to at least [65536]
sudo vim /etc/security/limits.conf
添加如下内容:
- soft nofile 65536
- hard nofile 131072
- soft nproc 2048
- hard nproc 4096
vi /etc/security/limits.d/90-nproc.conf
找到如下内容:
- soft nproc 1024
#修改为 - soft nproc 4096
保存, 重启虚拟机
报错:
max virtual memory areas vm.max_map_count [65530] likely too low, increase to at least [262144]
原因:最大虚拟内存太小
Sudo vi /etc/sysctl.conf
添加vm.max_map_count=655360
Sudo sysctl -p 重启
从配置文件“/etc/sysctl.conf”加载内核参数设置
关闭es, 启动es
2.2.启动
不能用root启动, 必须用普通用户启动
Cd bin
./elasticsearch -h 查看命令说明

./elasticsearch 前台启动, ctrl+c或者关闭窗口就关闭服务了
./elasticsearch -d 后台启动
Jps查看elasticsearch进程

2.3.访问
2.3.1.Es首页
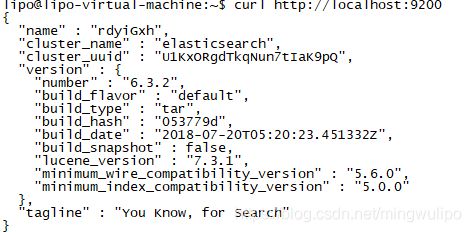
虚拟机打开浏览器, 输入localhost:9200, 可以访问
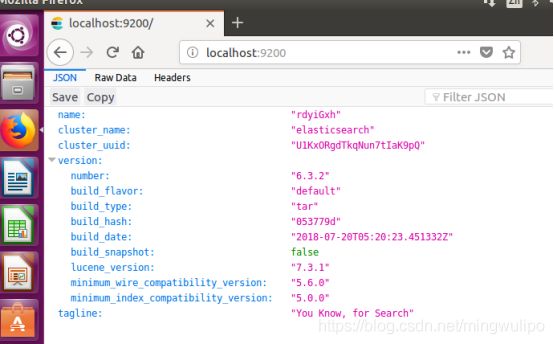
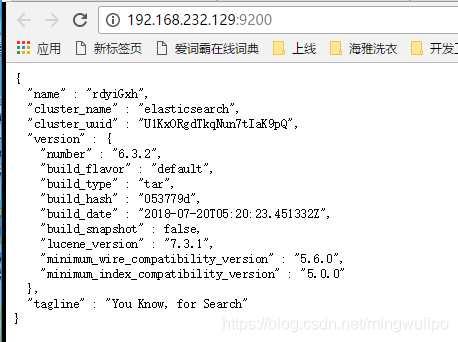
外网访问不了
vi elasticsearch-2.3.5/config/elasticsearch.yml
#设定绑定的ip
network.host: 0.0.0.0
2.4.关闭
Ps -ef|grep elasticsearch
Kill -9 进程id
2.5.配置文件
Conf/elasticsearch.yml
![]()
Node.name是节点名称, 去掉前面注释, 重启es
![]()
2.6.集群
拷贝一个es目录, cp elasticsearch-6.3.2 elasticsearch-2 -r
修改elasticsearch.yml的node.name和port不同即可.
node.name=node-2
http.port=9201
删除data下的nodes目录
启动失败,内存不够
3.使用
3.1.查看_cat
3.1.1.集群健康
http://192.168.232.129:9200/_cat/health?v

推荐下面的, 因为返回json
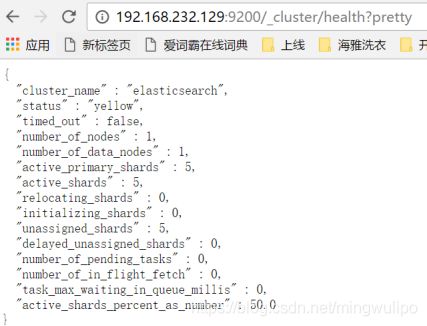
http://192.168.232.129:9200/_cluster/health

Green - 一切运行正常(集群功能齐全)
Yellow - 所有数据是可以获取的,但是一些复制品还没有被分配(集群功能齐全).
Red - 一些数据因为一些原因获取不到(集群部分功能不可用)
索引发生这种情况的原因是Elasticsearch默认为当前索引创建一个拷贝。但是当前我们只启动了一个节点,这个拷贝直到一段时间后有另一个节点加入集群之前,不会被分配(为了高可用,拷贝不会与索引分配到同一个节点上)。一旦拷贝在第二个节点上获得分配,这个索引的健康状态就会变成green。
3.1.2.?pretty格式化成json
等价于pretty=true
3.1.3.节点列表
http://192.168.232.129:9200/_cat/nodes?v

3.1.4.索引
http://192.168.232.129:9200/_cat/indices?v

索引twitter有5个主分片, 1个拷贝, 3个文档
3.2.Curl命令
X 请求方法
-H 请求头
-d 传输的数据
3.2.1.PUT创建修改索引
put必须大写,小写无效
curl -XPUT ‘localhost:9200/customer?pretty’

创建索引并添加数据
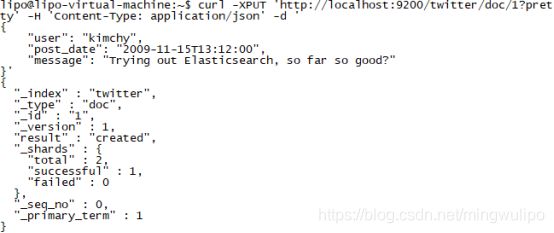
curl -XPUT ‘http://localhost:9200/twitter/doc/1?pretty’ -H ‘Content-Type: application/json’ -d ’
{
“user”: “kimchy”,
“post_date”: “2009-11-15T13:12:00”,
“message”: “Trying out Elasticsearch, so far so good?”
}’
把id从1改成2,3,再插入两次
3.2.2.GET查询索引
curl -XGET ‘localhost:9200/customer?pretty’
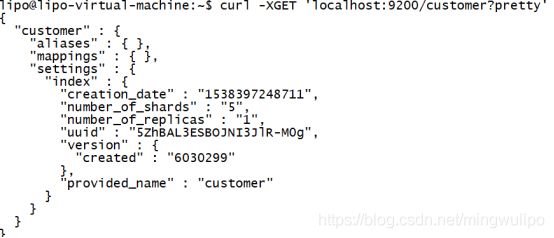
查询索引的一个文档内容
curl -XGET ‘http://localhost:9200/twitter/doc/1?pretty’
curl -XGET ‘http://localhost:9200/twitter/doc/1?pretty=true’

3.2.2.1.搜索数据_search
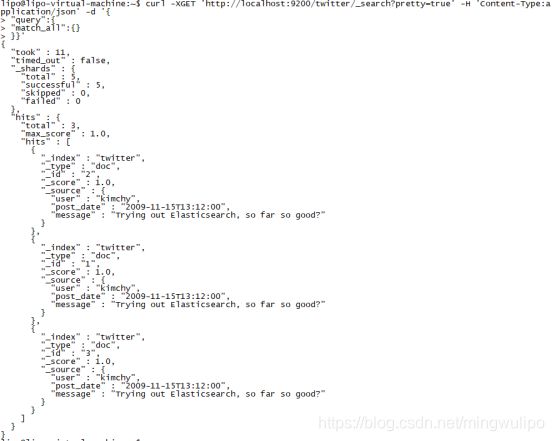
查询索引的全部文档
curl -XGET ‘http://localhost:9200/twitter/_search?pretty’
3.2.2.2.字段q=
curl -XGET ‘http://localhost:9200/twitter/_search?q=user:kimchy&pretty=true’
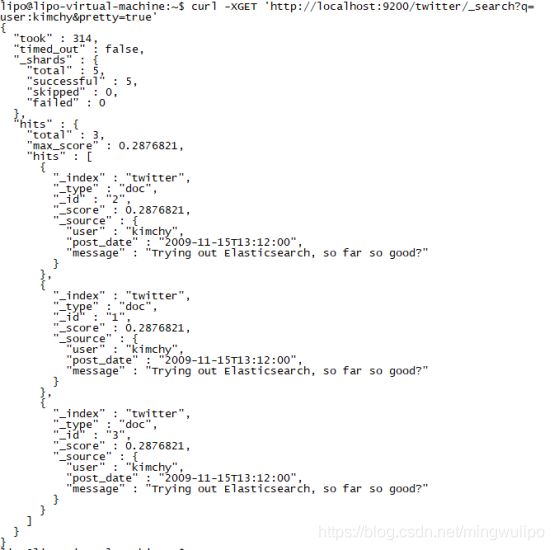
took - Elasticsearch 执行查询的时间(以毫秒为单位)
timed_out - 告诉我们查询是否超时
_shards - 告诉我们查询了多少个分片,以及查询成功/失败的分片数量
hits - 查询结果
hits.total - 符合我们查询条件的文档总数
hits.hits - 实际查询结果数组(默认为前10个文档)
hits.sort - 对结果进行排序的键(如果没提供,则默认使用_score进行排序)
hits._score和max_score-现在先忽略这些字段
3.2.2.3.Json查询
curl -XGET ‘http://localhost:9200/twitter/_search?pretty=true’
-H ‘Content-Type: application/json’ -d ’
{
“query” : {
“match_all” : {}
}
}’
匹配查询
curl -XGET ‘http://localhost:9200/twitter/_search?pretty=true’
-H ‘Content-Type: application/json’ -d ’
{
“query” : {
“match” : { “user”: “kimchy” }
}
}’
区间查询
curl -XGET ‘http://node02:9200/twitter/_search?pretty=true’ -H ‘Content-Type: application/json’ -d ’
{
“query” : {
“range” : {
“post_date” : { “from” : “2009-11-15T13:00:00”, “to” : “2009-11-15T14:00:00” }
}
}
}’
3.2.3.DELETE删除索引
curl -XDELETE ‘localhost:9200/customer?pretty’

3.2.4.批处理_bulk
批量添加
必须分行写入命令
curl -XPOST ‘localhost:9200/customer/doc/_bulk?pretty&pretty’ -H ‘Content-Type: application/json’ -d’
{“index”:{"_id":“1”}}
{“name”: “John Doe” }
{“index”:{"_id":“2”}}
{“name”: “Jane Doe” }
’
最后的单引号必须另起一行
修改和删除
curl -XPOST ‘localhost:9200/customer/doc/_bulk?pretty&pretty’ -H ‘Content-Type: application/json’ -d’
{“update”:{"_id":“1”}}
{“doc”: { “name”: “John Doe becomes Jane Doe” } }
{“delete”:{"_id":“2”}}
’
curl -XGET 'localhost:9200/customer/doc/_search?pretty’查看变化
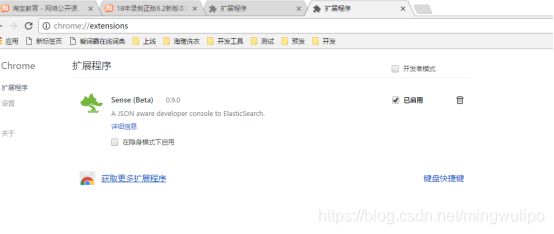
3.3.Chrome安装sense插件
4.Kibana查询
4.1.排序
GET /es-message-2018.10.12/_search
{
“sort”: [
{
“@timestamp”: {
“order”: “asc”
}
}
],
“query”: {
“match_all” : {
}
}
}
Asc升序, desc降序
5.问题
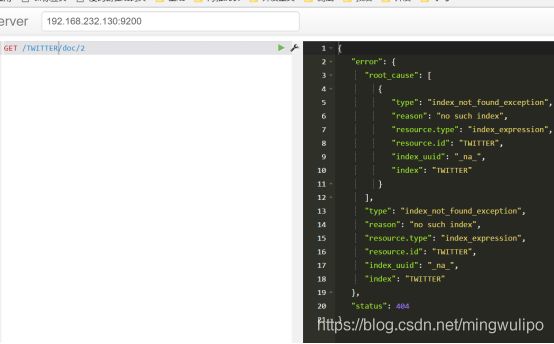
5.1.[match] query does not support [type]"
Api版本和es安装版本不匹配.
一般是api版本低了
6.Java操作
6.1.Jest
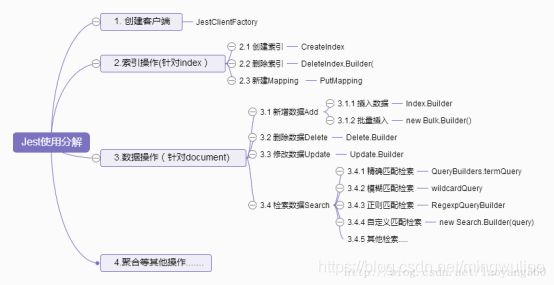
Jest是Elasticsearch 的Java Http Rest 客户端。
ElasticSearch已经具备应用于Elasticsearch内部的Java API,但是Jest弥补了ES自有API缺少Elasticsearch Http Rest接口客户端的不足。
Jest优势概括如下:
1)提供Restful API, 原生ES API不具备;
2)若ES集群使用不同的ES版本,使用原生ES API会有问题,而Jest不会;
3) 更安全(可以在Http层添加安全处理)。
7.权限
自带x-pack, 无需使用elasticsearch-plugin install来安装x-pack,我们需要做的是使x-pack工作
7.1.启动es
Config/elasticsearch.yml
添加
xpack.security.enabled: true
启动es
7.2.启用trial license(30天试用)
curl -H “Content-Type:application/json”
-XPOST http://localhost:9200/_xpack/license/start_trial?acknowledge=true
控制台打印
![]()
可以看到elasticsearch控制台显示license 已变为trial
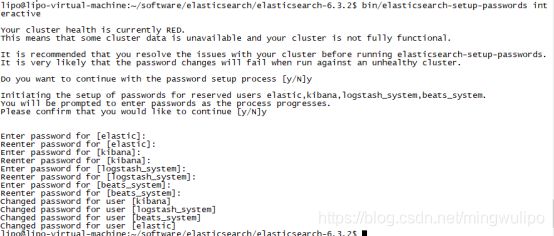
7.3.设置用户名密码
命令:bin/elasticsearch-setup-passwords interactive

Config/elasticsearch.yml
添加
xpack.security.enabled: true
重启es
再次访问http://192.168.232.132:9200/
需要输入用户名和密码了
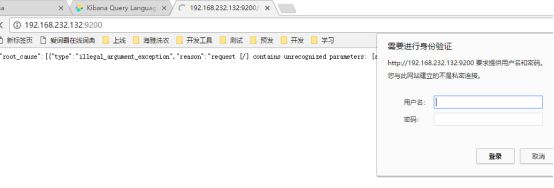
上面四个用户随便填
7.4.以后所有curl访问必须加-u 用户了, 否则报错
-u 用户:密码, 不需要输入密码了
curl -XPOST -H “Content-Type:application/json” -u elastic:123456 ‘localhost:9200/_xpack/security/user/lipo2’ -d ‘{ “password” : “123456”, “full_name” : “lipo”, “email” : “[email protected]”, “roles” : [ “clicks_admin” ] }’
![]()
7.5.修改密码
curl -H “Content-Type:application/json” -XPOST -u elastic ‘http://localhost:9200/_xpack/security/user/elastic/_password’ -d ‘{ “password” : “1234567” }’
![]()
输入旧密码123456
再次访问http://192.168.232.132:9200/
需要重新输入用户名和密码了
7.6.角色
7.6.1.查看所有角色
curl -XGET -u elastic ‘localhost:9200/_xpack/security/role?pretty’
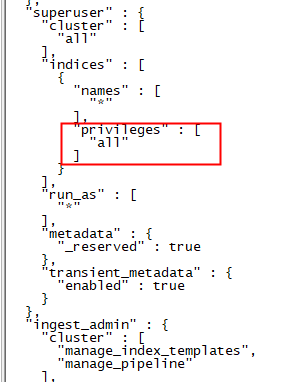
好多角色
7.6.2.添加角色
curl -H “Content-Type:application/json” -XPOST -u elastic ‘localhost:9200/_xpack/security/role/clicks_admin’ -d '{ “indices” : [ { “names” : [ “events*” ], “privileges” : [ “all” ] }, { “names” : [ “.kibana*” ], “privileges” : [ “manage”, “read”, “index” ] } ] }’
Word中英文的单引号, 复制到securecrt中变成中文引号, 不识别, 要删掉重新输入英文单引号.
curl -H “Content-Type:application/json” -XPOST -u elastic ‘localhost:9200/_xpack/security/role/clicks_admin’ -d ‘{ “indices” : [ { “names” : [ “events*” ], “privileges” : [ “all” ] }, { “names” : [ “.kibana*” ], “privileges” : [ “manage”, “read”, “index” ] } ] }’
![]()
7.6.3.查看具体角色
curl -XGET -u elastic ‘localhost:9200/_xpack/security/role/clicks_admin’
![]()
7.6.4.删除角色
curl -XDELETE -u elastic ‘localhost:9200/_xpack/security/role/clicks_admin?pretty’
![]()
7.7.用户
7.7.1.查看所有用户
curl -XGET -u elastic ‘localhost:9200/_xpack/security/user?pretty’
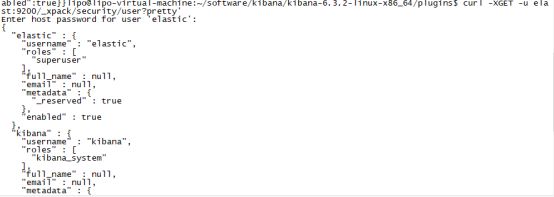
7.7.2.添加用户
curl -XPOST -H “Content-Type:application/json” -u elastic ‘localhost:9200/_xpack/security/user/lipo’ -d ‘{ “password” : “123456”, “full_name” : “lipo”, “email” : “[email protected]”, “roles” : [ “clicks_admin” ] }’
![]()
7.7.3.查看单个用户
curl -XGET -u elastic ‘localst:9200/_xpack/security/user/lipo?pretty’

7.7.4.删除用户
curl -XDELETE -lhost:9200/_xpack/security/user/lipo?pretty’

7.8.更新证书
使用证书30天过期, 启动报错
[ERROR][o.e.x.s.a.f.SecurityActionFilter] [l-pgvpc] blocking [cluster:monitor/health] operation due to expired license. Cluster health, cluster stats and indices stats
operations are blocked on license expiration. All data operations (read and write) continue to work.
If you have a new license, please update it. Otherwise, please reach out to your support contact.
查询证书状态
虽然启动没成功, 但是状态可以查询的
curl -XGET -u elastic:123456 ‘http://localhost:9200/_license’
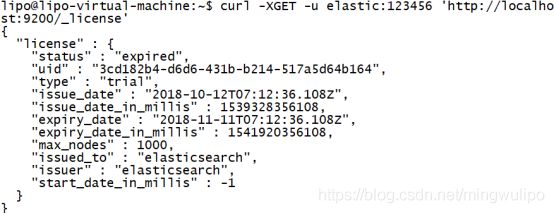
只能再次申请license
免费的license一年只能申请一次,有效期1年
https://register.elastic.co/marvel_register

点击链接下载license,选择对应版本的license;根据自己的版本查看更新方法
上传license到Elasticsearch服务器
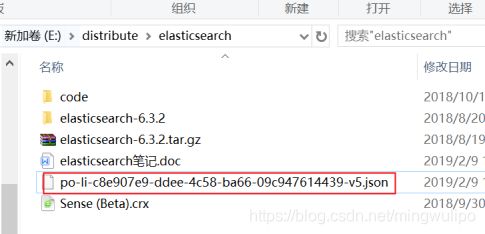
curl -XPUT -u elastic:123456 ‘http://localhost:9200/_xpack/license’ -H “Content-Type: application/json” -d @po-li-c8e907e9-ddee-4c58-ba66-09c947614439-v5.json

curl -XPOST -u elastic:123456 ‘http://localhost:9200/_xpack/license/start_basic’
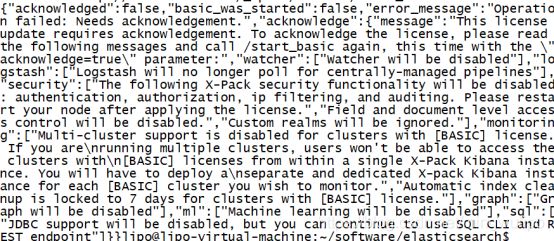
curl -XPOST -u elastic:123456 ‘http://localhost:9200/_xpack/license/start_basic?acknowledge=true’
![]()
