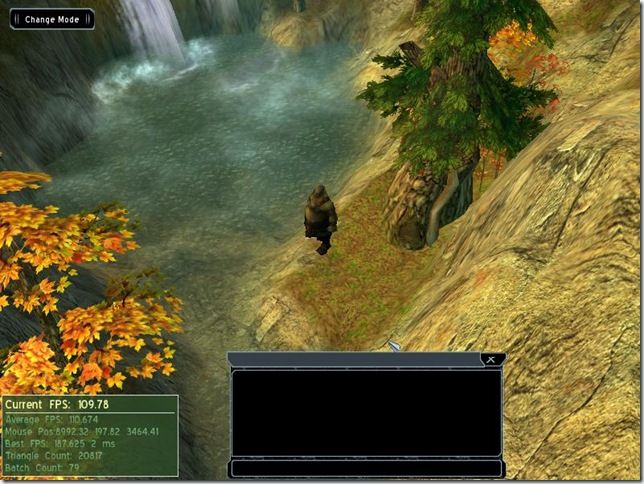
天龙八部水面
本文主要讲的是《天龙八部》游戏中水面(TerrainLiquid)的具体实现,使用C++, Ogre1.6 。
天龙的水面做的比较简单,虽然没有倒影,但动态纹理+深度图做出的效果还行,看着不是特别假。
一般情况下,TerrainLiquid有一层动态纹理,有的还会有一层1D深度图纹理,深度图纹理用来控制不同深度水面的透明度。另外还会给出一个坐标,可以称之为种子坐标,通过这个坐标可以填充整个水面。总的来说要实现天龙的水面只要搞清楚两个问题
1.如何利用种子坐标填充整个水面
2.如何利用深度图纹理控制水面透明图
文章最后我放了TerrainLiquid的代码的链接,配合上篇随笔给的地形Demo代码再加上水面相关的资源,很容易就能在那基础上加上水面效果。
TerrainLiquid格式
<Object type="TerrainLiquid"><Property name="material" value="haihuwater"/><Property name="position" value="2500 636 -4901"/><Property name="texture scale" value="0.25"/><Property name="depth texture layer.enable" value="true"/><Property name="depth texture layer.height scale" value="0.008"/></Object>
上面是一个典型的TerrainLiquid的例子,
material,不用说了,材质
position就是我上面说的种子坐标,天龙不给出整个水面覆盖的范围,而只给出这个坐标,载入场景时实时填充
texture scale,这个值是用来确定第一层纹理坐标的,假设某个点与种子间隔(x,y)个顶点,则该点第一层动态纹理的坐标为(x*texture scale, y*texture scale)。
depth texture layer.enable,这一项如果是true的时候,说明要用深度图。
depth texture layer.height scale,是用来确定水面上某点的深度和该点的透明度间的关系,深度*这个值=透明度。
水面填充
开始要实现水面的时候,我首先想的很简单,弄四个点,一个平面,动态贴图一贴,完了。后来发现没那么简单,水面不能用一个长方形来做,多看几个场景就能发现,这个肯定是不合适的。Google了一下,看了几个大牛的博客,知道水面应该用填充算法来生成,可惜大牛们都不贴代码,估计觉得太简单了吧…… 只好自己实现一下。
我用的填充算法比较简单,递归… 没有任何优化,但很易懂,很简单。 一般如果不是大的变态的水面应该没有问题,而且这个填充的过程是在载入场景的过程中,也没有什么优化的必要,估计再快也就快个一两秒吧。
下面是核心的填充代码,很简单吧…
    代码


      void
       TerrainLiquid::__spreed(
      int
       x,
      int
       z,
      int
       direction )
{

      //
       判断是否已包含该点和该点是否应该被看做水面的一部分


      if
      (
      !
      __isGridContained( x, z )
      &&
       __isValidGrid( x,z, direction ) )
        __addGrid( x, z );

      else


      return
      ;

    __spreed( x, z
      -
      1
      , UP );
    __spreed( x, z
      +
      1
       , DOWN );
    __spreed( x
      -
      1
      , z, LEFT );
    __spreed( x
      +
      1
      , z , RIGHT );
}
__isValidGrid()用来判断该点是否是水面的一部分,简单点说就是判断地形上的这一点是否高于种子的高度,实际上判断还是有点复杂的,如果单纯判断点的当前点的高度遇到复杂一点的水面情况就会出BUG,我的做法是分不同的方向分别判断。具体代码如下:


      bool
       TerrainLiquid::__isValidGrid(
      int
       x,
      int
       z,
      int
       dir )
{

      int
       y
      =
       mSeedPos.y;

      int
       left
      =
       mTerrainInfo
      ->
      getOffset().x;

      int
       right
      =
       left
      +
       (mTerrainInfo
      ->
      getWidth()
      -
      1
      )
      *
      mTerrainInfo
      ->
      getScaling().x;

      int
       top
      =
       mTerrainInfo
      ->
      getOffset().z;

      int
       bottom
      =
       top
      +
       (mTerrainInfo
      ->
      getHeight()
      -
      1
      )
      *
      mTerrainInfo
      ->
      getScaling().y;

    Ogre::Vector3 leftTop
      =
       __getPos( x,z );
    Ogre::Vector3 rightTop
      =
       __getPos( x
      +
      1
      , z );
    Ogre::Vector3 leftBottom
      =
       __getPos( x,z
      +
      1
      );
    Ogre::Vector3 rightBottom
      =
       __getPos( x
      +
      1
      , z
      +
      1
       );


      int
       lt
      =
       mTerrainInfo
      ->
      getHeightAt( leftTop.x, leftTop.z );

      int
       rt
      =
       mTerrainInfo
      ->
      getHeightAt( rightTop.x, rightTop.z );

      int
       lb
      =
       mTerrainInfo
      ->
      getHeightAt( leftBottom.x, leftBottom.z );

      int
       rb
      =
       mTerrainInfo
      ->
      getHeightAt( rightBottom.x, rightBottom.z );


      //
       bounding check


      if
      ( leftTop.x
      <
       left
      ||
       rightTop.x
      >
       right
      ||
       leftTop.z
      <
       top
      ||
       leftBottom.z
      >
       bottom )

      return

      false
      ;


      if
      ( lt
      >
       leftTop.y
      &&
       rt
      >
       rightTop.y
      &&
       lb
      >
       leftBottom.y
      &&
       rb
      >
       rightBottom.y )

      return

      false
      ;


      else

      if
      ( dir
      ==
       LEFT )
    {

      if
      ( ( lt
      <
       y
      ||
       lb
      <
       y )
      &&
       ( rt
      >=
      y
      &&
       rb
      >=
      y) )

      return

      false
      ;
    }


      else

      if
      ( dir
      ==
       RIGHT )
    {

      if
      ( ( rt
      <
       y
      ||
       rb
      <
       y )
      &&
       ( lt
      >=
       y
      &&
       lb
      >=
       y ) )

      return

      false
      ;
    }


      else

      if
      ( dir
      ==
       UP )
    {

      if
      ( ( rt
      <
       y
      ||
       lt
      <
       y )
      &&
       ( rb
      >=
       y
      &&
       lb
      >=
       y ) )

      return

      false
      ;
    }


      else

      if
      ( dir
      ==
       DOWN )
    {

      if
      ( ( rb
      <
       y
      ||
       lb
      <
       y )
      &&
       ( rt
      >=
      y
      &&
       lt
      >=
       y ) )

      return

      false
      ;
    }

      return

      true
      ;
}
首先判断四个点对应的地形的高度是否都大于种子高度,若大于则返回false
然后判断是否超出地图边界,超出则返回false
再分四个方向判断前两点和后两点的高度,若前两点有一点或两点地形高度小于种子高度,且后两点地形高度都大于种子高度,则返回false
具体为什么这么判断比较难描述… 反正在边界比较窄的情况下,若不这样判断就会检测不到水面的边界。
水面透明度处理
当水面填充做好以后,这个就不难处理了,就是在每个顶点生成的时候设置纹理坐标。第一层纹理是动态纹理,第二层是一维的深度图纹理。第一层纹理坐标的设定要根据 TerrainLiquid 中 texture_scale值来确定。由于Ogre默认的纹理映射方式是wrap,就是说Any value beyond 1.0 wraps back to 0.0. Texture is repeated (引用自Ogre官网的Manual). 我们不需要考虑纹理坐标大于1或者小于0的状况,它自己会映射到正确的位置,所以我们只要将(x,y)处点的纹理坐标设为( x*texture_scale, y*texture_scale )就OK了。
第二层纹理的形式是这样的:(中间那一条)
在ps里面看一下可以发现,这是一张宽度为256,高度为1的一维纹理,有4通道,每个通道的值都是从0-255递增。不难推测,我们需要用水面的深度情况来取一个值作为水面的透明度。
从水面的纹理的材质可以看出,第二层纹理的映射方式为clamp,所以纹理坐标在在大于1.0时,会映射到1.0.所以( depth texture layer.height scale*水面深度)求出的就是第二层的纹理坐标。水面深度=种子坐标高度-当前点的地形高度。
要注意的是第二层纹理一定要声明为1D的。
下面是顶点格式的声明,有FLOAT3的顶点坐标,FLOAT3的法线方向(统一向上),FLOAT2的一层纹理,FLOAT1的二层纹理。
    代码


      decl
      ->
      addElement( MAIN_BINDING, offset, VET_FLOAT3, VES_POSITION );
offset
      +=
       Ogre::VertexElement::getTypeSize( VET_FLOAT3 );

decl
      ->
      addElement( MAIN_BINDING, offset, VET_FLOAT3, VES_NORMAL );
offset
      +=
       Ogre::VertexElement::getTypeSize( VET_FLOAT3 );

decl
      ->
      addElement( MAIN_BINDING, offset, VET_FLOAT2, VES_TEXTURE_COORDINATES,
      0
       );
offset
      +=
       Ogre::VertexElement::getTypeSize( VET_FLOAT2 );


      if
      ( m_bDepthEnable )
    decl
      ->
      addElement( MAIN_BINDING, offset, VET_FLOAT1, VES_TEXTURE_COORDINATES,
      1
       );
将TerrainLiquid添加到地形中
在原来地形Demo中载入场景的函数中适当位置添加这一段应该就没问题了。
    代码


      else

      if
      ( IsStrEqual(
      "
      TerrainLiquid
      "
      , strTemp ) )
{
    TerrainLiquid
      *
       pTerrainLiquid
      =

      new
       TerrainLiquid;
    SceneNode
      *
       pSsceneNode
      =
       m_pSceneManager
      ->
      getRootSceneNode()
      ->
      createChildSceneNode(
      "
      terrain_liquid
      "

      +
       StringConverter::toString( staticIndex
      ++
       ) );
    TiXmlElement
      *
       propriety
      =
       element
      ->
      FirstChildElement(
      "
      Property
      "
       );


      float
       x,y,z;

      float
       texture_scale
      =

      0.0f
      ;

      float
       depth_scale
      =

      0.0f
      ;

      bool
       depth_enable
      =

      false
      ;

      while
      ( propriety )
    {
        strTemp
      =
       propriety
      ->
      Attribute(
      "
      name
      "
       );
        sValue
      =
       propriety
      ->
      Attribute(
      "
      value
      "
       );

      if
      ( IsStrEqual(
      "
      material
      "
      , strTemp ) )
        {
            sValue
      =
       UTF8ToANSI(sValue);
            pTerrainLiquid
      ->
      setMaterial( sValue );
            delete[] sValue;
        }

      else

      if
      ( IsStrEqual(
      "
      position
      "
      , strTemp ) )
        {
            sscanf( sValue,
      "
      %f %f %f
      "
      ,
      &
      x,
      &
      y,
      &
      z );
            pSsceneNode
      ->
      setPosition( x, y, z );
        }

      else

      if
      ( IsStrEqual(
      "
      texture scale
      "
      , strTemp ) )
        {
            sscanf( sValue,
      "
      %f
      "
      ,
      &
      texture_scale );
        }

      else

      if
      ( IsStrEqual(
      "
      depth texture layer.enable
      "
      , strTemp ) )
        {

      if
      ( IsStrEqual( sValue,
      "
      true
      "
      ))
                depth_enable
      =

      true
      ;

      else

                depth_enable
      =

      false
      ;
        }

      else

      if
      ( IsStrEqual(
      "
      depth texture layer.height scale
      "
      , strTemp ) )
        {
            sscanf( sValue,
      "
      %f
      "
      ,
      &
      depth_scale );
        }


      else

            ThrowException(
      "
      TerrainLiquid
      "
      , strTemp
      /
      Files
      /
      syqking
      /
      TerrainLiquid_src.rar );

        propriety
      =
       propriety
      ->
      NextSiblingElement();
    }

    pTerrainLiquid
      ->
      createTerrainLiquid( Ogre::Vector3( x,y,z ), texture_scale, depth_enable, depth_scale, mTerrainMgr
      ->
      getTerrainInfo() );
    m_pSceneManager
      ->
      getRootSceneNode()
      ->
      createChildSceneNode()
      ->
      attachObject(pTerrainLiquid);
}


