Java Web学习笔记6:状态管理——>cookie对象,session对象,application对象
状态管理
:
cookie:存储在客户机的文本文件,保存了大量文本信息
session:使用JSP会话跟踪机制,可以维持每个用户的会话信息
application:类似于系统的“全局变量”,用于实现用户之间的数据共享
1.Cookie
用户在浏览购物网站查看不同的商品时,系统会自动记录已经浏览过的商品。Cookie是Web服务器保存在客户端的一些列文本信息。
2.Cookie的作用
- 会话状态管理(如用户登录状态,购物车,游戏分数或其他需要记录的信息)
2.个性化设置(如用户自定义设置,主题等)
3.浏览器行为跟踪(如跟踪分析用户行为等)
Cookie安全性能:使用Cookie,信息容易泄露
3、Cookie语法
(1)导入包
import=“javax.servlet.http.Cookie”
(2)创建Cookie
Cookie newCookie=new Cookie(“parameter”, “value”);
parameter:用于代表cookie的名称(key)
value:用于表示当前key名称所对应的值
(3)写入Cookie
response.addCookie(newCookie)
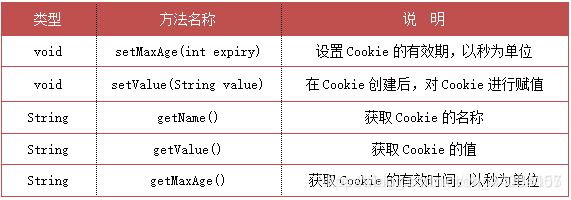
4、Cookie对象常用方法

5、案例演示:利用Cookie保存登录用户名信息
(1)创建Web项目CookieDemo
(2)在web目录里创建登录页面login.jsp

<%@ page contentType="text/html;charset=UTF-8" language="java" %>
<html>
<head>
<title>用户登录</title>
</head>
<body>
<h3 style="text-align: center">用户登录</h3>
<form action="do_login.jsp" method="post">
<table border="1" cellpadding="10" style="margin: 0px auto">
<tr>
<td align="center">用户名</td>
<td><input type="text" name="username"/></td>
</tr>
<tr>
<td align="center">密 码</td>
<td><input type="password" name="password"/>
</td>
</tr>
<tr align="center">
<td colspan="2">
<input type="submit" value="登录">
<input type="reset" value="重置">
</td>
</tr>
</table>
</form>
</body>
</html>
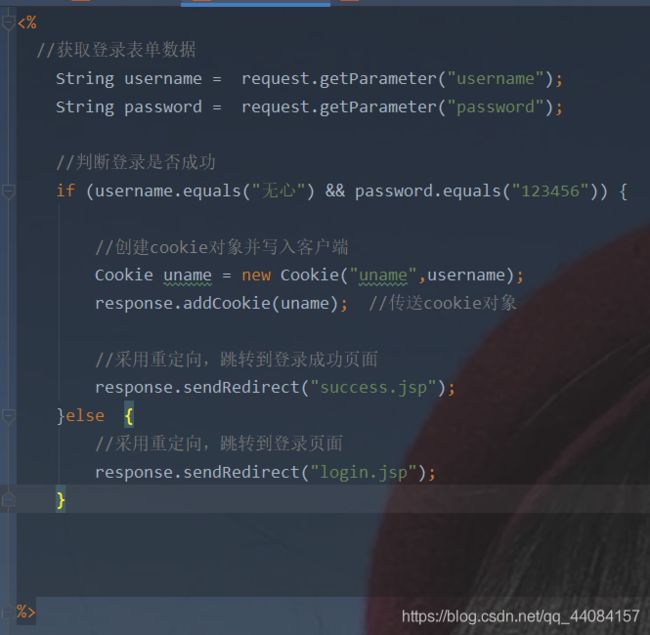
(3)在web目录里创建登录处理页面do_login.jsp

<%
  //获取登录表单数据
    String username =  request.getParameter("username");
    String password =  request.getParameter("password");

    //判断登录是否成功
    if (username.equals("无心") && password.equals("123456")) {


        //创建cookie对象并写入客户端
        Cookie uname = new Cookie("uname",username);
        response.addCookie(uname);  //传送cookie对象

        //采用重定向,跳转到登录成功页面
        response.sendRedirect("success.jsp");
    }else  {

        //采用重定向,跳转到登录页面
        response.sendRedirect("login.jsp");
    }


%>
<%@ page contentType="text/html;charset=UTF-8" language="java" %>
<html>
<head>
    <title>登录成功</title>
</head>
<body>
<%
 String uname="";
 Cookie[] cookies = request.getCookies(); //读取cookie对象
    for (Cookie cookie: cookies){

        if (cookie.getName().equals("uname")){

            uname = cookie.getValue();

        }

    }


%>

<h3><%= new String(uname.getBytes("ISO8859-1"),"utf-8")%>,登录成功!</h3>

</body>
</html>
5)在web.xml文件里将login.jsp设置项目首页文件

(6)启动tomcat服务器,查看运行效果

任务:第二次登录,在用户名框里显示上次登录成功的用户名。
我们需要在lojin页面添加代码
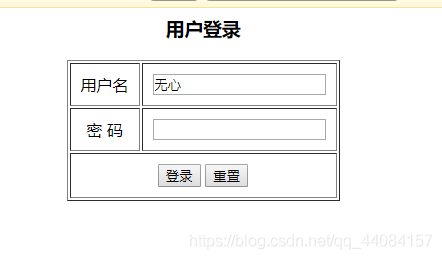
 我们再次启动tomcat会发现在用户名这一栏会自动出现上一次输入的用户名

课堂练习:第二次登录,在用户名框里显示上次登录成功的用户名,在密码框里显示上次登录成功的密码
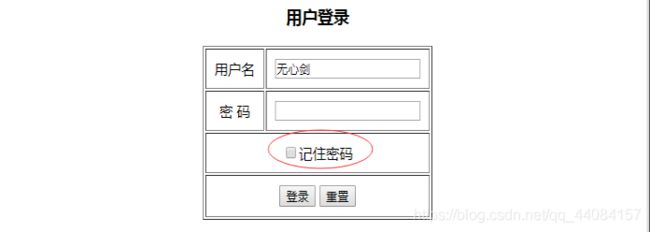
这里我们主要是用到cookie对象,但是和用户名不一样的是,记住用户上一次输入的密码,我们还需要再创建一个控件来选择是否记住密码。那么在这里就不再像记住用户名那么简单,我们需要进行判断用户是否勾选了记住密码,

注意:如果浏览器禁用Cookie,那么上述功能就无法实现了。
因为可能会有cookie注入,所以为了浏览器的安全性能有些浏览器就会禁用cookie
(1)修改login.jsp
<%@ page contentType="text/html;charset=UTF-8" language="java" %>
<html>
<head>
<title>用户登录</title>
</head>
<body>
<h3 style="text-align: center">用户登录</h3>
<form action="do_login.jsp" method="post">
<table border="1" cellpadding="10" style="margin: 0px auto">
<tr>
<td align="center">用户名</td>
<td><input id="uname" type="text" name="username"/></td>
</tr>
<tr>
<td align="center">密 码</td>
<td><input id="psd" type="password" name="password"/>
</td>
</tr>
<tr align="center">
<td colspan="2">
<input type="checkbox" id="setm" name="setm" value="记住密码"/>记住密码
</td>
</tr>
<tr align="center">
<td colspan="2">
<input type="submit" value="登录">
<input type="reset" value="重置">
</td>
</tr>
</table>
</form>
<%
String uname = "";
String psd = "";
String setm = "";
Cookie[] cookies = request.getCookies(); //读取cookie对象
for (Cookie cookie: cookies){
if (cookie.getName().equals("uname")){
uname = cookie.getValue();
}
if (cookie.getName().equals("psd")){
psd = cookie.getValue();
}
if (cookie.getName().equals("setm")){
setm = cookie.getValue();
}
}
%>
<script type="text/javascript">
var chksetm = document.getElementById("setm");
var setm = "<%= setm %>";
if (setm == "yes") {
chksetm.checked= true;
}
var txtUname = document.getElementById("uname");
txtUname.value = "<%= new String(uname.getBytes("iso-8859-1"),"utf-8")%>"
var setm = document.getElementById("setm");
if (setm.checked){
var txtPsd = document.getElementById("psd");
txtPsd.value = "<%= psd%>";
}
</script>
</body>
</html>
(2)修改do_login.jsp
<%
  //获取登录表单数据
    String username =  request.getParameter("username");
    String password =  request.getParameter("password");
    String[] choice = request.getParameterValues("setm");

    //判断登录是否成功
    if (username.equals("无心") && password.equals("123456")) {


        //创建cookie对象并写入客户端
        Cookie uname = new Cookie("uname",username);
        Cookie psd = new Cookie("psd",password);
        Cookie setm = new Cookie("setm","no");
        if (choice != null) {

            setm = new Cookie("setm","yes");
        }
        response.addCookie(uname);  //传送cookie对象
        response.addCookie(psd);
        response.addCookie(setm);


        //采用重定向,跳转到登录成功页面
        response.sendRedirect("success.jsp");
    }else  {

        //采用重定向,跳转到登录页面
        response.sendRedirect("login.jsp");
    }


%>

这里报错。发现是上面没有声明choice

(3)重启服务器,查看运行效果

如果勾选了记住密码,那么在第二次登陆的时候就会自动登陆,不用再次输入密码,但这也说明用cookie对象,信息比较容易泄露,就是容易遭cookie注入

5、案例演示:使用session实现访问控制
(1)创建Web项目SessionDemo
(2)在src目录里创建net.hw.bean包,在包里创建User实体类


User实体类代码如下
package net.wlq.bean;

public class User {

    private  int id;
    private  String username;
    private  String password;

    public int getId() {

        return id;
    }

    public void setId(int id) {

        this.id = id;
    }

    public String getUsername() {

        return username;
    }

    public void setUsername(String username) {

        this.username = username;
    }

    public String getPassword() {

        return password;
    }

    public void setPassword(String password) {

        this.password = password;
    }

    @Override
    public String toString() {

        return "User{" +
                "id=" + id +
                ", username='" + username + '\'' +
                ", password='" + password + '\'' +
                '}';
    }
}
(3)在web目录里修改首页文件index.jsp,在index里面随便写点内容

(4)在web目录里创建登录页面login.jsp
<%@ page contentType="text/html;charset=UTF-8" language="java" %>
<html>
<head>
    <title>用户登录</title>
</head>
<body>
<h3 style="align-content: center">用户登录</h3>
<form action="do_login.jsp" method="post">
    <table border="1" cellpadding="10" style="align-content: center">
        <tr>
            <td align="center">用户名</td>
            <td>
                <input type="text" name="username"/></td>
        </tr>
        <tr>
            <td>
               <input type="password" name="password"/>
            </td>
        </tr>
        <tr align="center">
            <td colspan="2">
                <input type="submit" value="提交"/>
                <input type="reset" value="重置"/>
            </td>
        </tr>
    </table>

</form>

</body>
</html>
(5)在web目录里创建登录处理页面do_login.jsp
<%@ page import="net.wlq.bean.User" %>
<%
 //获取登录表单数据
    String username = request.getParameter("username");
    String password = request.getParameter("password");

    //判断登录是否成功
    if (username.equals("李") && password.equals("123456")) {

        //创建用户对象
        User user = new User();
        //设置用户对象属性
        user.setUsername(username);
        user.setPassword(password);
        //保存登录用户信息
        session.setAttribute("LOGINED_USER",user);
        //采用重定向,跳转到首页
        response.sendRedirect("index.jsp");
    }else {

        //采用重定向,跳转到登录页面
        response.sendRedirect("login.jsp");
    }

%>
(6)在web目录里创建添加新闻页面,增加登录验证
<%@ page import="net.wlq.bean.User" %><%--
<%@ page contentType="text/html;charset=UTF-8" language="java" %>
<html>
<head>
    <title>添加新闻</title>
</head>
<body>
<%--利用session实现登录验证--%>
<%
  User user = (User) session.getAttribute("LOGINED_USER");
  if (user == null) {

      session.setAttribute("errMsg","要访问添加新闻页面,请先登录!");
      response.sendRedirect("login.jsp");
  }else {

      session.removeAttribute("errMsg");
  }

%>
<h3>添加新闻</h3>
此页面还在建设中......
</body>
</html>
(7)修改登录页面login.jsp
<%@ page contentType="text/html;charset=UTF-8" language="java" %>
<html>
<head>
<title>用户登录</title>
</head>
<body>
<h3 style="text-align: center">用户登录</h3>
<form action="do_login.jsp" method="post">
<table border="1" cellpadding="10" style="margin: 0px auto">
<tr>
<td align="center">用户名</td>
<td>
<input type="text" name="username"/></td>
</tr>
<tr>
<td align="center">密码</td>
<td>
<input type="password" name="password"/>
</td>
</tr>
<tr align="center">
<td colspan="2">
<input type="submit" value="提交"/>
<input type="reset" value="重置"/>
</td>
</tr>
</table>
</form>
<%
String errMsg = (String) session.getAttribute("errMsg");
if (errMsg != null) {
out.print("");
}
%>
</body>
</html>
三、application对象
1、application对象的作用
application类似于系统的“全局变量”,用于实现用户之间的数据共享。
2、application对象的常用方法
void setAttribute(String key, Object value):以键/值的方式,将一个对象的值存放到application中
Object getAttribute(String key):根据键去获取application中存放对象的值
下面代码有错,会运行不出来!!!!!!!!!!!!!
3、案例演示:统计网站访问人数
(1)创建Web项目ApplicationDemo

在项目结构窗口里修改Artifacts的名称


(2)在WEB-INF目录里创建lib目录,添加数据库驱动程序jar包
(3)
(4)在web目录里创建登录页面login.jsp
<%@ page contentType="text/html;charset=UTF-8" language="java" %>
<html>
<head>
<title>用户登录</title>
</head>
<body>
<h3 style="text-align: center">用户登录</h3>
<form action="do_login.jsp" method="post">
<table border="1" cellpadding="10" style="margin: 0px auto">
<tr>
<td align="center">用户名</td>
<td><input type="text" name="username"/></td>
</tr>
<tr>
<td align="center">密 码</td>
<td><input type="password" name="password"/></td>
</tr>
<tr align="center">
<td colspan="2">
<input type="submit" value="登录"/>
<input type="reset" value="重置"/>
</td>
</tr>
</table>
</form>
<%
String errMsg = (String) session.getAttribute("errMsg");
if (errMsg != null) {
out.println(""
+ new String(errMsg.getBytes("ISO-8859-1"), "utf-8") + "");
}
%>
</body>
</html>
(5)在src里创建net.hw.bean包,创建用户实体类User
package net.waq.bean;
/**
 * 功能:用户实体类
 * 日期:2019.10.21
 * */
public class User {

    private int id;
    private  String username ;
    private  String password;

    public int getId() {

        return id;
    }

    public void setId(int id) {

        this.id = id;
    }

    public String getUsername() {

        return username;
    }

    public void setUsername(String username) {

        this.username = username;
    }

    public String getPassword() {

        return password;
    }

    public void setPassword(String password) {

        this.password = password;
    }

    @Override
    public String toString() {

        return "User{" +
                "id=" + id +
                ", username='" + username + '\'' +
                ", password='" + password + '\'' +
                '}';
    }
}
(6)在src里创建net.hw.dbutil包,在里面创建ConnectionManager类
package net.waq.dbutil;


import java.sql.Connection;
import java.sql.DriverManager;
import java.sql.SQLException;

/**
 * 功能:数据库连接管理类
 * 作者:华卫
 * 日期:2019年10月9日
 */
public class ConnectionManager {

    // 定义连接数据库的参数值
    private static final String DRIVER = "com.mysql.jdbc.Driver";
    private static final String URL = "jdbc:mysql://localhost:3306/t_user";
    private static final String USER = "root";
    private static final String PASSWORD = "18205071";

    /**
     * 私有化构造方法,拒绝实例化
     */
    private ConnectionManager() {

    }

    /**
     * 获取数据库连接静态方法
     *
     * @return 数据库连接
     */
    public static Connection getConnection() {

        // 声明数据库连接
        Connection conn = null;

        try {

            // 安装数据库驱动程序
            Class.forName(DRIVER);
            // 获取数据库连接
            conn = DriverManager.getConnection(URL, USER, PASSWORD);
        } catch (ClassNotFoundException e) {

            e.printStackTrace();
        } catch (SQLException e) {

            e.printStackTrace();
        }

        // 返回数据库连接
        return conn;
    }

    /**
     * 关闭数据库连接静态方法
     *
     * @param conn 数据库连接
     */
    public static void closeConn(Connection conn) {

        if (conn != null) {

            try {

                if (!conn.isClosed()) {

                    conn.close();
                }
            } catch (SQLException e) {

                e.printStackTrace();
            }
        }
    }
}
7)在src里创建net.hw.dao包,在里面创建用户数据访问接口UserDao

(8)在user.hw.dao里创建impl子包,在里面创建用户数据访问接口实现类UserDaoImpl
package net.waq.dao.impl;

import net.waq.dao.UserDao;
import net.waq.dbutil.ConnectionManager;

import java.sql.Connection;
import java.sql.PreparedStatement;
import java.sql.ResultSet;
import java.sql.SQLException;

/**
 * 功能:用户数据访问接口实现类
 * 日期:2019.10.21
 * */
public class UserDaoImpl implements UserDao {

    @Override
    public boolean login(String username, String password) {

        //定义标识变量
        boolean flag = false;


        //获取数据库连接
        Connection conn = ConnectionManager.getConnection();
        //定义SQL字符串
        String strSQL = "select * from t_user where username = ? and password = ?";

        try {

            //创建预备语句对象
            PreparedStatement pstmt = conn.prepareStatement(strSQL);

            //设置占位符的值
            pstmt.setString(1,username);
            pstmt.setString(2,password);
            //执行SQL查询,返回结果集
            ResultSet rs = pstmt.executeQuery();
            //判断结果集里是否有记录
            if (rs.next()) {

                flag = true;
            }
        } catch (SQLException e) {

            e.printStackTrace();
        }finally {

            //关闭数据库连接
            ConnectionManager.closeConn(conn);
        }


        //返回标识变量
        return false;
    }
}
(9)在web目录里创建登录处理页面do_login.jsp
<%@ page import="net.waq.dao.UserDao" %>
<%@ page import="net.waq.dao.impl.UserDaoImpl" %>
<%@ page import="net.waq.bean.User" %>
<%@ page import="java.util.ArrayList" %>
<%@ page import="java.util.List" %>
<%@ page import="java.net.URLEncoder" %><%
      //设置请求对象字符编码
    request.setCharacterEncoding("utf-8");
    //获取登录表单提交的数据
    String username = request.getParameter("username");
    String password = request.getParameter("password");

    //创建用户数据访问对象
    UserDao userDao = new UserDaoImpl();
    //判断用户是否登录成功
    if (userDao.login(username,password)) {

        //创建一个登录用户对象
        User loginedUser = new User();
        //设置用户对象的属性
        loginedUser.setUsername(username);
        loginedUser.setUsername(password);
        //判断application里是否有登录用户列表属性
        //创建登录用户用户列表对象
        List<User> loginedUsers = new ArrayList<>();
        if (application.getAttribute("LOGINED_USERS") ==null) {


            //在application里添加登录用户列表属性
            application.setAttribute("LOGINED_USERS",loginedUsers);

        }else {

       //从application里获取登录用户列表对象,()
            loginedUsers = (List<User>) application.getAttribute("LOGINED_USERS");
        }
        //将当期登录成功的用户添加到登录用户列表里
        loginedUsers.add(loginedUser);
        //更新application里登录用户列表属性值
        application.setAttribute("LOGINED_USERS",loginedUsers);
        //清除session里errMsg属性
        if (session.getAttribute("errMsg") !=null) {

            session.removeAttribute("errMsg");
        }
        //采用重定向,跳转到登录成功页面
        response.sendRedirect("success.jsp?username=" + URLEncoder.encode(username,"utf-8"));
    }else {

       //创建session属性errMsg
        session.setAttribute("errMsg","用户名或密码错误,请重新登录!");
        //采用重定向,跳转到登录页面
        response.sendRedirect("login.jsp");
    }


%>
(7)在web目录里创建登录成功页面success.jsp
<%@ page contentType="text/html;charset=UTF-8" language="java" %>
<html>
<head>
    <title>登陆成功</title>
</head>
<body>
<h3><%= request.getParameter("username")%>,登陆成功</h3>
<%
    List<User> loginedUsers = (List<User>) application.getAttribute("LOGINED_USERS");
%>
目前已有<%= loginedUsers.size()%>人访问过本网站。
</body>
</html>
最后需要修改o_login页面的内容,代码就可以运行成功了
也就是说前面有错的是do_login页面里的内容
<%@ page import="net.waq.dao.UserDao" %>
<%@ page import="net.waq.dao.impl.UserDaoImpl" %>
<%@ page import="net.waq.bean.User" %>
<%@ page import="java.util.ArrayList" %>
<%@ page import="java.util.List" %>
<%@ page import="java.net.URLEncoder" %>
<%
    // 设置请求对象字符编码
    request.setCharacterEncoding("utf-8");
    // 获取登录表单提交的数据
    String username = request.getParameter("username");
    String password = request.getParameter("password");

    // 创建用户数据访问对象
    UserDao userDao = new UserDaoImpl();
    // 判断用户是否登录成功
    if (userDao.login(username, password)) {

    // 创建登录用户对象
    User loginedUser = new User();
    // 设置用户对象属性
    loginedUser.setUsername(username);
    loginedUser.setPassword(password);
    // 创建登录用户列表对象
    List<User> loginedUsers = new ArrayList<>();
    // 判断application里是否有登录用户列表属性
    if (application.getAttribute("LOGINED_USERS") == null) {

    // 在application里添加登录用户列表属性
    application.setAttribute("LOGINED_USERS", loginedUsers);
    }
     else {

    // 从application里获取登录用户列表
    loginedUsers = (List<User>) application.getAttribute("LOGINED_USERS");
    }
    boolean isInUserList = false;
     for (User user:loginedUsers) {

         if (loginedUser.getUsername().equals(user.getUsername())) {

             isInUserList = true;
             break;
         }
     }
     if (!isInUserList) {

         // 将当前登录成功的用户添加到登录用户列表里
         loginedUsers.add(loginedUser);
         // 更新application里登录用户列表属性值
         application.setAttribute("LOGINED_USERS", loginedUsers);
     }
    // 清除session里errMsg属性
    if (session.getAttribute("errMsg") != null) {

    session.removeAttribute("errMsg");
    }
    // 采用重定向,跳转到登录成功页面
    response.sendRedirect("success.jsp?username=" + URLEncoder.encode(username, "utf-8"));
    }
    else {

    // 创建session属性errMsg
    session.setAttribute("errMsg", "用户名或密码错误,请重新登录!");
    // 采用重定向,跳转到登录页面
    response.sendRedirect("login.jsp");
    }
%>
最后的运行结果就是,当同一个人访问这个页面的时候,浏览器会显示是一个人访问了此页面,而不是靠点击率来计算访问人数。
运行结果如下:


